Panasonic TH-65PF12EK User Manual - Page 43
MULTI PIP Setup
 |
View all Panasonic TH-65PF12EK manuals
Add to My Manuals
Save this manual to your list of manuals |
Page 43 highlights
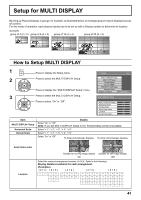
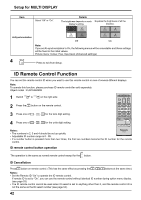
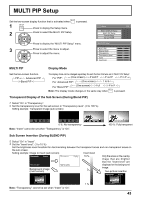
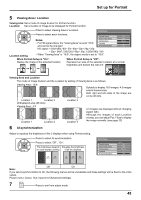
MULTI PIP Setup Set the two-screen display function that is activated when 1 Press to display the Setup menu. 2 Press to select the MULTI PIP Setup. is pressed. Press to display the "MULTI PIP Setup" menu. 3 Press to select the menu to adjust. Press to adjust the menu. Setup MULTI DISPLAY Setup MULTI PIP Setup Portrait Setup Set up TIMER MULTI PIP Setup MULTI PIP Display Mode Transparency Transparency level Insert Insert level 2/2 PIP - Off 0% Off 1 MULTI PIP Display Mode Set the two-screen function. PIP Advanced PIP Blend PIP The display mode can be changed separately for each function that was set in "MULTI PIP Setup". For "PIP": - (One screen) P and P P out P P in P For "Advanced PIP": - (One screen) 1 to 8 For "Blend PIP": - (One screen) Full P in P Note: The display mode changes in the same way when is pressed. Transparent Display of the Sub Screen (During Blend PIP) 1 Select "On" in "Transparency". 2 Set the transparency level for the sub screen in "Transparency level". (0 to 100 %) Setting example Transparent image (sub screen) 0 %: No transparency Note: "Insert" cannot be set when "Transparency" is "On". 100 %: Fully transparent Sub Screen Insertion (During BLEND PIP) 1 Select "On" in "Insert". 2 Set the "Insert level". (1 to 10 %) Set the brightness level threshold for discriminating between the transparent areas and non-transparent areas on the sub screen. Setting example Image to insert (sub screen) Insert level 10 % Only the areas on the overlay image that are brighter than the "Insert level" are displayed on the background Background image (main screen) image. Two-picture Insertion 1 % Note: "Transparency" cannot be set when "Insert" is "On". 43
-
 1
1 -
2
-
3
-
4
-
5
-
6
-
7
-
8
-
9
-
10
-
11
-
12
-
13
-
14
-
15
-
16
-
17
-
18
-
19
-
20
-
21
-
22
-
23
-
24
-
25
-
26
-
27
-
28
-
29
-
30
-
31
-
32
-
33
-
34
-
35
-
36
-
37
-
 38
38 -
 39
39 -
 40
40 -
 41
41 -
 42
42 -
 43
43 -
 44
44 -
 45
45 -
 46
46 -
 47
47 -
 48
48 -
49
-
50
-
51
-
52
-
53
-
54
-
55
-
56
-
57
-
58
-
59
-
60
-
61
-
62
-
63
-
64
 |
 |
