Panasonic TH-65PF12EK User Manual - Page 44
Set up for Portrait
 |
View all Panasonic TH-65PF12EK manuals
Add to My Manuals
Save this manual to your list of manuals |
Page 44 highlights
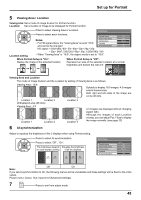
Set up for Portrait Divide an input image into 3 parts, and display one of them to a plasma display which is set vertically. The image will be enlarged 3 times and rotated 90-degree. (Example) Note: When using the Portrait function with displays set vertically, "Display orientation" in Setup menu has to be set to "Portrait" (see page 40). How to setup Portrait 1 Press to display the Setup menu. 2 Press to select the Portrait Setup. Press to display the "Portrait Setup" menu. 3 Press to select the Portrait Setup. Press to select "On" or "Off". Note: If you set Portrait Setup to On, MULTI DISPLAY Setup will be unavailable. 4 Press to select Seam hides video. Press to select "Off" , "On". To hide joints between displays. To show joints between displays. Setup 2/2 MULTI DISPLAY Setup MULTI PIP Setup Portrait Setup Set up TIMER PRESENT TIME Setup Network Setup Display orientation Landscape Portrait Setup Portrait Setup Seam hides video Viewing Area Location AI-synchronization Off Off 16 : 9 1 Off Portrait Setup Portrait Setup Seam hides video Viewing Area Location AI-synchronization Off Off 16 : 9 1 Off Suitable for moving image display. Suitable for still image display. On Off 44
-
 1
1 -
2
-
3
-
4
-
5
-
6
-
7
-
8
-
9
-
10
-
11
-
12
-
13
-
14
-
15
-
16
-
17
-
18
-
19
-
20
-
21
-
22
-
23
-
24
-
25
-
26
-
27
-
28
-
29
-
30
-
31
-
32
-
33
-
34
-
35
-
36
-
37
-
38
-
 39
39 -
 40
40 -
 41
41 -
 42
42 -
 43
43 -
 44
44 -
 45
45 -
 46
46 -
 47
47 -
 48
48 -
 49
49 -
50
-
51
-
52
-
53
-
54
-
55
-
56
-
57
-
58
-
59
-
60
-
61
-
62
-
63
-
64
 |
 |
