Pentax Optio S40 Operation Manual - Page 28
Taking Still Pictures - sd card
 |
UPC - 027075079830
View all Pentax Optio S40 manuals
Add to My Manuals
Save this manual to your list of manuals |
Page 28 highlights
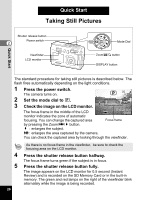
Quick Start Taking Still Pictures Quick Start Shutter release button Power switch 2 Viewfinder LCD monitor Mode Dial Zoom/f/y button DISPLAY button The standard procedure for taking still pictures is described below. The flash fires automatically depending on the light conditions. 1 Press the power switch. 4 The camera turns on. 2 Set the mode dial to R. 3 Check the image on the LCD monitor. The focus frame in the middle of the LCD monitor indicates the zone of automatic focusing. You can change the captured area by pressing the Zoom/w/x button. x : enlarges the subject. w: enlarges the area captured by the camera. 04/25/2004 10:25 Focus frame You can check the captured area by looking through the viewfinder. 4 5 26 As there is no focus frame in the viewfinder, be sure to check the focusing area on the LCD monitor. Press the shutter release button halfway. The focus frame turns green if the subject is in focus. Press the shutter release button fully. The image appears on the LCD monitor for 0.5 second (Instant Review) and is recorded on the SD Memory Card or in the built-in memory. The green and red lamps on the right of the viewfinder blink alternately while the image is being recorded.
-
 1
1 -
2
-
3
-
4
-
5
-
6
-
7
-
8
-
9
-
10
-
11
-
12
-
13
-
14
-
15
-
16
-
17
-
18
-
19
-
20
-
21
-
22
-
 23
23 -
 24
24 -
 25
25 -
 26
26 -
 27
27 -
 28
28 -
 29
29 -
 30
30 -
 31
31 -
 32
32 -
 33
33 -
34
-
35
-
36
-
37
-
38
-
39
-
40
-
41
-
42
-
43
-
44
-
45
-
46
-
47
-
48
-
49
-
50
-
51
-
52
-
53
-
54
-
55
-
56
-
57
-
58
-
59
-
60
-
61
-
62
-
63
-
64
-
65
-
66
-
67
-
68
-
69
-
70
-
71
-
72
-
73
-
74
-
75
-
76
-
77
-
78
-
79
-
80
-
81
-
82
-
83
-
84
-
85
-
86
-
87
-
88
-
89
-
90
-
91
-
92
-
93
-
94
-
95
-
96
-
97
-
98
-
99
-
100
-
101
-
102
-
103
-
104
-
105
-
106
-
107
-
108
-
109
-
110
-
111
-
112
-
113
-
114
-
115
-
116
-
117
-
118
-
119
-
120
-
121
-
122
-
123
-
124
-
125
-
126
-
127
-
128
-
129
-
130
-
131
-
132
-
133
-
134
-
135
 |
 |
