Pentax S7 Operation Manual - Page 132
Printing All Images, Press the OK button twice.
 |
UPC - 027075121256
View all Pentax S7 manuals
Add to My Manuals
Save this manual to your list of manuals |
Page 132 highlights
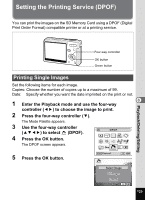
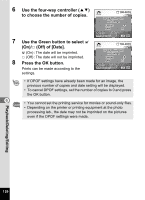
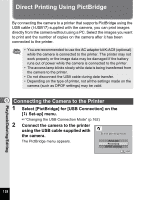
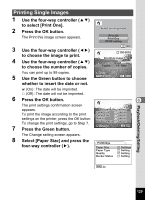
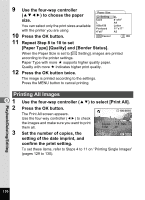
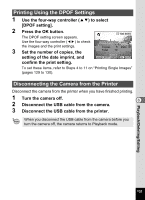
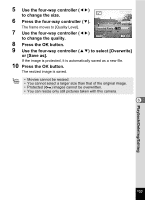
9 Use the four-way controller (2345) to choose the paper size. You can select only the print sizes available with the printer you are using. 10 Press the OK button. Paper Size Setting Card L 100x150 Postcard 4"x6" MENU Cancel 2L 8"x10" A4 Letter 11"x17" A3 OK OK 11 Repeat Step 8 to 10 to set [Paper Type] [Quality] and [Border Status]. When the Paper Size is set to [ Setting], images are printed according to the printer settings. Paper Type with more E supports higher quality paper. Quality with more E indicates higher print quality. 12 Press the OK button twice. The image is printed according to the settings. Press the MENU button to cancel printing. Printing All Images 61 2 3 Use the four-way controller (23) to select [Print All]. Press the OK button. The Print All screen appears. Use the four-way controller (45) to check the images and make sure you want to print them all. Set the number of copies, the setting of the date imprint, and confirm the print setting. 100-0010 Print all images Copies 1 Date Total 20 Date MENU Cancel OK Print To set these items, refer to Steps 4 to 11 on "Printing Single Images" (pages 129 to 130). Playback/Deleting/Editing 130
-
 1
1 -
2
-
3
-
4
-
5
-
6
-
7
-
8
-
9
-
10
-
11
-
12
-
13
-
14
-
15
-
16
-
17
-
18
-
19
-
20
-
21
-
22
-
23
-
24
-
25
-
26
-
27
-
28
-
29
-
30
-
31
-
32
-
33
-
34
-
35
-
36
-
37
-
38
-
39
-
40
-
41
-
42
-
43
-
44
-
45
-
46
-
47
-
48
-
49
-
50
-
51
-
52
-
53
-
54
-
55
-
56
-
57
-
58
-
59
-
60
-
61
-
62
-
63
-
64
-
65
-
66
-
67
-
68
-
69
-
70
-
71
-
72
-
73
-
74
-
75
-
76
-
77
-
78
-
79
-
80
-
81
-
82
-
83
-
84
-
85
-
86
-
87
-
88
-
89
-
90
-
91
-
92
-
93
-
94
-
95
-
96
-
97
-
98
-
99
-
100
-
101
-
102
-
103
-
104
-
105
-
106
-
107
-
108
-
109
-
110
-
111
-
112
-
113
-
114
-
115
-
116
-
117
-
118
-
119
-
120
-
121
-
122
-
123
-
124
-
125
-
126
-
 127
127 -
 128
128 -
 129
129 -
 130
130 -
 131
131 -
 132
132 -
 133
133 -
 134
134 -
 135
135 -
 136
136 -
 137
137 -
138
-
139
-
140
-
141
-
142
-
143
-
144
-
145
-
146
-
147
-
148
-
149
-
150
-
151
-
152
-
153
-
154
-
155
-
156
-
157
-
158
-
159
-
160
-
161
-
162
-
163
-
164
-
165
-
166
-
167
-
168
-
169
-
170
-
171
-
172
-
173
-
174
-
175
-
176
-
177
-
178
-
179
-
180
-
181
-
182
-
183
-
184
-
185
-
186
-
187
-
188
-
189
-
190
-
191
-
192
 |
 |
