Pfaff creative 2.0 Owner's Manual
Pfaff creative 2.0 Manual
 |
View all Pfaff creative 2.0 manuals
Add to My Manuals
Save this manual to your list of manuals |
Pfaff creative 2.0 manual content summary:
- Pfaff creative 2.0 | Owner's Manual - Page 1
Owner's manual - Pfaff creative 2.0 | Owner's Manual - Page 2
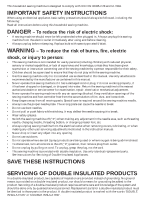
such as threading needle, changing needle, threading bobbin, or changing presser foot, etc. • Always unplug sewing machine from the electrical outlet when removing covers, lubricating, or when making any other user servicing adjustments mentioned in the instruction manual. • Never drop or insert any - Pfaff creative 2.0 | Owner's Manual - Page 3
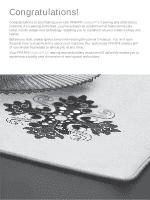
PFAFF® creative™ 2.0 sewing and embroidery machine. As a sewing enthusiast, you have acquired a machine that features the very latest in both design and technology, enabling you to transform all your creative ideas into reality. Before you start, please spend some time reading this owner's manual - Pfaff creative 2.0 | Owner's Manual - Page 4
of the embroidery unit 1:6 Included accessories 1:7 Presser feet 1:8 Stitch overview 1:9 Alphabets 1:11 2 Preparations 2:1 Unpacking 2:1 Connect to the power supply 2:1 Pack away after sewing 2.2 Free arm 2:2 Thread cutter 2:2 Spool pins 2:2 Threading the machine 2:3 Bobbin winding - Pfaff creative 2.0 | Owner's Manual - Page 5
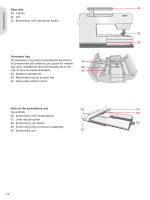
ruler 2. Threading slots 3. Thread cutter 4. Sensormatic buttonhole foot socket 5. Light bulbs 6. Built-in needle threader 7. Needle bar 8. Needle thread guide 9. Stitch plate 10. Bobbin cover 11. Free arm 12. Presser foot 13. Presser foot bar and presser foot holder 14. Needle screw 15. Buttons and - Pfaff creative 2.0 | Owner's Manual - Page 6
Rear side 30 30. Handle 31. IDT 32. Embroidery unit connection socket 31 32 Accessory tray The accessory tray features special compartments 33 for presser feet and bobbins, plus space for needles and other accessories. Store the accessories in the 34 tray so they are easily accessible - Pfaff creative 2.0 | Owner's Manual - Page 7
49 50 51 52 53 54 Included hoops 55 55. creative™ 120 SQUARE HOOP (120x120) 56. creative™ ELITE HOOP (260x200) Included accessories not in picture • Foot control • Power cord • Needles • CDs with embroidery designs, communication software etc. • creative™ 2.0 Embroidery collection 56 1:7 - Pfaff creative 2.0 | Owner's Manual - Page 8
Introduction Presser feet Standard presser foot 0A with IDT (attached on the machine upon delivery) This foot is used mainly for straight stitching and zigzag stitching with a stitch length longer than 1.0 mm. Fancy stitch foot 1A with IDT This foot is used for decorative stitches. The groove on - Pfaff creative 2.0 | Owner's Manual - Page 9
. 3 Straight stitch reverse Sew continuous reverse. 4 Basting stitch 5 Zigzag stitch 6 Zigzag stitch Single stitch used for basting. Touch foot control to sew one stitch. Move fabric manually to desired position and touch foot control again. to sew another stitch. Reinforce seams - Pfaff creative 2.0 | Owner's Manual - Page 10
buttonhole Buttonhole for light garments or jackets. 32 Stretch buttonhole Buttonhole for stretch fabrics. 33 Button sewing Sew on buttons or tacking. 34 Eyelet Heirloom sewing decorative trim. 35 Programmable darning stitch seams and pockets decoratively. Quilt stitches Stitch 40* 41 42 43 - Pfaff creative 2.0 | Owner's Manual - Page 11
100 101 102 103 104 105 106 107 108 109 110 111 112 Stitch 113 114 115 116 117 118 119 120 121 122 123 124 125 126 127 128 129 130 131 132 133 134 135 136 Stitch 137 138 139 140 141 142 143 144 145 146 147 148 149 - Pfaff creative 2.0 | Owner's Manual - Page 12
Preparations - Pfaff creative 2.0 | Owner's Manual - Page 13
the outer packaging and lift off the machine carrying case. 2. Remove all outer packing material and the plastic bag. 3. Slide off the accessory tray and remove the styrofoam inside. Note: Styrofoam left in the accessory tray while sewing may affect stitch quality. The styrofoam is for packing - Pfaff creative 2.0 | Owner's Manual - Page 14
. Slide the tray on to the machine around the free arm. 5. Place the foot control in the space above the free arm. 6. Put on the hard cover. Free arm To use the free arm, slide off the accessory tray. When attached, a hook keeps the accessory tray locked to the machine. Remove the tray by sliding it - Pfaff creative 2.0 | Owner's Manual - Page 15
that the presser foot is raised and the needle is in the up position. 1. Place the thread on the spool pin and Àt a spool cap of the right size. 2. Pull the thread into the thread guide (A) from the front to the back. Pull the thread from the right underneath the bobbin winder thread guide (B) on - Pfaff creative 2.0 | Owner's Manual - Page 16
of the needle. When threading the needle manually, make sure that the needle is threaded from front to back. The bobbin cover can be used as a magnifying glass. Threading for twin needle Replace the sewing needle with a twin needle. Make sure that the presser foot is raised and the needle is in the - Pfaff creative 2.0 | Owner's Manual - Page 17
Make sure that the presser foot and the needle are in the up position. Only wind through the needle if using a metal presser foot. Bring the thread up from the needle, under the presser foot, upward through the left-hand threading slot and through the bobbin thread guides (C). Then follow step 4 and - Pfaff creative 2.0 | Owner's Manual - Page 18
thread to the left to cut. 1 3 B A C IDT (integrated dual feed) For sewing any fabric precisely, PFAFF® creative™ 2.0 sewing and embroidery machine provides the ideal solution: the integrated dual feed, IDT system. As on industrial machines, the IDT feeds the fabric from the top and bottom at the - Pfaff creative 2.0 | Owner's Manual - Page 19
. Use with metallic and other specailty threads for embroidery and decorative sewing Denim stitches, breakage or snapping of the thread. A damaged needle can also damage the stitch plate. Do not use asymmetrical twin needles (H), since it may damage your sewing machine. Changing the needle 1. Use - Pfaff creative 2.0 | Owner's Manual - Page 20
the sewing machine to the left. Move the switch to the right if you wish to raise the feed dogs. Changing the presser foot Remove presser foot Press the presser foot downwards until it disengages from the presser foot holder. Attach presser foot Place the presser foot under the presser foot holder - Pfaff creative 2.0 | Owner's Manual - Page 21
, the light Áashes. Note: Do not remove the USB embroidery stick while the light is Áashing, as this can damage the Àles on your USB embroidery stick. creative 2.0 Note: The USB embroidery stick provided with the machine can be left in the machine when putting on the hard cover. Make sure that the - Pfaff creative 2.0 | Owner's Manual - Page 22
major embroidery formats, to pictures or desktop wallpaper for your computer. Installing your software If you own other PFAFF® 5D™ Embroidery System software, you may need to install the 5D™ Embroidery System 9.2 (or higher version) Update instead of installing the Embroidery Machine Communication - Pfaff creative 2.0 | Owner's Manual - Page 23
and upgrades for your machine and Owner's manual. Updating instructions • Go to the PFAFF® web site at www.pfaff.com and Ànd your sewing machine. Here you will Ànd updates available for your machine. • Download the update software to your USB embroidery stick, following the instructions on the web - Pfaff creative 2.0 | Owner's Manual - Page 24
(4) Press the button when you are not sewing and your sewing machine cuts the top and bobbin threads and raises the presser foot and the needle. To cut before the needle moves to the start position of the next stitch, press the thread snips button while sewing. The thread snips indicator will be lit - Pfaff creative 2.0 | Owner's Manual - Page 25
checkmark for OK (17). The wheel has several functions, for example stepping between stitches, setting the size of a buttonhole and moving between options in the settings menu. In embroidery mode use the wheel to move the design in the hoop. OK button (17) The wheel center icon is a checkmark for OK - Pfaff creative 2.0 | Owner's Manual - Page 26
machine. Note: Free-motion feet are optional and can be purchased at your local authorized PFAFF® dealer. Do not use if sensormatic free-motion is activated, since the needle might damage the presser foot. Any spring foot with light grey plastic housing, can also be used for free-motion embroidery - Pfaff creative 2.0 | Owner's Manual - Page 27
pressure for a sequence, bring the sequence to sewing mode and change the setting. Pivot height Adjust the height of the presser foot when the machine is set for free-motion or when in embroidery mode. In Sensormatic free-motion mode: Skipped stitches can occur if your fabric moves up and down with - Pfaff creative 2.0 | Owner's Manual - Page 28
Sewing - Pfaff creative 2.0 | Owner's Manual - Page 29
Press the info button to show sewing recommendations for the current stitch. Press the button again to hide the information. 7. Needle recommendation/setting Set for twin needle Wing needle recommended Set for stitch width safety 8. Presser foot recommendation 9. Stabilizer recommended 10. Feed dog - Pfaff creative 2.0 | Owner's Manual - Page 30
the two fabric layers. Your sewing machine electronically sets a thread tension for the selected stitch. Depending on the fabric, batting, thread etc, the tension may need to be adjusted. See page 2:14 for instructions on how to change the setting manually. If the bobbin thread is visible on the - Pfaff creative 2.0 | Owner's Manual - Page 31
tie-off indicator will be lit. The machine will Ànish the stitch and do a tie-off. When a thread snip (C) is programmed, the machine will automatically cut the threads after performing the tie-off end. The needle and presser foot will raise. Note: Stop sewing and press the reverse button twice to - Pfaff creative 2.0 | Owner's Manual - Page 32
end and you start to sew, the stitch width will start at 0 mm. It becomes wider until the selected stitch width is reached. Sew your desired length and press display will indicate the speed your machine is set to sew (B). 4. To deactivate the reduced speed, press the speed button. Press the - Pfaff creative 2.0 | Owner's Manual - Page 33
OK. 3. Press the save button again to return to sewing mode. Note: Some special stitches, such as buttonholes, cannot be saved. A pop-up will inform you of this when you try to save such a stitch. Load personal stitch 1. Load your personal stitches by pressing the load button. This will open the - Pfaff creative 2.0 | Owner's Manual - Page 34
elastic stitch to add elastic to pajamas, skirts and sportswear. Sewing Buttonholes To sew a buttonhole, Àrst attach the correct foot. Make sure that the IDT is disengaged. Note: Buttonholes up to 50 mm are sewn with the Sensormatic buttonhole foot. Buttonholes over 50 mm are sewn manually in - Pfaff creative 2.0 | Owner's Manual - Page 35
bar extending from the center back of the sensormatic buttonhole foot 5A. Pass the thread ends under the foot and pull up into the right and left guides on the front of the presser foot. 2. Snap on the sensormatic buttonhole foot 5A. Before starting to sew, make sure that the red arrow lines up with - Pfaff creative 2.0 | Owner's Manual - Page 36
buttons on the wheel. 5. Start to sew. The machine will sew the program for you and then tie-off and stop. Note: Use the multi-purpose tool to create a thread shank for your button. You can also use a sew-on button foot, available as an optional accessory. Darning Darning a small hole or a tear - Pfaff creative 2.0 | Owner's Manual - Page 37
. 3. Snap on the recommended foot shown in the sewing recommendations view. 4. Engage the IDT. 5. When you sew the stitch you should only see your bobbin thread. Increase the needle tension as needed to produce the desired effect. Recommended stitches for a handlook quilt Stitch 41 42 43 45 46 - Pfaff creative 2.0 | Owner's Manual - Page 38
it enters close to the edge of the zipper teeth by using one of the 37 needle positions available for the straight stitch. If the presser foot is attached on the right side, the needle must only be moved to the right. If the foot is attached on the left, the needle must only be moved to - Pfaff creative 2.0 | Owner's Manual - Page 39
on very heavy fabric or if the machine is blocked when sewing, the mainmotor can get overloaded and the machine will stop sewing. The pop-up message will close when the mainmotor and power supply are secure. Remove thread jam Clean the area under the stitch plate from thread and lint. Press OK - Pfaff creative 2.0 | Owner's Manual - Page 40
Sequencing - Pfaff creative 2.0 | Owner's Manual - Page 41
and sequences on your machine and reload and sew them any time you like. All stitches in your sewing machine can be used for sequencing except for buttonholes, darning, tapering stitches, button sewing and bartacks. Sequencing - overview 1. Current stitch number 2. Stitch Àeld 3. Sequence commands - Pfaff creative 2.0 | Owner's Manual - Page 42
upper or lower case, normal or special letters and symbols. Press the F2 button to change fonts (7). Adjust text and stitches You can mirror, adjust length (5) and width (4) or change the density and stitch position of the selected stitch. The adjustments work just like in sewing mode. See page - Pfaff creative 2.0 | Owner's Manual - Page 43
preÀxed by an M. Delete sequence Deleting your sequences from the machine works just like in sewing mode. See page 3:5. Sewing a sequence To sew the sequence, return to sewing mode by pressing the sequencing button or step on the foot control. Your sequence is ready to be sewn out. The sequence - Pfaff creative 2.0 | Owner's Manual - Page 44
Embroidery preparations - Pfaff creative 2.0 | Owner's Manual - Page 45
Level adjusting feet C Embroidery unit socket D Embroidery hoop connection assembly E Embroidery arm Embroidery hoop overview F Embroidery hoop connector G Outer hoop H Inner hoop I Quick release J Retaining screw K Ribs for Àtting the clips L Center markings creative™ 2.0 Embroidery collection Page - Pfaff creative 2.0 | Owner's Manual - Page 46
ready position. This calibration will set your embroidery functions each time you slide on the embroidery unit. Make sure not to calibrate the machine with the embroidery hoop attached as this can damage the needle, presser foot, hoop and/or the embroidery unit. Be sure to clear all materials from - Pfaff creative 2.0 | Owner's Manual - Page 47
on the fabric and close the quick release. When changing type of fabric, you might need to adjust the pressure using the retaining screw. Do not force the quick release. Slide on the hoop Slide the hoop onto the embroidery unit from front to back until it clicks into place. To remove the - Pfaff creative 2.0 | Owner's Manual - Page 48
Embroidering - Pfaff creative 2.0 | Owner's Manual - Page 49
embroidery unit connected to your machine to adjust your designs. To embroider a design, enter embroidery mode by attaching the embroidery unit. The load menu will automatically open. After loading a design there are two views available in embroidery mode - stitch-out and edit. Embroidery stitch - Pfaff creative 2.0 | Owner's Manual - Page 50
les using the 5D™ QuickFont software. See page 2:10. 1 4 Embroidery text editor view 1. Font Àle name 2. Text Àeld 3. Alphabet 2 5 3 6 4. Text length information 7 5. Text height information 6. Character set (upper case/lower case, normal/special, symbols) 7. Toggle to embroidery stitch - Pfaff creative 2.0 | Owner's Manual - Page 51
appear asking if you wish to returm to embroidery stitch out. If you select yes you will return to embroidery mode and all your adjustments will be kept block, use the + and - buttons. Orbit to check position (3) Orbiting can be used to trace the design area. Press the F1 button to move the hoop so - Pfaff creative 2.0 | Owner's Manual - Page 52
If you try to start sewing and the hoop you have selected is not the same as the hoop attached to the embroidery unit, a pop-up will appear to inform you of this. Attach the correct hoop or select another hoop in the list. Current position When you want to return to the current stitch and start - Pfaff creative 2.0 | Owner's Manual - Page 53
machine will sew a basting stitch around the design area. Basting enables you to secure your fabric to a stabilizer placed beneath it, especially when the fabric to be embroidered cannot be hooped. Basting provides support reduce the maximum embroidery speed. It works just like in sewing mode, see - Pfaff creative 2.0 | Owner's Manual - Page 54
load to embroidery stitch-out. 3. The design is placed in the center of the hoop. 4. Make sure the IDT is disengaged and snap on the embroidery foot. Insert a bobbin with lightweight bobbin thread. 5. Hoop a piece of fabric and stabilizer, and slide on the hoop. 6. Thread the machine with the Àrst - Pfaff creative 2.0 | Owner's Manual - Page 55
view you can adjust your design. When you press the start/stop button, the machine will automatically toggle to embroidery stitch-out. Design width (1) You can increase or decrease the design width up to 20%. Use the + and - buttons. The design width is scaled 5% each time you press a button. Design - Pfaff creative 2.0 | Owner's Manual - Page 56
Common embroidery pop-ups Embroidery unit calibration When the embroidery unit is attached, a popup asks you to slide off the hoop and clear the machine area for calibrating the embroidery arm. Note: It is very important to remove the hoop, otherwise the hoop or the embroidery unit may be damaged - Pfaff creative 2.0 | Owner's Manual - Page 57
dogs and turn off the machine. Remove the presser foot and slide off the bobbin cover. Place the screwdriver under the stitch plate as shown on the picture, and gently turn the screwdriver to pop off the stitch plate. Clean the feed dogs with the brush found with the accessories. 7:1 Maintenance - Pfaff creative 2.0 | Owner's Manual - Page 58
not blow air into the bobbin case area. The dust and lint will be blown into your machine. Note: When using the optional accessory PFAFF® Embroidery Cutwork Needles, it is neccessary to clean the bobbin area after each embroidered design/project. B A C Replacing the stitch plate With the feed dogs - Pfaff creative 2.0 | Owner's Manual - Page 59
to touch? Remedy Clean lint from bobbin area and use only the original PFAFF® bobbins approved for this model. Remove stitch plate and clean lint from bobbin area. Enable automatic thread snips in the settings menu. Make sure that machine is not set in free-motion mode in the settings menu. Make - Pfaff creative 2.0 | Owner's Manual - Page 60
that the embroidery unit is properly attached into the socket. Slide on the correct hoop. Maintenance Have your sewing machine serviced regularly by your local authorized PFAFF® dealer! If you have followed this trouble shooting information and still have problems, take your sewing machine to your - Pfaff creative 2.0 | Owner's Manual - Page 61
Embroidery stitch-out 6:7 Embroidery text editor 6:2-6:3 Embroidery unit Connect 5:2 Level adjusting feet 5:1 Overview 5:1 Remove 5:2 Engage IDT 2:6 F F1 2:13 F2 2:13 Feed dogs, lower 2:8 Font, load 6:2 Foot control 2:1 Free-motion Sensormatic free-motion 2:15 Spring foot free-motion - Pfaff creative 2.0 | Owner's Manual - Page 62
the presser foot 2:12, 2:15 Remove the embroidery unit 5:2 Replacing the stitch plate 7:2 Reverse button 2:12 Reverse indicator 2:12 Rolled hem 3:10 Rotate 6:7 S Safety instructions 2 Save Sequencing 4:3 Sewing mode 3:5 Select a stitch 2:13, 3:1 Select hoop 6:4 Sensormatic buttonhole - Pfaff creative 2.0 | Owner's Manual - Page 63
2:12 Options 3:3 Troubleshooting 7:3 Twin needle Set for twin needle 2:14, 3:1 Threading for twin needle 2:4 U Unpacking 2:1 Update machine 2:11 USB Embroidery stick 2:9, 6:2 USB port 2:9 Using the alphabet 4:2 Utility stitches 1:9-1:10 V W Wheel 2:13 Winding bobbin 2:5 Winding from - Pfaff creative 2.0 | Owner's Manual - Page 64
- Pfaff creative 2.0 | Owner's Manual - Page 65
- Pfaff creative 2.0 | Owner's Manual - Page 66
5D™ Embroidery Machine Communication CD (For personal computer. See page 2:10) - Pfaff creative 2.0 | Owner's Manual - Page 67
and the product. Intellectual Property Patents protecting this product are listed on a label positioned underneath the Sewing Machine. PFAFF, CREATIVE, IDT (image) and 5D are trademarks of KSIN Luxembourg II, S.ar.l. Please note that on disposal, this product must be safely recycled in accordance - Pfaff creative 2.0 | Owner's Manual - Page 68
www.pfaff.com 413 29 98-26B • English • InHouse • © 2011 KSIN Luxembourg II, S.ar.l. • All rights reserved • Printed in Sweden on environmentally-friendly paper
-
 1
1 -
 2
2 -
 3
3 -
 4
4 -
 5
5 -
 6
6 -
 7
7 -
8
-
9
-
10
-
11
-
12
-
13
-
14
-
15
-
16
-
17
-
18
-
19
-
20
-
21
-
22
-
23
-
24
-
25
-
26
-
27
-
28
-
29
-
30
-
31
-
32
-
33
-
34
-
35
-
36
-
37
-
38
-
39
-
40
-
41
-
42
-
43
-
44
-
45
-
46
-
47
-
48
-
49
-
50
-
51
-
52
-
53
-
54
-
55
-
56
-
57
-
58
-
59
-
60
-
61
-
62
-
63
-
64
-
65
-
66
-
67
-
68
 |
 |
Owner's manual