Pfaff creative 2.0 Owner's Manual - Page 51
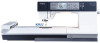
Stitches left in color block 1, Current color 2, Orbit to check position 3
 |
View all Pfaff creative 2.0 manuals
Add to My Manuals
Save this manual to your list of manuals |
Page 51 highlights
Embroidery text editor An alphabet will be shown automatically when you have loaded a font. The text editor works just like sequencing, see page 4:2. 1. Create your embroidery text by selecting letters using the arrow buttons. 2. ConÀrm your selections by pressing OK. 3. Press F1 to change character set. 4. When you want to sew your text, press the F2 button to bring the text to embroidery stitchout. The text will now have the appearance of the loaded font. 5. Use the + and - buttons to adjust the length and height of the text. Note: Press the sequencing button to enter the text editor again. All adjustments made in embroidery mode will be cancelled if you go back to the text editor. A popup will therefor appear asking if you wish to returm to embroidery stitch out. If you select yes you will return to embroidery mode and all your adjustments will be kept. If you select no the text editor will open and all your adjustments made in embroidey mode will be cancelled. Select yes or no with the arrow buttons and press OK. Stitches left in color block (1) This number shows the number of stitches left in the current color block. In brackets is the total number of stitches left in the design. Press the + and - buttons to step forward and backwards stitch by stitch in the design. Step backwards a few stitches if the needle thread breaks or runs out. Current color (2) The current color block number will be shown, next to the total number of color blocks in the design, shown in brackets. To go to the next color block, use the + and - buttons. Orbit to check position (3) Orbiting can be used to trace the design area. Press the F1 button to move the hoop so the needle is placed in the upper left corner of where the design will be embroidered. Each press of the button will move the hoop to view all corners of the design. On the Àfth press the hoop will move to the center position of the design and on the sixth press it will move back to its original position. 1 2 3 4 6:3 Embroidering
-
 1
1 -
2
-
3
-
4
-
5
-
6
-
7
-
8
-
9
-
10
-
11
-
12
-
13
-
14
-
15
-
16
-
17
-
18
-
19
-
20
-
21
-
22
-
23
-
24
-
25
-
26
-
27
-
28
-
29
-
30
-
31
-
32
-
33
-
34
-
35
-
36
-
37
-
38
-
39
-
40
-
41
-
42
-
43
-
44
-
45
-
 46
46 -
 47
47 -
 48
48 -
 49
49 -
 50
50 -
 51
51 -
 52
52 -
 53
53 -
 54
54 -
 55
55 -
 56
56 -
57
-
58
-
59
-
60
-
61
-
62
-
63
-
64
-
65
-
66
-
67
-
68
 |
 |
