Pfaff creative 2.0 Owner's Manual - Page 35
Manual buttonhole, Corded buttonhole
 |
View all Pfaff creative 2.0 manuals
Add to My Manuals
Save this manual to your list of manuals |
Page 35 highlights
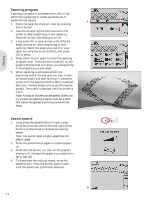
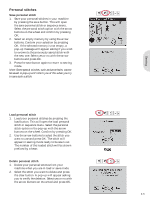
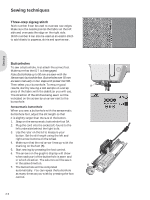
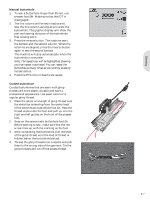
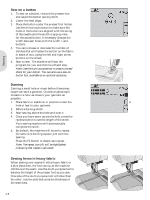
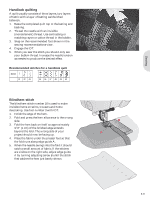
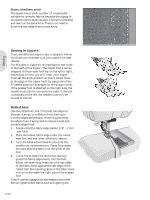
Sewing Manual buttonhole 1. To sew a buttonhole longer than 50 mm, use presser foot 5M. Make sure that the IDT is disengaged. 2. The Àrst column will be sewn backwards. Sew the Àrst column as long as you want the buttonhole. The graphic display will show the part and sewing direction of the buttonhole that is being sewn. 3. Press the reverse button. The machine sews the bartack and the second column. When the columns are aligned, press the reverse button again to sew the second bartack. The machine will stop automatically when the buttonhole is complete. Note: The repeat icon will be highlighted, showing you that repeat is activated. You can repeat the buttonhole as many times as you wish by pressing the foot control. 4. Press the F2 button to deactivate repeat. Corded buttonhole Corded buttonholes that are sewn with gimp threads are more stable, durable and have a professional appearance. Use pearl cotton or a regular gimp thread. 1. Place the center of a length of gimp thread over the metal bar extending from the center back of the sensormatic buttonhole foot 5A. Pass the thread ends under the foot and pull up into the right and left guides on the front of the presser foot. 2. Snap on the sensormatic buttonhole foot 5A. Before starting to sew, make sure that the red arrow lines up with the marking on the foot. 3. After completing the buttonhole, pull the ends of the gimp thread until the loop of thread is hidden below the buttonhole bartack. 4. Thread the gimp threads into a needle and pull them to the wrong side of the garment. Tie the gimp threads and cut off the excess thread. 3:7
-
 1
1 -
2
-
3
-
4
-
5
-
6
-
7
-
8
-
9
-
10
-
11
-
12
-
13
-
14
-
15
-
16
-
17
-
18
-
19
-
20
-
21
-
22
-
23
-
24
-
25
-
26
-
27
-
28
-
29
-
 30
30 -
 31
31 -
 32
32 -
 33
33 -
 34
34 -
 35
35 -
 36
36 -
 37
37 -
 38
38 -
 39
39 -
 40
40 -
41
-
42
-
43
-
44
-
45
-
46
-
47
-
48
-
49
-
50
-
51
-
52
-
53
-
54
-
55
-
56
-
57
-
58
-
59
-
60
-
61
-
62
-
63
-
64
-
65
-
66
-
67
-
68
 |
 |
