Pfaff creative 2.0 Owner's Manual - Page 36
Sew on a button, Darning, Sewing hems in heavy fabric
 |
View all Pfaff creative 2.0 manuals
Add to My Manuals
Save this manual to your list of manuals |
Page 36 highlights
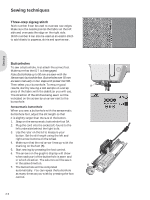
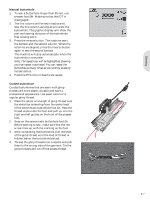
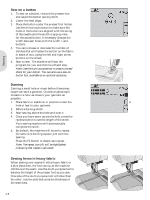
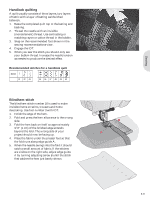
Sewing Sew on a button 1. To sew on a button, remove the presser foot and select the button sewing stitch. 2. Lower the feed dogs. 3. Place the button under the presser foot holder. Use the mirroring function to make sure the holes in the button are aligned with the swing of the needle and the width is appropriate for the actual button. If necessary change the width between holes with the width + and buttons. 4. You can increase or decrease the number of stitches that will fasten the button on the fabric in steps of two, using the left and right arrow buttons on the wheel. 5. Start to sew. The machine will sew the program for you and then tie-off and stop. Note: Use the multi-purpose tool to create a thread shank for your button. You can also use a sew-on button foot, available as an optional accessory. Darning Darning a small hole or a tear before it becomes larger can save a garment. Choose a lightweight thread in a color as close to your garment as possible. 1. Place fabric or stabilizer in position under the A hole or tear in your garment. 2. Select a darning stitch. 3. Start sewing above the hole and over it. 4. Once you have sewn across the hole, press the reverse button to set the length of the stitch. Your sewing machine will automatically complete the stitch. 5. By default, the machine will be set to repeat the same size darning square, just continue sewing. Press the F1 button to deactivate repeat. Note: The repeat icon (A) will be highlighted, indicating that repeat is activated. Sewing hems in heavy fabric When sewing over seams in extra heavy fabric or a blue jeans hem, the foot can tip as the machine climbs over the seam. Use the multi-purpose tool to balance the height of the presser foot as you sew. One side of the multi-purpose tool is thicker than the other. Use the side that suits the thickness of the seam best. 3:8
-
 1
1 -
2
-
3
-
4
-
5
-
6
-
7
-
8
-
9
-
10
-
11
-
12
-
13
-
14
-
15
-
16
-
17
-
18
-
19
-
20
-
21
-
22
-
23
-
24
-
25
-
26
-
27
-
28
-
29
-
30
-
 31
31 -
 32
32 -
 33
33 -
 34
34 -
 35
35 -
 36
36 -
 37
37 -
 38
38 -
 39
39 -
 40
40 -
 41
41 -
42
-
43
-
44
-
45
-
46
-
47
-
48
-
49
-
50
-
51
-
52
-
53
-
54
-
55
-
56
-
57
-
58
-
59
-
60
-
61
-
62
-
63
-
64
-
65
-
66
-
67
-
68
 |
 |
