Pfaff creative 2.0 Owner's Manual - Page 42
Using the alphabet
 |
View all Pfaff creative 2.0 manuals
Add to My Manuals
Save this manual to your list of manuals |
Page 42 highlights
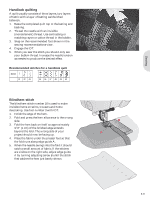
Sequencing Using the alphabet 1. Move the cursor through the stitch Àeld (1) 4 with the left and right arrow buttons on the 1 wheel to where you want to add a letter. 2 5 2. Use the down arrow button to step through the sequence commands (2) to the alphabet 3 6 (3). Select a letter using the arrow buttons and press OK to insert it. It will be placed at the 7 cursor position in the stitch Àeld. Note: The selected letter in the alphabet will be highlighted. Select character set and font Press the F1 button to change character set (6) between upper or lower case, normal or special letters and symbols. Press the F2 button to change fonts (7). Adjust text and stitches You can mirror, adjust length (5) and width (4) or change the density and stitch position of the selected stitch. The adjustments work just like in sewing mode. See page 3:2 - 3:4. When you have changed a value, the digits will be highlighted on the graphic display to show that the value is not default. Note: The adjustments will only affect the stitch at the cursor position. If you return to sewing mode, all adjustments made there will affect the entire sequence and will not be saved. Delete a stitch or letter in a sequence If you want to delete a stitch, move the cursor to the stitch you want to delete and press the clear button. To delete the entire sequence from the stitch Àeld, long press the clear button. 4:2
-
 1
1 -
2
-
3
-
4
-
5
-
6
-
7
-
8
-
9
-
10
-
11
-
12
-
13
-
14
-
15
-
16
-
17
-
18
-
19
-
20
-
21
-
22
-
23
-
24
-
25
-
26
-
27
-
28
-
29
-
30
-
31
-
32
-
33
-
34
-
35
-
36
-
 37
37 -
 38
38 -
 39
39 -
 40
40 -
 41
41 -
 42
42 -
 43
43 -
 44
44 -
 45
45 -
 46
46 -
 47
47 -
48
-
49
-
50
-
51
-
52
-
53
-
54
-
55
-
56
-
57
-
58
-
59
-
60
-
61
-
62
-
63
-
64
-
65
-
66
-
67
-
68
 |
 |
