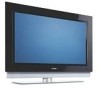
Philips 50PF9631D User manual
Philips 50PF9631D - 50" Plasma TV Manual
 |
UPC - 609585113824
View all Philips 50PF9631D manuals
Add to My Manuals
Save this manual to your list of manuals |
Philips 50PF9631D manual content summary:
- Philips 50PF9631D | User manual - Page 1
welcome - and thanks for investing in a PHILIPS product. CAUTION RISK OF ELECTRIC SHOCK DO NOT OPEN CAUTION: TO REDUCE THE RISK OF ELECTRIC SHOCK, DO NOT REMOVE COVER (OR BACK). NO USER-SERVICEABLE PARTS INSIDE. REFER SERVICING TO QUALIFIED SERVICE PERSONNEL. t This "bolt of lightning" indicates - Philips 50PF9631D | User manual - Page 2
. 10. Protect the power cord from being walked on or pinched particularly at plugs, convenience receptacles, and the point where they exit from the apparatus. 11. Only use attachments/accessories specified by the manufacturer. 12. Use only with a cart, stand, tripod, bracket, or table specified - Philips 50PF9631D | User manual - Page 3
your television set or on the packaging, ready, before calling the Philips helpline 1-888-PHILIPS (744-5477) Model: 42-50-63PF9631D/37 Serial No: Contents Safety warnings 2 Getting started 3 Use of the remote control RC4403 6 My content 9 Buttons on the right side of the TV 11 Turn the TV on - Philips 50PF9631D | User manual - Page 4
safety standards. Mounting the TV on the wall This TV provides the VESA mounting interface (not supplied) and is VESA compatible with the 4 supplied VESA studs to be inserted in the back of the TV. Warning concerning stationary images on the TV screen A characteristic of Plasma Display Panels is - Philips 50PF9631D | User manual - Page 5
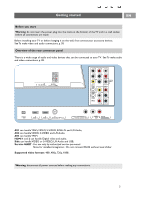
VIDEO or S-VIDEO, L/R Audio and USB, Service UART : For use only by authorized service personnel. Note for installers/integrators : Do not connect RS232 without level shifter. Supported video formats: 480i, 480p, 720p, 1080i. Warning: disconnect all power sources before making any connections. 3 - Philips 50PF9631D | User manual - Page 6
Cable box (or satellite receiver box) to the back of the TV using the best connection options. See to make audio and video connections, p. 38. 3. Select the source using the AV button on the remote control. 4. Press the OK button to confirm your selection. For more information, please refer to your - Philips 50PF9631D | User manual - Page 7
first use Autoprogram, however, to store channels in the TV's memory. See page 14. This connection will supply stereo sound to the TV if it is being broadcast by the station you are watching. Connect the mains < Insert the power cord supplied into the mains at the bottom of the TV and in the wall - Philips 50PF9631D | User manual - Page 8
is physically unplugged. TV Press to select TV mode. DVD STB VCR AUX Press to select one of the system modes in which the remote control can be used. DEMO Demo on/off See p. 13. Color buttons When functions are attached to the color buttons, the color buttons are shown on screen. MY CONTENT / OPTION - Philips 50PF9631D | User manual - Page 9
Audio and Video equipment buttons See Audio and Video equipment buttons, p. 50. See Multimedia browser functional buttons, p. 37. INFO Display information: Press to display (when available) information about the selected TV channel and program or accessory device. PIP HDMI Dual screen/PIP See p.17 - Philips 50PF9631D | User manual - Page 10
you choose the display format of your preference. POWER Press this button repeatedly to select another picture format: Automatic, Super zoom, 4:3, Movie expand 14:9, Movie expand 16:9, 16:9 subtitle or Wide screen. MY CONTENT FORMAT GUIDE Automatic Super zoom 4:3 FAV .... VOL MUTE CH - Philips 50PF9631D | User manual - Page 11
Use of the MY CONTENT / OPTION button EN POWER MY CONTENT FORMAT GUIDE MY CONTENT FAV .. MUTE Quick access My Content (Un)Mark Digital audio language Closed caption SOURCE Picture format Equalizer PIP format Clock Television Multimedia TV menu TV channels The my MY CONTENT/OPTION button - Philips 50PF9631D | User manual - Page 12
p. 25, or Use of the remote control, Format button, p. 8. Equalizer See Use of the TV menu settings, Adjust Sound menu settings, Auto sound, p. 26. PIP format See use of the Setup menu, Adjust Picture/Sound preferences, p. 17. Clock Select to activate/deactivate the clock display on the screen. 10 - Philips 50PF9631D | User manual - Page 13
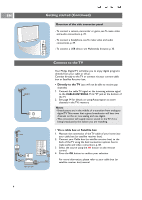
button. Turn the TV on < Press the power switch B at the right side of the TV. > An indicator on the front of the TV lights up. < Press the +CH- button or the POWER B button on the remote control. Note: the first time (and only the first time) you turn on your TV, you see a Welcome screen followed - Philips 50PF9631D | User manual - Page 14
POWER EN How to navigate through the menus MY CONTENT FORMAT GUIDE FAV .... VOL MUTE CH Settings SOURCE TV Setup Installation Demo Exit TV Picture Sound Ambilight Features Channels Introduction A lot of guiding instructions, help texts and messages will be displayed on your TV when using - Philips 50PF9631D | User manual - Page 15
How to navigate through the menus (continued) EN Settings TV Setup Installation Demo Exit Info Demo Ambilight Pixel Plus Active Control Demo The Demo menu allows the user to get an idea of the features that are part of the television. 1. Select Demo in the Settings menu and press the cursor - Philips 50PF9631D | User manual - Page 16
. If requested, enter your PIN code to unlock all channels. See Adjust Menu preferences in the Settings, TV menu, p. 20. Previous Next 6. Press the green corresponding color button on the remote control for "Start" to start autoprogramming. > The menu screen disappears and the progress of - Philips 50PF9631D | User manual - Page 17
TV channels or Cable TV channels. Note: Do not start Autoprogram but press the red color button.Then press the MENU button. If you make use be selected by pressing the digit remote control direct-access channel number programming, the time to select and view a digital channel may take slightly longer - Philips 50PF9631D | User manual - Page 18
inst. Software upgrade How to upgrade the TV software This menu allows you to upgrade your TV software using a USB device. The USB device must be filled with the appropriate upgrade image (and structure) which can be found on the www.philips.com/support website. How to upload a new software version - Philips 50PF9631D | User manual - Page 19
the PIP button on the remote control is pressed and when - PIP is selected, the TV shows a full screen of video with a pip window of video on top of it. - Dual screen is selected, the TV splits the screen into two equally sized screens. Remind: Dual screen/PIP functionality, also called HDMI PIP, is - Philips 50PF9631D | User manual - Page 20
service: > CC 1, 2, 3 or 4 Dialogue (and descriptions) for the action on the captioned TV program shows on screen. Usually CC 1 is the most used. CC 2 may be used for alternate languages if they are being transmitted. > T 1, 2, 3 or 4 Often used for channel guide, schedules, bulletin board - Philips 50PF9631D | User manual - Page 21
shows.The captioned programs are usually noted in the TV listings with service marks such as 'CC'. Digital caption service This allows you to configure the way you choose to view the digital captioning. < Select one of the digital service channels made available by the caption provider. There are - Philips 50PF9631D | User manual - Page 22
Use of the Setup menu (continued) Settings/Setup Preferences Menu preferences Picture the cable operator.The standard SCTE18 defines an Emergency Alert signalling method for use by cable TV systems to to remove the message from the screen. - The message display will overlap whatever menu element or other - Philips 50PF9631D | User manual - Page 23
or change the personal 4-digit access code that is used in the different lock functions of the TV. 1. Select Set or Change PIN with the cursor down. > If no PIN-code exists yet, the menu item is set to Set PIN. Follow the instructions on screen. > If a PIN-code has previously been entered, the menu - Philips 50PF9631D | User manual - Page 24
with the cursor up/down. > When you select AV1, AV2, AV3, HDMI 1, HDMI 2 or Side, a list appears allowing you to identify which type of 3. Press the cursor right to instruct the TV to get the time automatically or manually. Note: Most of the TV channels are not transmitting clock information. - Philips 50PF9631D | User manual - Page 25
useful if picture, sound and ambilight settings and to control the settings of special TV features and functions. Note: Dependent on the input signal, one or more menu items may not be selectable. 1. Press the MENU button on the remote control. > The Settings menu appears on the screen. 2. Select TV - Philips 50PF9631D | User manual - Page 26
:This Philips TV has been set at the factory to look best in bright store environments which typically use fluorescent lighting. As your home will likely not be as well lit as a store, we recommend that you cycle through the various auto picture modes to find the one that best suits your own viewing - Philips 50PF9631D | User manual - Page 27
according to the image noise in the picture. Color enhancement Automatically controls green enhancement and blue stretch. It makes the picture. Picture format This menu item performs the same as the FORMAT button on the remote control. See Use of the remote control, p. 8. Active Control The TV - Philips 50PF9631D | User manual - Page 28
settings Settings TV Setup Installation Demo Exit TV Picture Sound Ambilight Features Channels Info The Sound menu contains the settings that affect the quality of the the sound. 1. Press the MENU button on the remote control. > The Settings menu appears on the screen. 2. Select TV and press - Philips 50PF9631D | User manual - Page 29
Settings TV Picture Sound Ambilight Features Channels Info Adjust Sound menu settings (continued) of special features. 1. Press the MENU button on the remote control. > The Settings menu appears on the screen. 2. Select TV and press the cursor right. > The TV menu is displayed and gives an overview - Philips 50PF9631D | User manual - Page 30
. Analysis of the picture content adapts the colors continuously. But the lights can also be set to any fixed color and many shades of white. 1. Press the MENU button on the remote control. > The Settings menu appears on the screen. 2. Select TV and press the cursor right. > The TV Menu is displayed - Philips 50PF9631D | User manual - Page 31
you to adjust the color and level of light intensity on the sides of the picture. Caution: Infrared interference To avoid bad infrared remote control reception, place your peripheral equipment out of sight of the ambient lights of your TV. Ambilight does not function well when the room temperature - Philips 50PF9631D | User manual - Page 32
Settings TV Picture Sound Ambilight Features Channels Channels Lock after Channels lock TV ratings lock Movie ratings lock Preferred channels Region ratings lock Clear region ratings This menu allows you to control special functions for the TV channels. 1. Press the MENU button on the remote - Philips 50PF9631D | User manual - Page 33
code. - Each ratings item has a box-graphic in front of it to indicate whether or not programs carrying that rating are currently locked. TV ratings TV-Y TV-Y7 TV-Y7-FV TV-G TV-PG TV-14 TV and strong language. programs are designed to be viewed by adults and may be unsuitable for children under - Philips 50PF9631D | User manual - Page 34
TV ratings lock Please enter your PIN Movie ratings lock Preferred channels Region ratings lock Clear region ratings Movie ratings lock This function allows you to control access to individual movies based on their MPAA ratings (Motion Picture code. (See Set/Change PIN, p. 21.) If the code - Philips 50PF9631D | User manual - Page 35
channels After having finished to search for and to store TV channels, all the installed, non-scrambled,TV channels are marked as preferred by default. With the -CH+ button on the remote control you can browse through the list of the TV channels. Only those channels which are in the preferred list - Philips 50PF9631D | User manual - Page 36
current program and also about the next program (if this information is available). Note: these instructions may differ according to the type of Electronic Program Guide. 1. Press the GUIDE button. > The EPG screen appears. Dependent on conditions it may take some time to acquire EPG data. > The EPG - Philips 50PF9631D | User manual - Page 37
supported. To view content from a USB device Tip: if your USB device does not fit into the USB connector at the side, use an USB extend cable to connect the USB device to the USB port. Ask your dealer for more information. To insert a USB device Note: USB devices are not supplied with this TV - Philips 50PF9631D | User manual - Page 38
the corresponding function mentioned at the bottom of the screen. Tip: the blue color button can, if necessary, be used to let the color buttons reappear. 9. To stop playing content, press the ‡ button on the remote control. Notes: - your TV supports slide shows with background music. See Annex - Philips 50PF9631D | User manual - Page 39
CONTENT FORMAT GUIDE FAV MUTE SOURCE INFO PIP A/CH Function buttons at the bottom of the screen Details to display a description of the selected file or directory Transitions to select if you like to apply a transition during a slide show Slide time to select the duration a picture will - Philips 50PF9631D | User manual - Page 40
set, adjust the picture position to the centre of the screen with the cursor buttons. Note: - your TV comes with all types of connectors with the exception of the DVI connector but some of your equipment may be equipped with this type. In this case you'll need a DVI to HDMI adapter or a HDMI to DVI - Philips 50PF9631D | User manual - Page 41
the abbreviations may vary, the letters B and R stand for the blue and red component signals, respectively, and Y indicates the luminance signal. Refer to the DVD player's or devices instructions for use for definitions and connection details; - This television is designed to accept high definition - Philips 50PF9631D | User manual - Page 42
VIDEO AV2 L Pb R Y SERVICE UART o HDMI 1 o HDMI 2 o ANTENNA 75 DISPLAY SYNCHRONIZED Game console Cable box Digital surround receiver DIGITAL AUDIO IN Note: - Due to possible digital image distortion when displaying signals from connected digital equipment, automatically the Auto picture - Philips 50PF9631D | User manual - Page 43
the AV connectors you have connected your equipment to. Notes: - cables are often color-coded to connectors. Connect red to red, white to white.... - if your recorder has an S-VHS video jack: For improved picture quality, connect an S-video cable with the S-VIDEO input and connect the audio cables - Philips 50PF9631D | User manual - Page 44
the AV connectors you have connected your equipment to. Notes: - cables are often color-coded to connectors. Connect red to red, white to white.... - if your recorder has an S-VHS video jack: For improved picture quality, connect an S-video cable with the S-VIDEO input of AV1or AV2 and connect the - Philips 50PF9631D | User manual - Page 45
1. Use an optional signal splitter. 2. Connect one of the cable TV signal splitter outputs 1 to the cable box's IN jack. 3. Connect the other cable TV signal color-coded to connectors. Connect red to red, white to white.... - if your recorder has an S-VHS video jack: For improved picture quality - Philips 50PF9631D | User manual - Page 46
AV connector you have connected your equipment to. Notes: - cables are often color-coded to connectors. Connect red to red, white to white.... - if your satellite receiver or cable box has an S-VHS video jack: For improved picture quality, connect an S-video cable with the S-VIDEO input of AV1 and - Philips 50PF9631D | User manual - Page 47
to the AV connector you have connected your equipment to. Notes: - cables are often color-coded to connectors. Connect red to red, white to white.... - if your recorder has an S-VHS video jack: For improved picture quality, connect an S-video cable with the S-VIDEO input of AV1 and connect the audio - Philips 50PF9631D | User manual - Page 48
DVD Player or other accessory digital source devices Note:This TV is capable of displaying 1080i, 720p and 480p DTV satellite receivers or other equipment, and to the Y, Pb and Pr jacks of AV1 or AV3 on the TV. 2. Connect to the Y, Pb and Pr jacks of AV1 in case of devices with analog audio signals - Philips 50PF9631D | User manual - Page 49
S-VIDEO connector do not connect any device to the AV VIDEO input that you are using. 2. Connect the audio cables to the device's AUDIO L and R jacks and to the L and R audio AV1 or AV2 jacks 2 on the TV accordingly to where you connected the SVideo cable. 3. Select the equipment you have connected - Philips 50PF9631D | User manual - Page 50
DVI output only, use a DVI to HDMI adapter cable (not supplied) to connect to the HDMI connector. (Then also connect the audio cables to AV1 AUDIO L and R.) - If necessary, you can adjust the picture position to the center of the screen with the cursor buttons. o HDMI 1 o HDMI 2 HDMI AV1: RGB - Philips 50PF9631D | User manual - Page 51
from a peripheral equipment connected to the HDMI input, the Digital audio output signal is muted. POWER MY CONTENT FORMAT Record with your recorder GUIDE Record a TV program You can record a TV program using your recorders tuner without affecting your TV. 1. Select the channel number on your - Philips 50PF9631D | User manual - Page 52
of products can be operated with the remote control of your TV. Press one of the buttons after you pressed one of the mode buttons (DVD, STB, VCR, AUX) according to the equipment you want to operate with this remote control. See Use of the Remote control, p. 7-8. POWER ® Ò ‡ π † INFO MENU - CH - Philips 50PF9631D | User manual - Page 53
antenna connection. Television not responding to remote control • Check whether the batteries are working. Replace if necessary. • Clean the remote control sensor lens on the monitor. • Operating range between TV and the remote control should not be > 240". • You can still use the buttons at the - Philips 50PF9631D | User manual - Page 54
www.philips.com/support to not install see which operating systems are supported. No stable or not Check if you have selected the correct VGA mode in your PC. synchronized VGA See Annex 4, Issues referring to connected equipment with a HDMI picture connector, p. 59. Standby Your TV consumes - Philips 50PF9631D | User manual - Page 55
www.philips.com/support website: 1. Go to www.philips.com/support using the web browser on your PC. 2. Follow the procedure to find the information and the software related to your TV. 3. than the current version. In this case only a manual software upgrade procedure is possible. See p. 55. Info 53 - Philips 50PF9631D | User manual - Page 56
TV with the POWER button on your remote control. Your TV will start up with the new software. Note: once the upgrade is finished use your PC to remove the TV Select the correct upgrade version and press the red color button to start the upgrade. Your TV will restart and will automatically go to the - Philips 50PF9631D | User manual - Page 57
Philips support website (www.philips.com/support). Use the type number of your TV to find this documentation and other related files. - Philips can't be held responsible for any problems An absolute path to content will also be supported. - relative path: pictures\test1.jpg, tamper.jpg, ..\new\bird. - Philips 50PF9631D | User manual - Page 58
EN Annex 2 (Continued) Supported XML-tags The following table gives a description of the XML syntax. Tag Name Use philips-slideshow mandatory title optional audio optional slide-duration optional slides slide mandatory optional Description Philips slideshow signature including the - Philips 50PF9631D | User manual - Page 59
found on the Philips support website (www.philips.com/support); - the software of your TV is upgradeable. If you have problems first check if you have the latest software installed on your TV. The latest software, together with instructions, can be found on the Philips support website. Use the type - Philips 50PF9631D | User manual - Page 60
(SDTV) 640x480i 720x480i Enhanced Definition TV (EDTV) 640x480p 720x480p High Definition TV (HDTV) 1920x1080i 1280x720p PC VGA 640x480 SVGA 800x600 XGA 1024x768 - If necessary, you can adjust the picture position to the centre of the screen with the cursor buttons. - Due to legal requirements - Philips 50PF9631D | User manual - Page 61
7 navigate through the menus 12-13 ok button 6 pc 48 picture format 25 pin code 21 pixel plus 25 preferences menu 20 preferred channels 33 rear panel overview 40 record a TV program 49 recorder 41-43,48 recycling 61 region ratings lock 33 remote control 5-8 reset av settings 21 safety - Philips 50PF9631D | User manual - Page 62
not installed and used in accordance with the instructions, may cause harmful interference to radio communications. However, there is no guarantee that interference will not occur in a particular installation. If this equipment does cause harmful interference to radio or television reception, which - Philips 50PF9631D | User manual - Page 63
www. philips. com/support. - If you need further assistance, please call the customer support service in your country. The corresponding telephone numbers and addresses are given in the supplied Worldwide guarantee booklet. Plasma display characteristics This Plasma display is designed to be used at - Philips 50PF9631D | User manual - Page 64
the Warranty Period. At its option, Philips will either (1) repair the product at no charge, sing new or refurbished replacement parts, or (2) exchange the product with a product that is new or which has been manufactured from new, or serviceable used parts and is at least functionally equivalent or
-
 1
1 -
 2
2 -
 3
3 -
 4
4 -
 5
5 -
 6
6 -
 7
7 -
8
-
9
-
10
-
11
-
12
-
13
-
14
-
15
-
16
-
17
-
18
-
19
-
20
-
21
-
22
-
23
-
24
-
25
-
26
-
27
-
28
-
29
-
30
-
31
-
32
-
33
-
34
-
35
-
36
-
37
-
38
-
39
-
40
-
41
-
42
-
43
-
44
-
45
-
46
-
47
-
48
-
49
-
50
-
51
-
52
-
53
-
54
-
55
-
56
-
57
-
58
-
59
-
60
-
61
-
62
-
63
-
64
 |
 |
Return your Product Registration Card or register online at
www.philips.com/usasupport today to get the very most from your purchase.
Registering your model with PHILIPS makes you eligible for all of the valuable benefits
listed below, so don’t miss out. Complete and return your Product Registration Card at
once to ensure:
* Proof of Purchase
Returning the enclosed card
guarantees that your date of
purchase will be on file, so no
additional paperwork will be
required from you to obtain
warranty service.
* Product Safety
Notification
By registering your product
you’ll receive notification -
directly from the
manufacturer - in the rare
case of a product recall or
safety defect.
* Additional Benefits
of Product Ownership
Registering your product
guarantees that you’ll receive
all of the privileges to which
you’re entitled, including
special money-saving offers.
Congratulations on your purchase, and
welcome to the “family!”
Dear PHILIPS product owner:
Thank you for your confidence in PHILIPS.You’ve
selected one of the best-built, best-backed
products available today.We’ll do everything in
our power to keep you happy with your
purchase for many years to come.
As a member of the PHILIPS “family,” you’re
entitled to protection by one of the most
comprehensive warranties and outstanding
service networks in the industry.What’s more,
your purchase guarantees you’ll receive all the
information and special offers for which you
qualify, plus easy access to accessories from our
convenient home shopping network.
Most importantly, you can count on our
uncompromising commitment to your total
satisfaction.
All of this is our way of saying welcome - and
thanks for investing in a PHILIPS product.
P.S.To get the most from your PHILIPS
purchase, be sure to complete and return
your Product Registration Card at once, or
register online at:
www.philips.com/usasupport
For Customer Use
Enter below the Serial No., which is
located on the rear of the cabinet. Retain
this information for future reference.
Model No. __________________________
Serial No.
__________________________
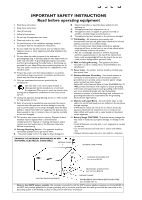
Know these
safety
symbols
This “bolt of lightning” indicates
uninsulated material within your unit
may cause an electrical shock. For the safety
of everyone in your household, please do not
remove product covering.
The “exclamation point” calls attention
to features for which you should read
the enclosed literature closely to prevent
operating and maintenance problems.
WARNING
:To reduce the risk of fire or
electric shock, this apparatus should not be
exposed to rain or moisture and objects
filled with liquids, such as vases, should not
be placed on this apparatus.
CAUTION:
To prevent electric shock,
match wide blade of plug to wide slot, fully
insert.
ATTENTION
: Pour éviter les chocs
électriques, introduire la lame la plus large de
la fiche dans la borne correspondante de la
prise et pousser jusqu’au fond.
CAUTION
RISK OF ELECTRIC SHOCK
DO NOT OPEN
CAUTION: TO REDUCE THE RISK OF ELECTRIC SHOCK, DO NOT
REMOVE COVER (OR BACK). NO USER-SERVICEABLE PARTS
INSIDE. REFER SERVICING TO QUALIFIED SERVICE PERSONNEL.
t
s
Visit our World Wide Web Site at http://www.philips.com/usasupport