Pioneer DVJ 1000 Owner's Manual - Page 17
Connections - djm
 |
UPC - 012562821481
View all Pioneer DVJ 1000 manuals
Add to My Manuals
Save this manual to your list of manuals |
Page 17 highlights
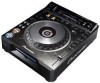
Before Operating (Connections) Connections Before making or changing the connections, switch off the power and disconnect the power cord from the AC outlet. 1. Connections to a Pioneer DJ mixer (sold separately) (audio output and control connector) Using the accessory audio cable, connect the white plug to the L (left) connector, and connect the red plug to the R (right) connector. By connecting the accessory control cord, the player can be controlled from the mixer, allowing fader start play and back cue operations. Note that digital connections can be made only with mixers equipped with digital input connectors (models DJM-800, DJM-1000, etc.). Use a commercially available coaxial digital cable to connect this unit's DIGITAL OUT connector to the DJ mixer's DIGITAL IN connector. Connection example DJM-800: SIGNAL GND PHONO CD L LINE CD L CONTROL CONTROL R DIGITAL CD R DIGITAL CD DIGITAL IN DJM-800 DVJ-1000 B Coaxial digital cable (sold separately) Accessory control cord DVJ-1000 A DIGITAL OUT AUDIO OUT R L CONTROL NORMAL DJ COMPOSITE VIDEO OUT S S PREVIEW OUT SYNC IN Accessory audio cable DIGITAL OUT AUDIO OUT R L CONTROL NORMAL DJ COMPOSITE VIDEO OUT S S PREVIEW OUT SYNC IN ¶ When making connections to the DJM-1000, the furnished audio cables can be used to connect one set of the CD/LINE connectors to player A, and the other set of CD/LINE connectors to a second player B. When making digital audio connections, a commercially available coaxial digital signal cable must be used to connect this unit's DIGITAL OUT connector to one of the DIGITAL IN connectors (3 to 6) of the DJM-1000 mixer. ¶ When connecting to the DJM-600, DJM-500, or DJM-300, use the furnished audio cables to connect the CD1 connectors to player A, and CD2 connectors to player B. ¶ When connecting to DJM-909, DJM-707 or DJM-400 use the furnished audio cables to connect the CH-1 CD connectors to player A, and CH-2 CD connectors to player B. ¶ When connecting to DJM-3000, connect player A to CH-1 LINE 1, and player B to CH-2 LINE 3. ¶ When connecting this unit to other audio mixers, connect the unit 's AUDIO OUT connectors to the mixer's LINE IN or AUX IN connectors. ( DO NOT connect to the PHONO connectors, since it may result in distorted sound or improper playback.) 17
-
 1
1 -
2
-
3
-
4
-
5
-
6
-
7
-
8
-
9
-
10
-
11
-
 12
12 -
 13
13 -
 14
14 -
 15
15 -
 16
16 -
 17
17 -
 18
18 -
 19
19 -
 20
20 -
 21
21 -
 22
22 -
23
-
24
-
25
-
26
-
27
-
28
-
29
-
30
-
31
-
32
-
33
-
34
-
35
-
36
-
37
-
38
-
39
-
40
-
41
-
42
-
43
-
44
-
45
-
46
-
47
-
48
-
49
-
50
-
51
-
52
-
53
-
54
-
55
-
56
 |
 |
