RCA DRC8000N User Guide
RCA DRC8000N - Progressive-Scan DVD Recorder/Player Manual
 |
UPC - 034909220382
View all RCA DRC8000N manuals
Add to My Manuals
Save this manual to your list of manuals |
RCA DRC8000N manual content summary:
- RCA DRC8000N | User Guide - Page 1
DVD Recorder User's Guide Changing Entertainment. Again. DRC8000N - RCA DRC8000N | User Guide - Page 2
on the back of the player. Model No. _____D_R_C_8__0_0_0 Serial No Purchase Date Dealer/Address/Phone WARNING To reduce the risk of fire or shock hazard, do not expose this DVD Recorder to rain or moisture. CAUTION THIS PRODUCT UTILIZES A LASER. USE OF CONTROLS OR ADJUSTMENTS OR PERFORMANCE - RCA DRC8000N | User Guide - Page 3
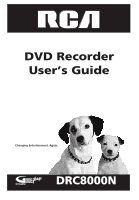
10 Connect the G-LINK cable 11 Install batteries in the remote control 12 Turn on the TV and the DVD Recorder 12 Complete Interactive Setup 12 How to find your TV's Video Input Channel 15 Back of the DVD Recorder 16 Front of the DVD Recorder 17 What to Expect 18 Next Steps 18 Chapter 2:The - RCA DRC8000N | User Guide - Page 4
ON INPUT - + VOLUME DVD / VIDEO / CD / MP3 PLAYER HARD DISC DRIVE RECORDER DRS 7000 OPEN/CLOSE PLAY PAUSE STOP RECORD PR- PR+ DVD Recorder DVD SAT• C A BLE TV ON• OFF RETU R N VOL CH MUTE G O• B A CK CLEAR MEN U OPEN• CLOSE ANGLE ZO OM GUIDE INFO 1 2 3 4 5 6 7 INPUT - RCA DRC8000N | User Guide - Page 5
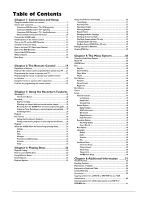
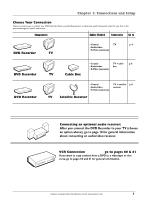
.Turn to the appropriate page for specific instructions. Components Cables Needed Connection Go to DVD Recorder TV • Coaxial TV p. 4 • Audio/video • S-Video (optional) DVD Recorder DVD Recorder • Coaxial TV + cable p. 6 • Audio/video box • S-Video (optional) TV Cable Box • Coaxial - RCA DRC8000N | User Guide - Page 6
If you need help finding your TV's various Video Input Channels, go to page 15. * The remote control packed with your DVD Recorder is capable of being programmed to operate many brands and models of TVs and VCRs. For instructions, go to page 19. If the remote operates your TV, press TV and INPUT to - RCA DRC8000N | User Guide - Page 7
, go to page 56. Note: If your TV is capable of progressive scan, connect the DVD Recorder to the TV using the COMPONENT VIDEO OUTPUT jacks, and slide the PROG SCAN switch to the ON position to see DVD titles (movies) in progressive scan format. If you need more explanation, go to page 55. 5. Attach - RCA DRC8000N | User Guide - Page 8
. If you need help finding your TV's various Video Input Channels, go to page 15. * The remote control packed with your DVD Recorder is capable of being programmed to operate many brands and models of TVs. For instructions, go to page 19. If the remote operates your TV, press TV and INPUT to access - RCA DRC8000N | User Guide - Page 9
go to page 56. Note: If your TV is capable of progressive scan, connect the DVD Recorder to the TV using the COMPONENT VIDEO OUTPUT jacks, and slide the PROG SCAN switch to the ON position to see DVD titles (movies) in progressive scan format. If you need more explanation, go to page 56. 3. Attach - RCA DRC8000N | User Guide - Page 10
here. SATELLITE DISH 1 DVD Recorder 2b 2a If you want to add a VCR to this connection, consult the manual that came with 4 your satellite receiver. INPUT VIDEO OUTPUT VIDEO RF ANTENNA/CABLE INPUT L AUDIO R S-VIDEO IN L AUDIO R S-VIDEO OUT COMPONENT VIDEO OUTPUT Y DIGITAL AUDIO - RCA DRC8000N | User Guide - Page 11
go to page 56. Note: If your TV is capable of progressive scan, connect the DVD Recorder to the TV using the COMPONENT VIDEO OUTPUT jacks, and slide the PROG SCAN switch to the ON position to see DVD titles (movies) in progressive scan format. If you need more explanation, go to page 56. 4. Connect - RCA DRC8000N | User Guide - Page 12
and Setup Consult the manual that came with your receiver to connect it properly. DVD Recorder INPUT VIDEO OUTPUT VIDEO RF ANTENNA/CABLE INPUT L AUDIO R S-VIDEO IN L AUDIO R S-VIDEO OUT DIGITAL AUDIO OUT COAXIAL OPTICAL COMPONENT VIDEO OUTPUT Y G-LINK Pb Pr PROG. SCAN IR SAT ON OFF - RCA DRC8000N | User Guide - Page 13
order for all of the DVD Recorder's features to work correctly. The G-LINK cable (provided) enables the DVD Recorder to control the cable box or satellite receiver so you can set up timer recordings. For cable box owners, you have to connect the G-LINK cable so the GUIDE Plus+ system (the on-screen - RCA DRC8000N | User Guide - Page 14
remote is in DVD mode - press the DVD button. Turn on the TV and DVD Recorder 1. Turn on the DVD Recorder-press the DVD button on the remote. 2. Turn on the TV and tune it to the correct Video Input Channel-if you have an RCA DVD Recorder. Use the remote control to follow the on-screen instructions. - RCA DRC8000N | User Guide - Page 15
the on-screen instructions to enter the correct cable box information, the GUIDE Plus+ System performs a test to make sure it has received the appropriate information. After the DVD Recorder completes its test, it gives you feedback. If the test failed, choose another brand or set it manually. 3d - RCA DRC8000N | User Guide - Page 16
(IRA SAT jack) and the other end of the cable must be placed in front of the remote sensor on the satellite receiver in order for the DVD Recorder to control the satellite receiver for Timer Recordings. (Go to page 11 for instructions.) Turn on the satellite receiver and follow the on-screen - RCA DRC8000N | User Guide - Page 17
2 VIDEO AUX 92 INPUT Next Steps This chapter is dedicated to connecting your DVD Recorder. Choose what you want to do next, and go to the appropriate chapter for instructions. Chapter 2:The Remote Control (page 19) A description of each button is in Chapter 2. Additionally, the universal remote - RCA DRC8000N | User Guide - Page 18
1: Connections and Setup INPUT VIDEO OUTPUT VIDEO RF ANTENNA/CABLE INPUT L AUDIO R S-VIDEO IN L AUDIO R S-VIDEO OUT DIGITAL AUDIO OUT COAXIAL OPTICAL COMPONENT VIDEO OUTPUT Y G-LINK IR SAT Pb Pr PROG. SCAN ON OFF Back of the DVD Recorder The back of your recorder might look a little - RCA DRC8000N | User Guide - Page 19
G-Link Cable (provided) to this jack in order for the DVD Recorder to control the satellite receiver for timer recordings. For instructions, go to page 11. PROG. SCAN switch - If you've connected your DVD Recorder to a TV that uses progressive scanning to display the image via the Y, Pb, Pr jacks - RCA DRC8000N | User Guide - Page 20
change channels via the DVD Recorder's channel up and down buttons (or number buttons) and the TV stays on the Video Input Channel that instructions. Note: the GUIDE Plus+ system doesn't list satellite programming. *The Universal Remote Control packed with the DVD Recorder operates most RCA - RCA DRC8000N | User Guide - Page 21
Chapter 2 The Remote Control • Explanation of the buttons • Find out if the remote can operate your TV • Programming the remote to operate your TV • Programming the remote to operate other components Graphics contained within this User's Guide are for representation only. Some of the menu screens, - RCA DRC8000N | User Guide - Page 22
TV. CLEAR Removes on-screen menus and displays. DVD Puts the remote in DVD mode so it operates the DVD Recorder. FORWARD Searches forward through the disc. The Universal Remote Control that came with your DVD Recorder operates most RCA, GE, and Proscan branded components. Additionally, the - RCA DRC8000N | User Guide - Page 23
TV This remote control is designed to operate most RCA, GE, and Proscan TVs. 1. Press the TV button. 2. Press the ON•OFF button (if the TV turns on or off, this remote will operate the TV). 3. If that doesn't work, you can try programming the remote by following the instructions below. Programming - RCA DRC8000N | User Guide - Page 24
act a specific way are mode dependent- if you want to change settings in your TV's menu, you must press the TV button before you press the MENU button so the remote control knows that you want to access the TV's menu system. To summarize, to operate the DVD Recorder you must press the DVD button; to - RCA DRC8000N | User Guide - Page 25
The Remote Control Code 1006 1090 1091 1092 1179 1185 Portland 1004 1005 1006 1016 1171 Price Club 1105 Prism 1054 Proscan 1000 1181 Proton 1004 1006 1012 1093 Shack Realistic 1000 1004 1006 1012 1038 1049 1095 1162 1171 1172 RCA 1000 1003 1004 1005 1006 1007 1019 1096 1098 1099 1100 1101 1102 - RCA DRC8000N | User Guide - Page 26
2: Remote Control Code Toshiba 1049 1071 1072 1105 1109 1117 1118 1160 1162 Totevision 1171 Universal 1052 1087 Victor 1066 1182 Vidtech 1004 1005 1006 Viking 1174 5015 5019 5025 5030 5031 5032 Pioneer 5033 5034 Proscan 5000 5001 RCA 5007 5047 5049 5052 Realistic 5009 Regal 5022 5035 Regency 5017 - RCA DRC8000N | User Guide - Page 27
Chapter 3 Using the DVD Recorder's Features • Watching TV • Recording • Playback • Disc Library • GUIDE Plus+ System Graphics contained within this User's Guide are for representation only. Some of the menu screens, buttons, and display messages might be different in your product than they appear in - RCA DRC8000N | User Guide - Page 28
remote doesn't operate your TV, use the TV's remote control to change channels. 4. When you're finished recording, remember to turn the TV back to its Video Input Channel and watch TV through the DVD Recorder . The remote that came with your DVD Recorder is a programmable Universal remote that can - RCA DRC8000N | User Guide - Page 29
the DVD Recorder's Features Recording from the GUIDE Plus+ on-screen programming guide You can schedule recordings from the GUIDE Plus+ on-screen programming guide (not available for satellite programming). 1. If the program guide isn't on the TV, press the GUIDE button on the remote control (the - RCA DRC8000N | User Guide - Page 30
until Show All Discs appears, and press OK (all of the DVD+RW and DVD+R discs you used to record programming on this DVD Recorder appear). 5. Press the right arrow button to highlight Sort by Space. Use the up/down arrow buttons on the remote until Show All Titles appears (all of the shows you - RCA DRC8000N | User Guide - Page 31
title, press OK (the next time you access the Player Menu, a still of the video will appear instead of the original thumbnail the DVD Recorder automatically assigned when it first recorded the program. Using the different disc menus for recorded titles: From the Disc menu, there are two separate - RCA DRC8000N | User Guide - Page 32
If you receive programming through satellite TV service, your DVD Recorder's Guide Plus+ System won't display programming. Using the GUIDE Plus+ System To enter the GUIDE Plus+ system: • Press the GUIDE button on the remote control. To exit the GUIDE Plus+ System: • Highlight a program and press OK - RCA DRC8000N | User Guide - Page 33
3: Using the DVD Recorder's Features Listings Guide The Listings Guide appears each time you enter the GUIDE Plus+ system. It displays the current programming for each channel.The current program is displayed in the video window. • Press the up and down arrow buttons on the remote to browse channel - RCA DRC8000N | User Guide - Page 34
DVD Recorder Occasionally you will receive messages regarding your GUIDE Plus+ system, as well as special Record Timer, highlight the program and use the Action buttons: • Remove Press the 1 button on the remote to remove the program from the Schedule menu. • Change Press 3 on your remote control - RCA DRC8000N | User Guide - Page 35
and Play Discs • Using the Different Menus • Search Options • Playback Options • Using the On-Screen Info Display Graphics contained within this User's Guide are for representation only. Some of the menu screens, buttons, and display messages might be different in your product than they appear in - RCA DRC8000N | User Guide - Page 36
DVD Recorder (press ON•OFF on the remote or press the STANDBY/ON button on the DVD Recorder). 1. Make sure the TV is tuned to its Video progressive scan TV via COMPONENT jacks. When you stop playing a disc, the player remembers where you stopped.When you start playing the disc again, the DVD Recorder - RCA DRC8000N | User Guide - Page 37
ZO OM GUIDE INFO 1 2 3 4 5 6 7 INPUT 8 9 0 ANTEN NA REVERSE RECOR D AGAIN PLAY FORWAR D STOP PAUSE LIVE ADVANCE FORWARD button Picture Scan To search a disc during playback, use the FORWARD or REVERSE button. Each time you press FORWARD or REVERSE, your DVD Recorder scans the - RCA DRC8000N | User Guide - Page 38
button on the remote while a disc buttons on the remote to scroll through the the screen, press INFO on the remote control. Time display (page 37) Chapter DVD disc. To make the Info Display appear, press the INFO button on the remote control Track PlayBack Control Audio (page 37) (page - RCA DRC8000N | User Guide - Page 39
the remote control. Press the up or down arrow button to go to the next title:When you're playing a VCD or an Audio CD, use these instructions to is removed or the player is turned off, the subtitle language will revert to the language setting specified through the DVD Recorder's Language menu. If - RCA DRC8000N | User Guide - Page 40
define a specific segment on the disc that you want to repeat. For example, you might want to watch a specific scene remote until Repeat Mode: Standard appears at the bottom of the Info Display. Note: Repeat is also cancelled when you eject the disc from the DVD Recorder. Audio Icon (DVD and Video - RCA DRC8000N | User Guide - Page 41
in which you want the tracks to play in the DVD Recorder's main menu system (go to page 45 for instructions). Random The Random option plays the tracks in a Display icons. Note:The player defaults to Standard Playback whenever you put a new CD into the DVD Recorder. Program The Program Play Mode - RCA DRC8000N | User Guide - Page 42
(PBC) works varies for different Video CDs.With most Video CDs, turning on Playback Control enables you to access the Video CD's menu if it has one and requires that you navigate through the Video CD's contents by using the Video CD menu instead of the DVD Recorder's Info Display.When PBC is on - RCA DRC8000N | User Guide - Page 43
disc. Creating an mp3 Disc on Your Computer Your DVD Recorder handles MPEG-1, layer 3 audio. If you encode Select a folder using the and buttons on the remote control, then press OK to display the list of files of JPEG files. • JPEG file: the player starts the slide show with the JPEG file you - RCA DRC8000N | User Guide - Page 44
This page intentionally left blank. - RCA DRC8000N | User Guide - Page 45
Chapter 5 Menu System • Overview of the DVD Recorder's Menu System • Watch TV Menu • GUIDE Plus+ Menu • Disc Menu • Disc Library Menu • Timer Menu • Setup Menu • Memory Card Menu Graphics contained within this User's Guide are for representation only. Some of the menu screens, buttons, and display - RCA DRC8000N | User Guide - Page 46
DVD Recorder's menu system, you'll see arrows on the on-screen menu bars.These arrows indicate you can use the correlating arrow buttons on the remote control the previous menu. Watch TV GUIDE Plus+ Disc Disc Library Timers Setup Play Disc Disc Title Menu Player Menu Playlist Disc Options To start - RCA DRC8000N | User Guide - Page 47
press OK. Note: Not all DVD players are able to play DVD+R and DVD+RW discs. Check the DVD player's owner's manual. The DVD Recorder's Player Menu shows how a DVD+R or DVD+RW disc menu will appear in another DVD player. Note: not all DVD players support DVD+R and DVD+RW discs. Playlist: (available - RCA DRC8000N | User Guide - Page 48
The Menu System Watch TV GUIDE Plus+ Disc Disc Library Timers Setup Play Disc Disc Title Menu Player Menu Playlist Disc Options To fashion. 4 x 3 Standard 16 x 9 16 x 9 - Choose this setting if your DVD Recorder is connected to a widescreen TV. If you choose this setting and you don't have a - RCA DRC8000N | User Guide - Page 49
is shipped unlocked without any rating limits set. If you want to use the Parental Control feature, set Ratings Limits and then lock the player. Don't confuse the DVD Recorder's Parental Control feature with a parental control feature that may be in your TV, often referred to as V-Chip.The ratings - RCA DRC8000N | User Guide - Page 50
as black level settings and dimmer options for the front display of your DVD Recorder. Digital Output: If you connected your DVD Recorder to a receiver via the DIGITAL AUDIO OUT jack (COAXIAL or OPTICAL) on the back of the player, choose the type of receiver (or decoder) you have: Dolby Digital and - RCA DRC8000N | User Guide - Page 51
Quality Smart Record Parental Control System Options Recording Options Disc Options Languages Display Installation Audio Subtitles Disc Chapter 5: The Menu System Recording Options: Recording Quality: Similar to quality settings on a VCR, you tell the DVD Recorder what quality you - RCA DRC8000N | User Guide - Page 52
interactive setup, you can set the DVD Recorder's clock using the number buttons on the remote and the arrow buttons to navigate. Follow the onscreen instructions. Note: In order for Timer Recordings to work, you must set the clock to the correct time and date. Channel List: Enables you to change - RCA DRC8000N | User Guide - Page 53
Chapter 6 Additional Information • Troubleshooting • Handling Cautions • Maintenance of Cabinet • Explanation of Jacks and Cables • Limited Warranty • Accessory Information • Copying content from DVD+R or DVD+RW disc to VCR videocassette • Copying VCR videocassette to a DVD+R or DVD+RW disc • Setup - RCA DRC8000N | User Guide - Page 54
the remote control - keep pressing both buttons for approximately 3 seconds (until the icon disappears from the front panel display). Release both buttons (the player should be unlocked). If that doesn't work, try resetting the DVD Recorder (instructions are listed below). • Reset the DVD Recorder - RCA DRC8000N | User Guide - Page 55
for instructions) • Some discs have defects that cause them to jump from one scene to the next. • Turn the PROG SCAN switch on the back of the DVD Recorder to the "off" position.This switch should only be turned on if you've connected the DVD Recorder to a television that uses progressive scanning - RCA DRC8000N | User Guide - Page 56
universal remote control that came with your DVD Recorder is already programmed to operate most RCA, GE, and Proscan TVs and satellite receivers.You can program it to operate many other brands and models of TVs, cable boxes, and digital satellite receivers. However, the remote doesn't support all - RCA DRC8000N | User Guide - Page 57
and the player's internal parts may be damaged. • Don't put any container filled with liquid or any small metal objects on the DVD Recorder. • Don cracked or warped) discs. Cleaning Discs • Dirty discs can cause reduced video and audio performance. Always keep discs clean by wiping them gently with - RCA DRC8000N | User Guide - Page 58
cable carries only the picture signal, not the sound. AUDIO OUT R VIDEO OUT L Audio/Video Jacks and Cables (RCA-type) Audio These jacks are used to send the audio from the disc you're playing in the DVD Recorder to the TV.The audio jacks and cables are often color-coded (red for right audio - RCA DRC8000N | User Guide - Page 59
units begins with the first rental or 45 days from date of shipment to the rental firm, whichever comes first. What we will do: • Pay any Authorized RCA Service Center the labor charges to repair your DVD Recorder. • Pay any Authorized RCA Service Center for the new or, at our option, refurbished - RCA DRC8000N | User Guide - Page 60
, or limitations on how long an implied warranty lasts, so the above limitations or exclusions may not apply to you. • This warranty gives you specific legal rights, and you also may have other rights that vary from state to state. If you purchased your product outside the United States: • This - RCA DRC8000N | User Guide - Page 61
, go on-line to www.rca.com reset off busy protected wiring Optical Plug DVD Recorder, or copy them to a DVD+RW disc. Other compatible card readers are available at retailers.Your DVD Recorder is compatible with current Class Compatible USB Mass Storage Devices that are USB 1.1 Remote Control - RCA DRC8000N | User Guide - Page 62
Chapter 6: Additional Information DVD Recorder INPUT VIDEO OUTPUT VIDEO RF ANTENNA/CABLE INPUT L AUDIO R S-VIDEO IN L AUDIO R S-VIDEO OUT DIGITAL AUDIO OUT COAXIAL OPTICAL COMPONENT VIDEO OUTPUT Y G-LINK IR SAT Pb Pr PROG. SCAN ON OFF Coaxial cable To cable or antenna OUT TO TV IN - RCA DRC8000N | User Guide - Page 63
videocassette you want to record onto disc into the VCR, and cue it up. 8. Tune the DVD Recorder to its Video Input Channel (press the DVD button and then the INPUT button on the DVD Recorder's remote control). 9. Put a DVD+R or DVD+RW disc into the DVD Recorder, and press RECORD. 10. Press PLAY on - RCA DRC8000N | User Guide - Page 64
Visit our website at www.rca.com Please do not send any products to the Indianapolis address listed in this manual or on the carton.This will only add delays in service for your product. Thomson Inc. 10330 North Meridian Street Indianapolis, IN 46290 ©2003 Thomson Inc. Trademark(s) ® Registered
-
 1
1 -
 2
2 -
 3
3 -
 4
4 -
 5
5 -
 6
6 -
 7
7 -
8
-
9
-
10
-
11
-
12
-
13
-
14
-
15
-
16
-
17
-
18
-
19
-
20
-
21
-
22
-
23
-
24
-
25
-
26
-
27
-
28
-
29
-
30
-
31
-
32
-
33
-
34
-
35
-
36
-
37
-
38
-
39
-
40
-
41
-
42
-
43
-
44
-
45
-
46
-
47
-
48
-
49
-
50
-
51
-
52
-
53
-
54
-
55
-
56
-
57
-
58
-
59
-
60
-
61
-
62
-
63
-
64
 |
 |
DVD Recorder
User’s Guide
Changing Entertainment. Again.
DRC8000N