RCA DRC8000N User Guide - Page 19
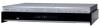
Front of the DVD Recorder - progressive scan dvd recorder player
 |
UPC - 034909220382
View all RCA DRC8000N manuals
Add to My Manuals
Save this manual to your list of manuals |
Page 19 highlights
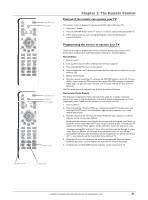
Chapter 1: Connections and Setup OPTICAL - connect an optical cable (SPDIF) to the OPTICAL jack on the DVD Recorder and Digital Audio Optical Input jack on your receiver. COAXIAL - connect a digital coaxial cable to this jack and to the Digital Audio Coaxial Input jack on your receiver.The cable is not a black coaxial cable, but an RCA-type cable. G-LINK: If you have a cable box connected, connect the G-Link Cable (provided) to this jack in order for the DVD Recorder to control the cable box for timer recordings and program listings. For instructions, go to page 11. IRA SAT: If you have a satellite receiver connected, connect the G-Link Cable (provided) to this jack in order for the DVD Recorder to control the satellite receiver for timer recordings. For instructions, go to page 11. PROG. SCAN switch - If you've connected your DVD Recorder to a TV that uses progressive scanning to display the image via the Y, Pb, Pr jacks, turn the switch to the "on" position for progressive scan playback of DVD discs.Typically, only some High Definition Televisions and high-end multimedia monitors use progressive scanning. Leave the switch in the OFF position for S-VIDEO or regular VIDEO (yellow) connections. Note: If you turn the PROG SCAN switch on, and your TV isn't capable of progressive scanning you won't see a clear picture on the TV screen. Additionally, when playing DVDs you won't see any picture- press STOP (the main menu appears) and turn the PROG SCAN switch to the OFF position.Try playing the disc again. COMPONENT VIDEO OUTPUT (Y, Pb, Pr): Some high-end TVs and monitors have Component Video Input jacks.The cables that send the video signal through these Output Jacks provide the highest resolution because the video signal is divided into 3 separate parts. As with VIDEO and S-VIDEO, COMPONENT VIDEO (Y, Pb, Pr) only carries the picture signal so you need to connect the audio cables so you'll hear the sound. If your TV has COMPONENT INPUT jacks, use three video grade cables to connect the DVD Recorder to these jacks on the TV to get the best picture quality. Open the door to access the front audio video input jacks (INPUT 2) and the USB port. STANDBY/ON INPUT - + VOLUME DVD / VIDEO / CD / MP3 PLAYER HARD DISC DRIVE RECORDER DRS 7000 OPEN/CLOSE PLAY PAUSE STOP RECORD PR- PR+ Front of the DVD Recorder Underneath the door: INPUT 2:Audio/Video jacks - These Input Jacks are provided for convenience when you are connecting a temporary component, such as a camcorder. S-VIDEO- If a component you're connecting, such as a camcorder, has an S-Video Output jack connect it to this jack for picture quality that is better than regular video (yellow). Remember, you still have to connect audio cables to hear sound. USB Input- Connect a compatible Card Reader so you can view and/or copy music or pictures. Go to page 59 to find out which Card Readers are compatible with this product. STANDBY/ON - Turns the DVD Recorder on and off. INPUT - Accesses different Video Input Channels (this is the "channel" to which you tune the DVD Recorder so you can see the signal coming from a component that is connected to the different Input Jacks on the DVD Recorder). For example, if your camcorder is connected to the Audio and Video Input jacks on the front of the DVD Recorder (behind the door), you would press the INPUT button until INPUT 2-Front appears. OPEN/CLOSE - Opens and closes the disc tray. PLAY - Press to begin playback. PAUSE - Pauses playback and/or recording. STOP - Stops playback and/or recording. RECORD - Records content to a DVD disc (DVD+R or DVD+RW discs only). CH- (channel down) - Goes to the previous channel in the channel list when you're watching TV. SKIP - When playing a disc, goes to the beginning of the preceding title, chapter, or track on a disc. CH+ (channel up) - Goes to the next channel in the channel list when you're watching TV. SKIP - When playing a disc, goes to the beginning of the next title, chapter, or track on a disc (in effect,"skipping" the title, chapter, or track). SEARCH - Reverse and fast forward buttons (search backwards or search forwards). Graphics contained within this publication are for representation only. 17
-
 1
1 -
2
-
3
-
4
-
5
-
6
-
7
-
8
-
9
-
10
-
11
-
12
-
13
-
 14
14 -
 15
15 -
 16
16 -
 17
17 -
 18
18 -
 19
19 -
 20
20 -
 21
21 -
 22
22 -
 23
23 -
 24
24 -
25
-
26
-
27
-
28
-
29
-
30
-
31
-
32
-
33
-
34
-
35
-
36
-
37
-
38
-
39
-
40
-
41
-
42
-
43
-
44
-
45
-
46
-
47
-
48
-
49
-
50
-
51
-
52
-
53
-
54
-
55
-
56
-
57
-
58
-
59
-
60
-
61
-
62
-
63
-
64
 |
 |
