Ricoh Aficio MP 2000 Scanner Reference - Page 116
Scan Settings When Using Twain Scanner, Setting Original Orientation on the TWAIN Scanner
 |
View all Ricoh Aficio MP 2000 manuals
Add to My Manuals
Save this manual to your list of manuals |
Page 116 highlights
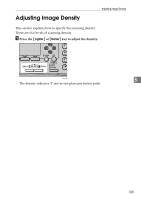
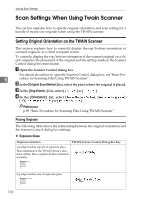
Various Scan Settings Scan Settings When Using Twain Scanner This section explains how to specify original orientation and scan setting for a bundle of mixed size originals when using the TWAIN scanner. Setting Original Orientation on the TWAIN Scanner This section explains how to correctly display the top/bottom orientation of scanned originals on a client computer screen. To correctly display the top/bottom orientation of the scanned original on a client computer, the placement of the original and the settings made in the Scanner Control dialog box must match. A Open the Scanner Control dialog box. For details about how to open the Scanner Control dialog box, see "Basic Pro- 5 cedure for Scanning Files Using TWAIN Scanner". B In the [Original Scan Method:] list, select the place where the original is placed. C In the [Orig.Orientn.:] list, select [ ] or [ ]. D In the [Orientation:] list, select [ / ], [ / ], [ / ] or [ / ]. Reference p.89 "Basic Procedure for Scanning Files Using TWAIN Scanner" Placing Originals The following table shows the relationship between the original orientation and the Scanner Control dialog box settings: ❖ Exposure Glass Original orientation TWAIN Scanner Control Dialog Box Key top edge touches top left of exposure glass This orientation is the TWAIN driver's standard setting. Place originals in this orientation normally. top edge touches rear of exposure glass 110
-
 1
1 -
2
-
3
-
4
-
5
-
6
-
7
-
8
-
9
-
10
-
11
-
12
-
13
-
14
-
15
-
16
-
17
-
18
-
19
-
20
-
21
-
22
-
23
-
24
-
25
-
26
-
27
-
28
-
29
-
30
-
31
-
32
-
33
-
34
-
35
-
36
-
37
-
38
-
39
-
40
-
41
-
42
-
43
-
44
-
45
-
46
-
47
-
48
-
49
-
50
-
51
-
52
-
53
-
54
-
55
-
56
-
57
-
58
-
59
-
60
-
61
-
62
-
63
-
64
-
65
-
66
-
67
-
68
-
69
-
70
-
71
-
72
-
73
-
74
-
75
-
76
-
77
-
78
-
79
-
80
-
81
-
82
-
83
-
84
-
85
-
86
-
87
-
88
-
89
-
90
-
91
-
92
-
93
-
94
-
95
-
96
-
97
-
98
-
99
-
100
-
101
-
102
-
103
-
104
-
105
-
106
-
107
-
108
-
109
-
110
-
 111
111 -
 112
112 -
 113
113 -
 114
114 -
 115
115 -
 116
116 -
 117
117 -
 118
118 -
 119
119 -
 120
120 -
 121
121 -
122
-
123
-
124
-
125
-
126
-
127
-
128
-
129
-
130
-
131
-
132
 |
 |
