Ricoh Aficio MP 2500 Facsimile Reference - Page 68
Specifying a destination using the Quick Dial key, Press, to switch the destination type between
 |
View all Ricoh Aficio MP 2500 manuals
Add to My Manuals
Save this manual to your list of manuals |
Page 68 highlights
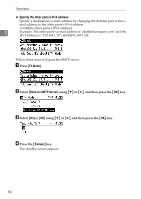
Transmission Specifying a destination using the Quick Dial key A Press [ ] to switch the destination type between and . 1 B Press the Quick Dial key in which the destination's number is programmed. ARX031S Flip the Quick Dial Flip Plate down to access Quick Dial keys 01 through 16, flip up to access keys 17 through 32. The destination's name is shown on the display. If you make a mistake, press the {Clear/Stop} key and try again. To select more destinations, repeat steps A and B. When you add destinations, if you switch the destination type between and , press [Add Dest], and then repeat steps A and B. C Press the {Start} key. Note ❒ Destinations programmed can be checked using "Destination List" in "Ad- ministrator Tools" in "System Settings". ❒ You do not have to press [Add Dest] when adding the same type of destina- tion as you specified in step A using the Quick Dial keys. Reference "System Settings", General Settings Guide "Registering Addresses and Users for Facsimile/Scanner Functions", General Settings Guide 58
-
 1
1 -
2
-
3
-
4
-
5
-
6
-
7
-
8
-
9
-
10
-
11
-
12
-
13
-
14
-
15
-
16
-
17
-
18
-
19
-
20
-
21
-
22
-
23
-
24
-
25
-
26
-
27
-
28
-
29
-
30
-
31
-
32
-
33
-
34
-
35
-
36
-
37
-
38
-
39
-
40
-
41
-
42
-
43
-
44
-
45
-
46
-
47
-
48
-
49
-
50
-
51
-
52
-
53
-
54
-
55
-
56
-
57
-
58
-
59
-
60
-
61
-
62
-
 63
63 -
 64
64 -
 65
65 -
 66
66 -
 67
67 -
 68
68 -
 69
69 -
 70
70 -
 71
71 -
 72
72 -
 73
73 -
74
-
75
-
76
-
77
-
78
-
79
-
80
-
81
-
82
-
83
-
84
-
85
-
86
-
87
-
88
-
89
-
90
-
91
-
92
-
93
-
94
-
95
-
96
-
97
-
98
-
99
-
100
-
101
-
102
-
103
-
104
-
105
-
106
-
107
-
108
-
109
-
110
-
111
-
112
-
113
-
114
-
115
-
116
-
117
-
118
-
119
-
120
-
121
-
122
-
123
-
124
-
125
-
126
-
127
-
128
-
129
-
130
-
131
-
132
-
133
-
134
-
135
-
136
-
137
-
138
-
139
-
140
-
141
-
142
-
143
-
144
-
145
-
146
-
147
-
148
-
149
-
150
-
151
-
152
-
153
-
154
-
155
-
156
-
157
-
158
-
159
-
160
-
161
-
162
-
163
-
164
-
165
-
166
-
167
-
168
-
169
-
170
-
171
-
172
-
173
-
174
-
175
-
176
-
177
-
178
-
179
-
180
-
181
-
182
-
183
-
184
-
185
-
186
-
187
-
188
-
189
-
190
-
191
-
192
-
193
-
194
-
195
-
196
-
197
-
198
-
199
-
200
-
201
-
202
-
203
-
204
 |
 |
