Ricoh C222DN Operating Instructions - Page 19
Finish, Account Control, Allow, Printers, New Hardware, Found, Device Driver Wizard
 |
UPC - 026649060113
View all Ricoh C222DN manuals
Add to My Manuals
Save this manual to your list of manuals |
Page 19 highlights
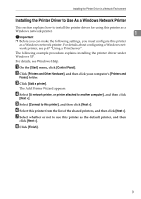
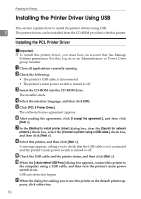
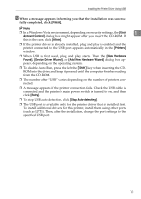
Installing the Printer Driver Using USB L When a message appears informing you that the installation was success- fully completed, click [Finish]. Note ❒ In a Windows Vista environment, depending on security settings, the [User 1 Account Control] dialog box might appear after you insert the CD-ROM. If this is the case, click [Allow]. ❒ If the printer driver is already installed, plug and play is enabled and the printer connected to the USB port appears automatically in the [Printers] window. ❒ When USB is first used, plug and play starts. Then the [New Hardware Found], [Device Driver Wizard], or [Add New Hardware Wizard] dialog box appears, depending on the operating system. ❒ To disable Auto Run, press the left the {Shift} key when inserting the CDROM into the drive and keep it pressed until the computer finishes reading from the CD-ROM. ❒ The number after "USB" varies depending on the number of printers connected. ❒ A message appears if the printer connection fails. Check the USB cable is connected and the printer's main power switch is turned to on, and then click [Retry]. ❒ To stop USB auto detection, click [Stop Auto-detecting]. ❒ The USB port is available only for the printer driver that is installed first. To install additional drivers for this printer, install them using other ports (such as LPT1). Then, after the installation, change the port settings to the specified USB port. 11
-
 1
1 -
2
-
3
-
4
-
5
-
6
-
7
-
8
-
9
-
10
-
11
-
12
-
13
-
 14
14 -
 15
15 -
 16
16 -
 17
17 -
 18
18 -
 19
19 -
 20
20 -
 21
21 -
 22
22 -
 23
23 -
 24
24 -
25
-
26
-
27
-
28
-
29
-
30
-
31
-
32
-
33
-
34
-
35
-
36
-
37
-
38
-
39
-
40
-
41
-
42
-
43
-
44
-
45
-
46
-
47
-
48
-
49
-
50
-
51
-
52
-
53
-
54
-
55
-
56
-
57
-
58
-
59
-
60
-
61
-
62
-
63
-
64
-
65
-
66
-
67
-
68
-
69
-
70
-
71
-
72
-
73
-
74
-
75
-
76
-
77
-
78
-
79
-
80
-
81
-
82
-
83
-
84
-
85
-
86
-
87
-
88
-
89
-
90
-
91
-
92
-
93
-
94
-
95
-
96
-
97
-
98
-
99
-
100
-
101
-
102
-
103
-
104
-
105
-
106
-
107
-
108
-
109
-
110
 |
 |
