Ricoh P 801 Setup Guide
Ricoh P 801 Manual
 |
View all Ricoh P 801 manuals
Add to My Manuals
Save this manual to your list of manuals |
Ricoh P 801 manual content summary:
- Ricoh P 801 | Setup Guide - Page 1
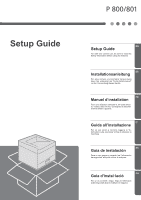
Setup Guide EN Setup Guide For safe and correct use, be sure to read the Safety Information before using the machine. DE Installationsanleitung Für eine sichere und korrekte Verwendung lesen Sie - Ricoh P 801 | Setup Guide - Page 2
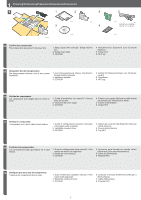
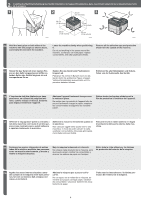
-127 V, 11 A, 60 Hz EAT028 DVK204 EBS100 EN Confirm the components. The components are stored in the inner box. 1. Setup Guide (This manual) / Safety Information 2. Waste toner bottle 3. CD-ROM 4. Attachment for Statement (only for North America) 5. Power cord 6. NFC tag DE Überprüfen Sie die - Ricoh P 801 | Setup Guide - Page 3
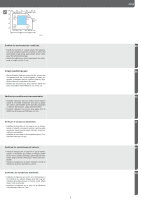
2 DVL205 Confirm the environmental conditions. • Install the machine in a place where the tempera- ture and humidity around the machine is within the permissible range (white area) shown above. (Blue area: Recommended range) • Install the machine on a level spot where the difference in height is - Ricoh P 801 | Setup Guide - Page 4
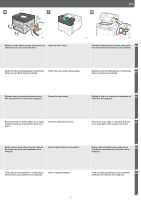
2. Installing the Machine/Aufstellung des Geräts/Installation de l'appareil/Installazione della macchina/Instalación de la máquina/Instal·lació de la màquina 1 2 40 cm 3 (15.7 inches) 30 cm (11.8 inches) 20 cm (7.8 inches) EBS023 30 cm (11.8 inches) 50 cm (19.6 inches) EBS024 EBS025 EN - Ricoh P 801 | Setup Guide - Page 5
4 5 EBS026 Remove all the adhesive tape and protective Open the front cover. sheet from the rear of the machine. Setup 6 1 2 EBS027 EBS028 Remove all the protective sheet and protec- EN tive material from the inside of the machine. Entfernen Sie alle Klebebänder und Schutzfolien von der Rü - Ricoh P 801 | Setup Guide - Page 6
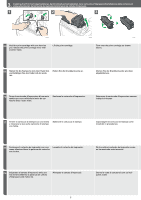
3. Installing the Print Cartridge/Installieren der Druckkartusche/Installation de la cartouche d'impression/Installazione della cartuccia di stampa/Instalación del cartucho de impresión/Instal·lació del cartutx d'impressió 1 1 2 2 3 EBS029 EN Hold the print cartridge with one hand as you - Ricoh P 801 | Setup Guide - Page 7
machine. EN Press the print cartridge until it clicks into place. Schütteln Sie die Kartusche mindestens zehn Mal nach links und rechts, damit der Toner im Inneren gleichmäßig verteilt wird. Drehen Sie die Druckkartusche wie oben abgebildet um. Legen Sie die Druckkartusche in das Gerät DE ein - Ricoh P 801 | Setup Guide - Page 8
71 EN DE FR IT ES CA Setup 7 8 2 EBS040 EBS032 EBS033 Lock the lever of the print cartridge. Close the front cover. Verriegeln Sie die Kartusche mit dem Hebel. Schließen Sie die vordere Abdeckung. Bloquez le levier de la cartouche d'impression. Refermez le capot avant. Bloccare la leva - Ricoh P 801 | Setup Guide - Page 9
ampolla de tòner residual 1 2 13 2 1 Open the left cover. EAT053 2 EAT054 EAT055 Open the cap of the waste toner bottle and Press the waste toner bottle until it clicks EN insert the waste toner bottle into the ma- into place. chine. Be sure to store the cap as well. Öffnen Sie die - Ricoh P 801 | Setup Guide - Page 10
4 5 EAT056 EBS101 EN Close the left cover. Affix the NFC tag. DE Schließen Sie die linke Abdeckung. Bringen Sie den NFC-Aufkleber an. FR Fermez-le. Coller l'étiquette NFC. IT Chiudere lo sportello di sinistra. Applicare il tag NFC. ES Cierre la tapa izquierda. Adhiera la etiqueta NFC. - Ricoh P 801 | Setup Guide - Page 11
délicatement le magasin jusqu'à ce qu'il s'arrête, soulevez l'avant du magasin, puis retirez-le de l'appareil. Pincez la pince du guide latéral, puis faites- Pincez le guide arrière et faites-le coulisser FR la coulisser pour l'ajuster au format papier. vers l'intérieur pour l'ajuster au format pa - Ricoh P 801 | Setup Guide - Page 12
4 5 6 EN Fan the paper. EAT059 Load the paper print side down EAT073 EAT074 • Do not stack paper over the limit mark. DE Fächern Sie das Papier auf. FR Déramez le papier. IT Smazzare la carta. Legen Sie das Papier mit der Druckseite nach unten zeigend ein. • Stapeln Sie Papier nicht über - Ricoh P 801 | Setup Guide - Page 13
schieben Sie es dann vorsichtig bis zum Anschlag in das Gerät. Ajustez les guides papier de sorte qu'il ne reste plus aucun espace. Faites tourner le le magasin soient visibles à travers la fenêtre. Regolare le guide della carta per colmare eventuali spazi. Ruotare il quadrante del formato - Ricoh P 801 | Setup Guide - Page 14
6. Turning the Power On/Einschalten des Geräts/Mise sous tension/Accensione della macchina/Cómo encender el dispositivo/Encesa del dispositiu 1 2 3 1 2 EAT063 EAT064 EAT065 EN Remove the power connector cover from the Plug the power cord into the machine and lower left hand corner of the - Ricoh P 801 | Setup Guide - Page 15
La macchina si accende. Dopo la schermata iniziale, compare la schermata di selezione della lingua. Per installare un'opzione, vedere Installazione nel manuale online. Pulse el interruptor de alimentación principal. La máquina se pone en funcionamiento. Tras la pantalla de inicio aparece la pantalla - Ricoh P 801 | Setup Guide - Page 16
want to use, and then press the [OK] key. English screens are used in this manual for example. Press the right selection key ([Start]). Press the [ ] or [ ] tecla [OK]. Pulse la tecla de selección derecha ([Inicio]). En este manual se utilizan las pantallas en inglés a modo de ejemplo. Pulse la - Ricoh P 801 | Setup Guide - Page 17
9. Date and Time/Datum und Uhrzeit/Date et heure/Data e ora/Fecha y hora/Data i hora 1 2 3 DYR017 DYR018 4 DYR019 Press the [ ] or [ ] key to Press the [ ] or [ ] key to enter Press the [ ] or [ ] key to enter EN select [Date and Time], and then the date, month, and year, and the time, - Ricoh P 801 | Setup Guide - Page 18
10. Daylight Saving Time/Sommerzeit/Heure d'été/Ora legale/Horario de verano/Horari d'estiu 1 2 3 4 DYR020 DYR022 DYR023 DYR024 DYR021 EN Press the [ ] or [ ] key to select [Daylight Saving Time], and then press the [OK] key. Press the [ ] or [ ] key to select [Active] or [Inactive], and - Ricoh P 801 | Setup Guide - Page 19
LAN sense fils) - → Consulteu la pàgina 23. FR Only for machines that support Wireless LAN./Nur für Geräte, die Wireless LAN unterstützen./ Uniquement pour les selection key ([Exit]), and then go to "12. Installing the Printer Driver". → See page 26. Drücken Sie auf die rechte Auswahltaste - Ricoh P 801 | Setup Guide - Page 20
11. Network (Wired LAN)/Netzwerk (Kabelgebundenes LAN)/Réseau (LAN filaire)/Rete (LAN cablata)/Red (LAN con cable)/Xarxa (LAN amb fil) 1 2 3 4 DYR025 DYR026 DYR027 EBS035 EN Press the [ ] or [ ] key to select [Network], and then press the [OK] key. Press the [ ] or [ ] key to select [LAN - Ricoh P 801 | Setup Guide - Page 21
or [ ] key to select [USB Port], and then press the [OK] EN key ([Exit]). key. Obtains an IP address automatically. Manual Configuration: Specify an IP address manually. You can select a value by pressing key. Drücken Sie auf die rechte Auswahltaste ([Weiter]). Wählen Sie das Verfahren zum - Ricoh P 801 | Setup Guide - Page 22
9 10 11 12 DYR042 DYR031 DYR032 DYR033 DYR049 DYR034 EN Press the [ ] or [ ] key to select [Active] or [Inactive], and then press the [OK] key. Select [Active] if you will connect the ma- chine and your computer via USB connec- tion. When the network connection is complete, press the - Ricoh P 801 | Setup Guide - Page 23
push button that is on your For details, see Setup in the web manual. router, the machine is connected to the network. PIN Code Method: de la pantalla i connecteu-vos a la xarxa. Per obtenir més informació, consulteu el manual web. Mètode de botó d'ordre: Quan premeu el botó d'ordre del router, - Ricoh P 801 | Setup Guide - Page 24
4 Wireless LAN setting was 5 complete. Exit DYR038 6 DYR043 7 DYR042 DYR044 EN Confirm the message on the screen, and then press the right selection key ([Exit]). Press the [ ] or [ ] key to select [USB Port], and then press the [OK] key. Press the [ ] or [ ] key to select [Active] or [ - Ricoh P 801 | Setup Guide - Page 25
Initial Settings 8 9 10 11 DYR045 DYR039 DYR032 DYR033 DYR049 DYR034 Press the [ ] or [ ] key to When the network connection is Confirm the message on the Press the right selection key EN select [Active] or [Inactive], and complete, press the right selec- screen, and then press the - Ricoh P 801 | Setup Guide - Page 26
./ Especifique cómo se instalará el driver de impresora./ Especificar com instal·lar el driver d'impressora./ This chapter explains how to install the printer driver when using Windows. If you are using OS X, see Driver Installation Guide in the web manual. In diesem Kapital wird die Installation - Ricoh P 801 | Setup Guide - Page 27
12.Installing the Printer Driver (CD-ROM)/Installieren des Druckertreibers (CD-ROM)/Installation du pilote d'impression (CD-ROM)/Installazione del driver della stampante (CD-ROM)/Instalación del driver de impresora (CD-ROM)/Instal·lació del driver d'impressora (CD-ROM) 1 2 3 4 DVK238 Insert - Ricoh P 801 | Setup Guide - Page 28
the cable until you are instructed to do so on the screen. • If you connect the computer via a Wireless LAN, do not connect any cables, even though the message to do so appears during the installation. When the [Install Printer Driver] screen appears, select [Add a new printer] and proceed the - Ricoh P 801 | Setup Guide - Page 29
(Online)/Installieren des Druckertreibers (Online)/Installing the Printer Driver (Online)/Installazione del driver della stampante (online)/Instalación del driver de impresora (Online)/ Instal·lació del driver d'impressora (en línia) 1 2 3 4 DVK238 Insert the CD-ROM into your computer. If - Ricoh P 801 | Setup Guide - Page 30
connect the computer via a network or by a USB cable. • If you connect the computer by a USB cable, do not connect the cable until you are instructed to do so on the screen. • If you connect the computer by Wireless LAN, do not connect any cables, even though the message to do - Ricoh P 801 | Setup Guide - Page 31
- Ricoh P 801 | Setup Guide - Page 32
© 2019 EN GB DE DE FR FR IT IT ES ES CA ES M0CH-7052A
-
 1
1 -
 2
2 -
 3
3 -
 4
4 -
 5
5 -
 6
6 -
 7
7 -
8
-
9
-
10
-
11
-
12
-
13
-
14
-
15
-
16
-
17
-
18
-
19
-
20
-
21
-
22
-
23
-
24
-
25
-
26
-
27
-
28
-
29
-
30
-
31
-
32
 |
 |
Setup Guide
Setup Guide
For safe and correct use, be sure to read the
Safety Information before using the machine.
EN
Installationsanleitung
Für eine sichere und korrekte Verwendung
lesen Sie unbedingt die “Sicherheitshinweise”
vor der Verwendung dieses Geräts.
DE
Manuel d’installation
Pour une utilisation correcte et en toute sécuri-
té, veillez à bien lire les “Consignes de sécurité”
avant d’utiliser l’appareil.
FR
Guida all’installazione
Per un uso sicuro e corretto, leggere le “In-
formazioni sulla sicurezza” prima di utilizzare la
macchina.
IT
Guía de instalación
Para un uso seguro y correcto, lea “Información
de seguridad” antes de utilizar la máquina.
ES
Guia d’instal·lació
Per un ús correcte i segur, llegiu la Informació
sobre seguretat abans d’utilitzar la màquina.
CA