Samsung S24B300HL User Manual Ver.1.0 (English) - Page 57
H-Position & V-Position
 |
View all Samsung S24B300HL manuals
Add to My Manuals
Save this manual to your list of manuals |
Page 57 highlights
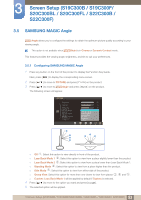
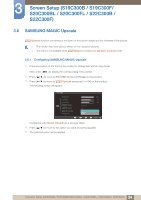
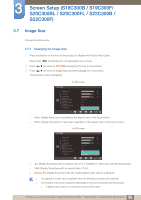
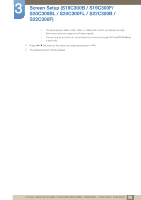
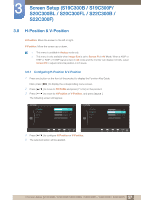
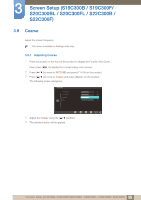
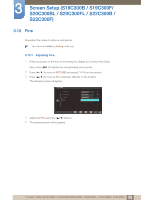
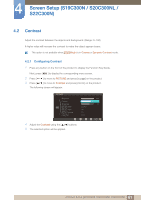
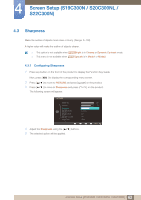
3 Screen Setup (S19C300B / S19C300F/ S20C300BL / S20C300FL / S22C300B / S22C300F) 3.8 H-Position & V-Position H-Position: Move the screen to the left or right. V-Position: Move the screen up or down. This menu is available in Analog mode only. This menu is only available when Image Size is set to Screen Fit in AV Mode. When a 480P or 576P or 720P or 1080P signal is input in AV mode and the monitor can display normally, select Screen Fit to adjust horizontal position in 0-6 levels. 3.8.1 Configuring H-Position & V-Position 1 Press any button on the front of the product to display the Function Key Guide. Next, press [MENU] to display the corresponding menu screen. 2 Press [ 3 Press [ ] to move to PICTURE and press [ ] on the product. ] to move to H-Position or V-Position, and press [ ]. The following screen will appear. PICTURE H-Position V-Position Coarse Fine 50 50 2160 0 PICTURE H-Position V-Position Coarse Fine 50 50 2160 0 RReettuurrnn AAddjjuusstt AEEAAUAUAUnnTUTUTttOOTeeOTOOrr 4 Press [ ] to configure H-Position or V-Position. 5 The selected option will be applied. RReettuurrnn AAddjjuusstt AEEAAUAUAUnnTUTUTttOOTeeOTOOrr 57 3 Screen Setup (S19C300B / S19C300F/S20C300BL / S20C300FL / S22C300B / S22C300F)
-
 1
1 -
2
-
3
-
4
-
5
-
6
-
7
-
8
-
9
-
10
-
11
-
12
-
13
-
14
-
15
-
16
-
17
-
18
-
19
-
20
-
21
-
22
-
23
-
24
-
25
-
26
-
27
-
28
-
29
-
30
-
31
-
32
-
33
-
34
-
35
-
36
-
37
-
38
-
39
-
40
-
41
-
42
-
43
-
44
-
45
-
46
-
47
-
48
-
49
-
50
-
51
-
 52
52 -
 53
53 -
 54
54 -
 55
55 -
 56
56 -
 57
57 -
 58
58 -
 59
59 -
 60
60 -
 61
61 -
 62
62 -
63
-
64
-
65
-
66
-
67
-
68
-
69
-
70
-
71
-
72
-
73
-
74
-
75
-
76
-
77
-
78
-
79
-
80
-
81
-
82
-
83
-
84
-
85
-
86
-
87
-
88
-
89
-
90
-
91
-
92
-
93
-
94
-
95
-
96
-
97
-
98
-
99
-
100
-
101
-
102
-
103
-
104
-
105
-
106
-
107
-
108
-
109
-
110
-
111
-
112
-
113
-
114
-
115
-
116
-
117
-
118
-
119
-
120
-
121
-
122
-
123
-
124
-
125
-
126
-
127
-
128
-
129
-
130
-
131
-
132
-
133
-
134
-
135
-
136
-
137
-
138
-
139
-
140
-
141
-
142
-
143
-
144
-
145
-
146
-
147
-
148
-
149
-
150
-
151
-
152
-
153
-
154
-
155
-
156
 |
 |
