Samsung SHR-8162 User Manual - Page 13
MONITOR, Using the Numeric buttons, Changing the Remote Control ID, OVERVIEW
 |
View all Samsung SHR-8162 manuals
Add to My Manuals
Save this manual to your list of manuals |
Page 13 highlights
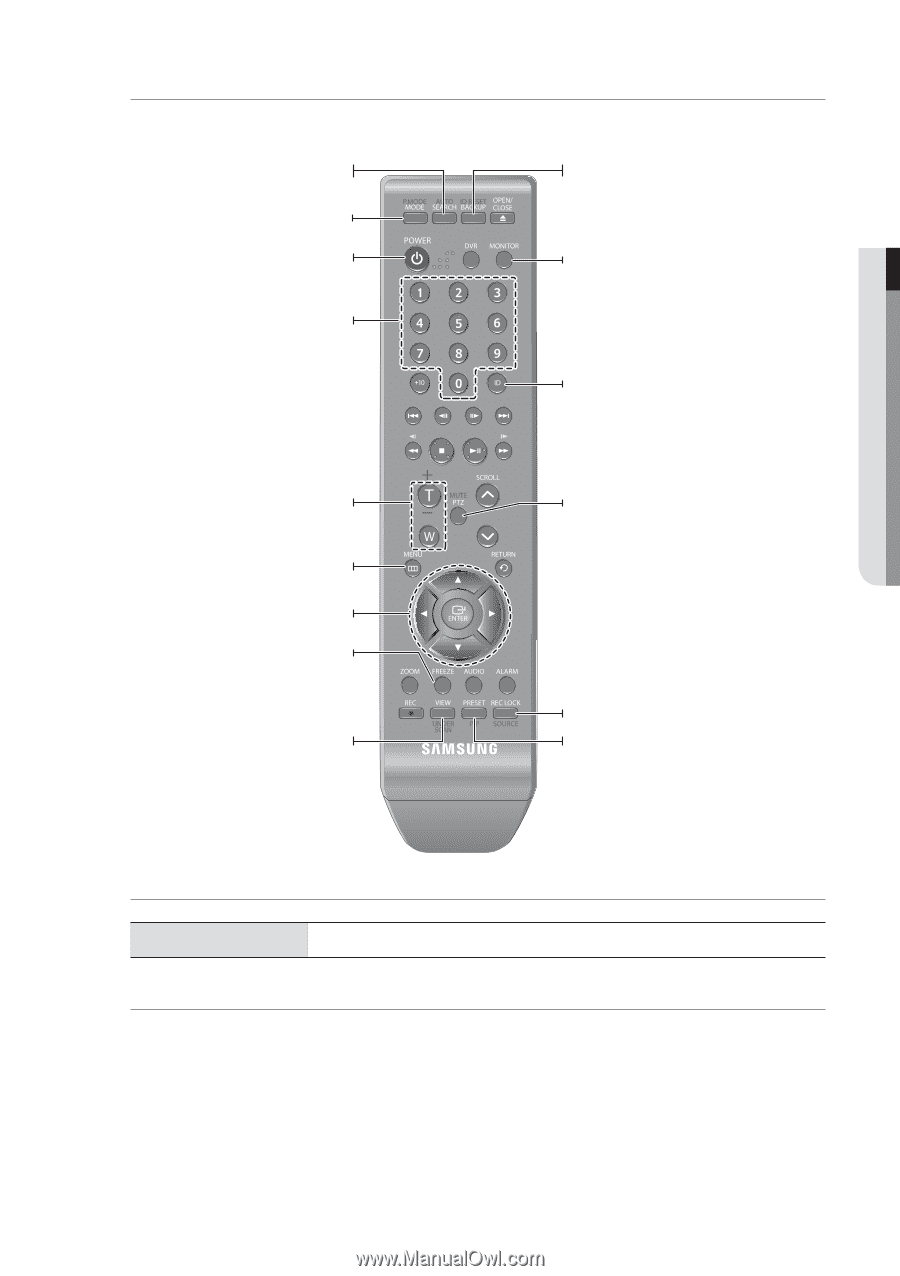
OVERVIEW MONITOR Available after switching to Monitor mode by pressing the [MONITOR] button on the remote control. AUTO Selects the screen status automaticallyĕ P.MODE Selects the screen modeĕ POWER Turns the monitor power on/offĕ ID RESET Initializes the ID value to 01. MONITOR Activates the monitor function. NUMBER [0~9] Changes the system ID. ID Sets the ID. Select 2 digits from 0 ~ 9 while pressing the ID Key. +/Adjusts the audio volumeĕ MENU Displays the Setup Menuĕ Up/Down/Left/Right ENTER Moves the cursor up/down/left/right, and runs the Select Menu. FREEZE Screen Freezeĕ UNDER SCAN Displays the video screen within a screenĕ MUTE Mutes the audio out. SOURCE Selects the input signal source. PIP Selects or deselects the PIP function. Using the Numeric buttons CHANNEL 1-9 Press any button among 1 to 9. Changing the Remote Control ID 1. Press the ID button of the remote control and check the ID displayed on the DVR screen. The factory default ID of the remote control is 00. 2. Enter 2 digits of your selection in order, while pressing the system [ID] button. 3. When ID input is done, press the system [ID] button again to check the setting. M If you want to change the remote control ID to 08: Press 0 and 8 in order while the system [ID] button is pressed. Remote control's ID and DVR's ID should be matched for proper operation. Refer to "Remote Devices". (Page 45) English _13
-
 1
1 -
2
-
3
-
4
-
5
-
6
-
7
-
 8
8 -
 9
9 -
 10
10 -
 11
11 -
 12
12 -
 13
13 -
 14
14 -
 15
15 -
 16
16 -
 17
17 -
 18
18 -
19
-
20
-
21
-
22
-
23
-
24
-
25
-
26
-
27
-
28
-
29
-
30
-
31
-
32
-
33
-
34
-
35
-
36
-
37
-
38
-
39
-
40
-
41
-
42
-
43
-
44
-
45
-
46
-
47
-
48
-
49
-
50
-
51
-
52
-
53
-
54
-
55
-
56
-
57
-
58
-
59
-
60
-
61
-
62
-
63
-
64
-
65
-
66
-
67
-
68
-
69
-
70
-
71
-
72
-
73
-
74
-
75
-
76
-
77
-
78
-
79
-
80
-
81
-
82
-
83
-
84
-
85
-
86
-
87
-
88
-
89
-
90
-
91
-
92
-
93
-
94
-
95
-
96
-
97
-
98
-
99
-
100
-
101
-
102
-
103
-
104
-
105
-
106
-
107
-
108
-
109
-
110
-
111
-
112
-
113
-
114
-
115
-
116
-
117
-
118
-
119
-
120
 |
 |