Samsung SHR-8162 User Manual - Page 36
Setting the Administrator, Using Virtual Keyboard, admin, Caps Lock, Shift
 |
View all Samsung SHR-8162 manuals
Add to My Manuals
Save this manual to your list of manuals |
Page 36 highlights
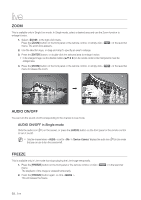
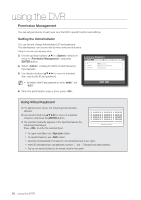
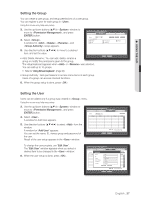
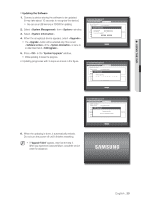
using the DVR Permission Management You can set permissions of each user over the DVR's specific function and settings. Setting the Administrator You can set and change Administrator's ID and password. The administrator can use and set all menu items and functions. Using the mouse may help easy setup. 3. Use the up/down buttons (▲▼) in window to move to , and press [ENTER] button. 4. Select . A dialog for Admin ID and Password input appears. Permission Management Admin Group User ID Password Confirm P/W admin (Number only) Setup 5. Use direction buttons to move to a desired item, and set the ID and password. M By default, initial ID and password are set to "admin", and "4321". OK Cancel 6. When the administrator setup is done, press . Using Virtual Keyboard For alphanumeric inputs, the virtual keyboard window appears. Use direction buttons to move to a desired character, and press the [ENTER] button. The selected character appears in the input field above the virtual keyboard layout. Press to enter the selected input. ` 12 3 45678 90- = q w e r t y u i o p [ ] \ Del a s d f g h j k l ; ' Caps Lock z x c v b nm , . / Shift Space Ctrl OK Cancel For upper case letters, use button. For special characters, use button. Using the virtual keyboard is the same to a normal keyboard use in your region. Admin ID only allows lower case alphabets, numbers, "." and '-'. Password only allows numbers. You can use number buttons on the remote control or front panel. 36_ using the DVR
-
 1
1 -
2
-
3
-
4
-
5
-
6
-
7
-
8
-
9
-
10
-
11
-
12
-
13
-
14
-
15
-
16
-
17
-
18
-
19
-
20
-
21
-
22
-
23
-
24
-
25
-
26
-
27
-
28
-
29
-
30
-
 31
31 -
 32
32 -
 33
33 -
 34
34 -
 35
35 -
 36
36 -
 37
37 -
 38
38 -
 39
39 -
 40
40 -
 41
41 -
42
-
43
-
44
-
45
-
46
-
47
-
48
-
49
-
50
-
51
-
52
-
53
-
54
-
55
-
56
-
57
-
58
-
59
-
60
-
61
-
62
-
63
-
64
-
65
-
66
-
67
-
68
-
69
-
70
-
71
-
72
-
73
-
74
-
75
-
76
-
77
-
78
-
79
-
80
-
81
-
82
-
83
-
84
-
85
-
86
-
87
-
88
-
89
-
90
-
91
-
92
-
93
-
94
-
95
-
96
-
97
-
98
-
99
-
100
-
101
-
102
-
103
-
104
-
105
-
106
-
107
-
108
-
109
-
110
-
111
-
112
-
113
-
114
-
115
-
116
-
117
-
118
-
119
-
120
 |
 |
