Samsung SHR-8162 User Manual - Page 42
Setting the PTZ, Brightness, Contrast, Color, Remote Devices, Device, Camera, ENTER
 |
View all Samsung SHR-8162 manuals
Add to My Manuals
Save this manual to your list of manuals |
Page 42 highlights
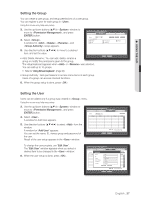
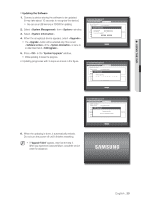
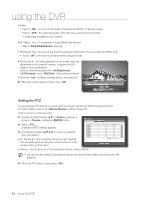
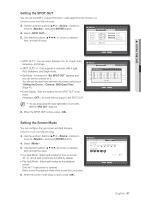
using the DVR • Audio - If set to , you can turn the audio of the channel ON/OFF on the Live screen. - If set to , the channel's audio is off on the Live screen and not recorded. Audio output is available for only 1 channel. • CH Name : Up to 15 characters including blanks are allowed. Refer to "Using Virtual Keyboard". (Page 36) • SEQ-Dwell Time: You can set the dwell time between channels for the Live screen and SPOT OUT. If set to , the channel is not listed in the Auto Sequence mode. • Screen Setup : The video appeared on the screen may vary depending on the channel's camera, configure the DVR display to your preferences. Select a channel and adjust the < (Brightness)>, < (Contrast)>, and < (Color)> of the selected channel. • Press the to initialize settings back to the default 50. 6. When the camera setup is done, press . Screen Setup CH1 50 50 OK 50 Init Cancel Apply to All CH Setting the PTZ To use Camera's PTZ functions, ID and protocols of each camera and DVR should be matched. For other settings, refer to the "Remote Devices" settings. (Page 45) Using the mouse may help easy setup. 3. Use the up/down buttons (▲▼) in window to move to , and press [ENTER] button. 4. Select . A window of PTZ settings appears. 5. Use direction buttons to move to a desired item, and select it. • ID : Set the ID of the connected camera of each channel. You can easily setup by using the numeric buttons on the remote control or front panel. Camera Camera CH 1 2 3 4 5 6 7 8 PTZ ID 0 > 1 > 2 > 3 > 4 > 5 > 6 > 7 > Protocol None None None None None None None None Previous/Next Page OK Cancel • Protocol : Set the protocol of the connected camera of each channel. M You can check the camera's ID and protocol if you turn the camera off and on after connecting it to the DVR. (Page 63) 6. When the PTZ setup is done, press . 42_ using the DVR
-
 1
1 -
2
-
3
-
4
-
5
-
6
-
7
-
8
-
9
-
10
-
11
-
12
-
13
-
14
-
15
-
16
-
17
-
18
-
19
-
20
-
21
-
22
-
23
-
24
-
25
-
26
-
27
-
28
-
29
-
30
-
31
-
32
-
33
-
34
-
35
-
36
-
 37
37 -
 38
38 -
 39
39 -
 40
40 -
 41
41 -
 42
42 -
 43
43 -
 44
44 -
 45
45 -
 46
46 -
 47
47 -
48
-
49
-
50
-
51
-
52
-
53
-
54
-
55
-
56
-
57
-
58
-
59
-
60
-
61
-
62
-
63
-
64
-
65
-
66
-
67
-
68
-
69
-
70
-
71
-
72
-
73
-
74
-
75
-
76
-
77
-
78
-
79
-
80
-
81
-
82
-
83
-
84
-
85
-
86
-
87
-
88
-
89
-
90
-
91
-
92
-
93
-
94
-
95
-
96
-
97
-
98
-
99
-
100
-
101
-
102
-
103
-
104
-
105
-
106
-
107
-
108
-
109
-
110
-
111
-
112
-
113
-
114
-
115
-
116
-
117
-
118
-
119
-
120
 |
 |