Samsung SMX-F50SN User Manual (user Manual) (ver.1.0) (English) - Page 51
Recording options, CHANGING THE MENU SETTINGS
 |
UPC - 036725303942
View all Samsung SMX-F50SN manuals
Add to My Manuals
Save this manual to your list of manuals |
Page 51 highlights
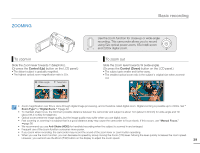
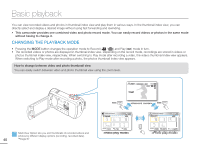
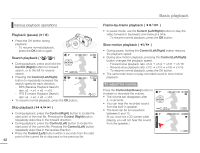
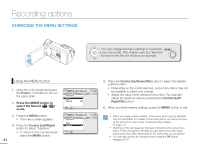
Recording options CHANGING THE MENU SETTINGS You can change the menu settings to customize your camcorder. This chapter uses the "Aperture" function in the Record mode as an example. Using the MENU button 1. Open the LCD screen and press the Power ( ) button to turn on the camcorder. 2. Press the MODE button to select the Record ( / ) mode. 3. Press the MENU button. • The menu screen appears. 4. Press the Control (Left/Right) button to select "Aperture." • To return to the normal screen, press the MENU button. 44 STBY 0:00:00 [475Min] Aperture Auto Manual Exit STBY 0:00:00 [475Min] Aperture Auto Manual Exit 5. Press the Control (Up/Down/OK) button to select the desired submenu item. • Depending on the mode selected, some menu items may not be available to select and change. • Adjust the value of the selected menu item. For example, adjust the Aperture value by pressing the Control (Left/ Right/OK) button. 6. When you finish making settings, press the MENU button to exit. • When you make a menu setting, some menu items may be dimmed and not selectable. For details on the menu items you cannot access at the same time, refer to the Troubleshooting chapter. page 111 • Starting on the next page are the basic instructions for using menu items. These instructions will help you use each menu item easily. Instructions may differ depending on the menu item you've selectd. • You can also access the shortcut menu using the OK button. pages 26~27
-
 1
1 -
2
-
3
-
4
-
5
-
6
-
7
-
8
-
9
-
10
-
11
-
12
-
13
-
14
-
15
-
16
-
17
-
18
-
19
-
20
-
21
-
22
-
23
-
24
-
25
-
26
-
27
-
28
-
29
-
30
-
31
-
32
-
33
-
34
-
35
-
36
-
37
-
38
-
39
-
40
-
41
-
42
-
43
-
44
-
45
-
 46
46 -
 47
47 -
 48
48 -
 49
49 -
 50
50 -
 51
51 -
 52
52 -
 53
53 -
 54
54 -
 55
55 -
 56
56 -
57
-
58
-
59
-
60
-
61
-
62
-
63
-
64
-
65
-
66
-
67
-
68
-
69
-
70
-
71
-
72
-
73
-
74
-
75
-
76
-
77
-
78
-
79
-
80
-
81
-
82
-
83
-
84
-
85
-
86
-
87
-
88
-
89
-
90
-
91
-
92
-
93
-
94
-
95
-
96
-
97
-
98
-
99
-
100
-
101
-
102
-
103
-
104
-
105
-
106
-
107
-
108
-
109
-
110
-
111
-
112
-
113
-
114
-
115
-
116
-
117
-
118
-
119
-
120
-
121
-
122
-
123
-
124
 |
 |
