Samsung WF457ARGSGR/A2 User Manual Ver.1.0 (English, French, Spanish) - Page 23
STEP 4, Adjusting the levelling feet
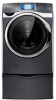 |
View all Samsung WF457ARGSGR/A2 manuals
Add to My Manuals
Save this manual to your list of manuals |
Page 23 highlights
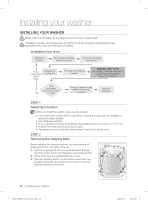
01 INSTALLING YOUR WASHER STEP 4 Adjusting the levelling feet When installing your washing machine, ensure that the power plug, the water supply and the drain are easily accessible. 1. Slide the washing machine into position. 2. Loosen all the lock nuts with the supplied wrench. 3. Level your washing machine by turning the levelling feet in and out as necessary by hand. 4. When your washing machine is level, tighten the locking nuts using a wrench or flathead screwdriver. Your washer must be level on all four sides. A carpenter's level should be used on all four corners of your washer. It's a good idea after the first dozen washes to make sure your washer is still level. Avoid damage to the legs. Do not move the washer unless the locking nuts are fastened to the bottom of the washer. WF457ARG-03153A-04_EN.indd 23 Installing your washer _23 2012-08-31 12:30:21
-
 1
1 -
2
-
3
-
4
-
5
-
6
-
7
-
8
-
9
-
10
-
11
-
12
-
13
-
14
-
15
-
16
-
17
-
 18
18 -
 19
19 -
 20
20 -
 21
21 -
 22
22 -
 23
23 -
 24
24 -
 25
25 -
 26
26 -
 27
27 -
 28
28 -
29
-
30
-
31
-
32
-
33
-
34
-
35
-
36
-
37
-
38
-
39
-
40
-
41
-
42
-
43
-
44
-
45
-
46
-
47
-
48
-
49
-
50
-
51
-
52
-
53
-
54
-
55
-
56
-
57
-
58
-
59
-
60
-
61
-
62
-
63
-
64
-
65
-
66
-
67
-
68
-
69
-
70
-
71
-
72
-
73
-
74
-
75
-
76
-
77
-
78
-
79
-
80
-
81
-
82
-
83
-
84
-
85
-
86
-
87
-
88
-
89
-
90
-
91
-
92
-
93
-
94
-
95
-
96
-
97
-
98
-
99
-
100
-
101
-
102
-
103
-
104
-
105
-
106
-
107
-
108
-
109
-
110
-
111
-
112
-
113
-
114
-
115
-
116
-
117
-
118
-
119
-
120
-
121
-
122
-
123
-
124
-
125
-
126
-
127
-
128
-
129
-
130
-
131
-
132
-
133
-
134
-
135
-
136
-
137
-
138
-
139
-
140
-
141
-
142
-
143
-
144
-
145
-
146
-
147
-
148
-
149
-
150
-
151
-
152
-
153
-
154
-
155
-
156
-
157
-
158
-
159
-
160
-
161
-
162
-
163
-
164
-
165
-
166
-
167
-
168
-
169
-
170
-
171
-
172
-
173
-
174
-
175
-
176
-
177
-
178
-
179
-
180
-
181
-
182
-
183
-
184
-
185
-
186
-
187
-
188
-
189
-
190
-
191
-
192
-
193
-
194
-
195
-
196
-
197
-
198
-
199
-
200
-
201
-
202
-
203
-
204
-
205
-
206
-
207
-
208
-
209
-
210
-
211
-
212
-
213
-
214
-
215
-
216
-
217
-
218
-
219
-
220
-
221
-
222
-
223
-
224
-
225
-
226
-
227
-
228
 |
 |
