Sharp KB-3300JS Service Manual - Page 48
Cook Top Radiant Heaters/hot Surface Indicator Removal
 |
View all Sharp KB-3300JS manuals
Add to My Manuals
Save this manual to your list of manuals |
Page 48 highlights
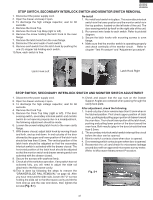
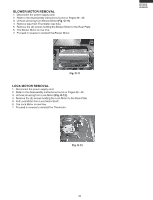
KB-3300JS KB-3300JK KB-3300JW COOK TOP RADIANT HEATERS/HOT SURFACE INDICATOR REMOVAL 1. Disconnect the power supply cord. 2. Refer to the disassembly instructions found on Pages 38 - 40. 3. After Cook Top Assembly is free, turn upside down (glass side down) on a protective surface to prevent scratching (Fig. O-13). 4. Remove the (10) screws from Bottom Plate and place to the side. 5. Remove Heater Protect Cover (Fig. O-14). 6. Remove necessary spring strap from Radiant Element. 7. Unhook Radiant Element or Hot Surface Indicator wiring. 8. The Radiant Elements are now free. 9. Proceed in reverse to reinstall the Radiant Elements and/or Hot Surface Indicator. Fig. O-13 Fig. O-14 46
-
 1
1 -
2
-
3
-
4
-
5
-
6
-
7
-
8
-
9
-
10
-
11
-
12
-
13
-
14
-
15
-
16
-
17
-
18
-
19
-
20
-
21
-
22
-
23
-
24
-
25
-
26
-
27
-
28
-
29
-
30
-
31
-
32
-
33
-
34
-
35
-
36
-
37
-
38
-
39
-
40
-
41
-
42
-
 43
43 -
 44
44 -
 45
45 -
 46
46 -
 47
47 -
 48
48 -
 49
49 -
 50
50 -
 51
51 -
 52
52 -
 53
53 -
54
-
55
-
56
-
57
-
58
-
59
-
60
-
61
-
62
-
63
-
64
-
65
-
66
-
67
-
68
-
69
-
70
-
71
-
72
 |
 |

46
KB-3300JS
KB-3300JK
KB-3300JW
COOK TOP RADIANT HEATERS/HOT SURFACE INDICATOR REMOVAL
1.
Disconnect the power supply cord.
2.
Refer to the disassembly instructions found on Pages 38 - 40.
3.
After Cook Top Assembly is free, turn upside down (glass side down) on a protective surface to prevent
scratching
(Fig. O-13)
.
4.
Remove the (10) screws from Bottom Plate and place to the side.
5.
Remove Heater Protect Cover
(Fig. O-14)
.
6.
Remove necessary spring strap from Radiant Element.
7.
Unhook Radiant Element or Hot Surface Indicator wiring.
8.
The Radiant Elements are now free.
9.
Proceed in reverse to reinstall the Radiant Elements and/or Hot Surface Indicator.
Fig. O-13
Fig. O-14