Sharp XL-HP500 Operation Manual
Sharp XL-HP500 Manual
 |
View all Sharp XL-HP500 manuals
Add to My Manuals
Save this manual to your list of manuals |
Sharp XL-HP500 manual content summary:
- Sharp XL-HP500 | Operation Manual - Page 1
product. To obtain the best performance from this product, please read this manual carefully. It will guide you in operating your SHARP product. XL-HP500W Micro Component System consisting of XLHP500W (main unit) and CP-HP500W (speaker system). OPERATION MANUAL XLHP500WA_FRONT 1 02.8.7, 9:54 AM - Sharp XL-HP500 | Operation Manual - Page 2
is still present inside the unit. When the ON/ STAND-BY button is set at STAND-BY position, the unit may be brought into operation by the timer mode or remote control. ! This unit contains no user serviceable parts. Never remove cov- ers unless qualified to do so. This unit contains dangerous - Sharp XL-HP500 | Operation Manual - Page 3
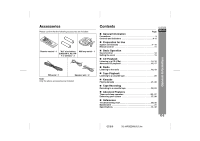
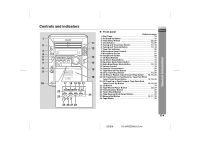
1 Speaker wire 2 Note: Only the above accessories are included. Contents XL-HP500W " General Information Page Precautions 3 Controls and indicators 4 - 6 ENGLISH " Preparation for Use System connections 7 - 10 Remote control 11 " Basic Operation Sound control 12 Setting the clock 13 - Sharp XL-HP500 | Operation Manual - Page 4
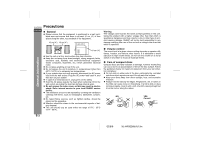
or other type of accident causing damage. SHARP will not be held responsible for any damage resulting from use of this unit with a voltage other than that which is specified. " Volume control The sound level at a given volume setting depends on speaker efficiency, location, and various other factors - Sharp XL-HP500 | Operation Manual - Page 5
27 4. Clock Button 13, 25 5. Tuning and Time Down Button 13, 18 6. Tuning and Time Up Button 13, 18 7. Timer Set Indicator 26 8. Microphone Level Control 21 9. Microphone Socket 21 10. Headphone Socket 28 11. CD Eject Buttons 14 12. CD Direct Play Buttons 15 13. Equaliser Mode Select Button - Sharp XL-HP500 | Operation Manual - Page 6
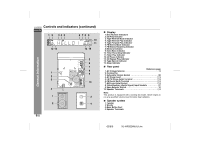
XL-HP500W Controls and indicators (continued) ENGLISH 1 2 34 5 6 78 9 10 11 12 13 14 15 General Information 5 6 7 8 1 9 2 3 10 4 1 3 2 4 E-5 " Display 1. Disc Number Indicators 2. CD Play Indicator 3. Tape Reverse Mode Indicator 4. Tape Reverse Play Indicator 5. Tape Forward - Sharp XL-HP500 | Operation Manual - Page 7
20 25 21 3 4 5 6 XL-HP500W ! Remote control ENGLISH Reference page 1. Remote Control Transmitter 11 2. CD Direct Play Buttons 15 3. CD Track Down or Fast Reverse, Tape Fast Wind, Tuner Preset Down Button 15, 19, 20 4. Clock Button 13 5. Equaliser Mode Select Button 12 7 6. Extra - Sharp XL-HP500 | Operation Manual - Page 8
XL-HP500W System connections ENGLISH AM loop aerial FM aerial Preparation for Use Right speaker Left speaker E-7 Red Black Wall socket (See page 9.) Red Black 02/8/6 XL-HP500W(A)1.fm - Sharp XL-HP500 | Operation Manual - Page 9
Position the AM loop aerial for optimum reception. Place the AM loop aerial on a shelf, etc., or attach it to a stand or a wall with screws (not AM loop aerial: < Assembling > < Attaching to the wall > XL-HP500W ! Speaker connection Connect the black wire to the minus (-) terminal, and the - Sharp XL-HP500 | Operation Manual - Page 10
XL-HP500W System connections (continued) ENGLISH 230V 240V Wall socket (230 - 240 V, 50/60 Hz) ! Setting the AC voltage selector Check the setting socket. If you plug the unit first, the unit will enter the demonstration mode (see page 10). Notes: " The unit will start the tape initialisation when - Sharp XL-HP500 | Operation Manual - Page 11
mode (demonstration mode), press the X-BASS/DEMO button. The demonstration mode will be cancelled and the display will disappear. To return to the demonstration mode: When the unit is in the power stand-by mode stored in memory including clock, timer settings, tuner preset, and CD programme. ! To - Sharp XL-HP500 | Operation Manual - Page 12
. (See pages 7 - 10.) Point the remote control directly at the remote sensor on the unit. The remote control can be used within the range shown below: Press the ON/STAND-BY button. Does the power turn on? Now, you can enjoy music. Remote sensor 0.2 m - 6 m (8" - 20') E-11 02/8/6 XL-HP500W(A)2.fm - Sharp XL-HP500 | Operation Manual - Page 13
, the volume will decrease. Remote control operation: Press the VOLUME (+ or -) button to increase or decrease the volume. ! Equaliser When the EQUALIZER (EQUALIZER MODE) button is pressed, the current mode setting will be displayed. To change to a different mode, press the EQUALIZER (EQUALIZER - Sharp XL-HP500 | Operation Manual - Page 14
remote control. The time display will appear for about 5 seconds. Note: The "CLOCK" or time will flash at the push of the CLOCK button when the AC power supply is restored after a power failure or unplugging the unit. Readjust the clock as follows. To readjust the clock: Perform "Setting the clock - Sharp XL-HP500 | Operation Manual - Page 15
button on the remote control. To resume playback from the same point, press the button. To stop playback: Press the (CD ) button. To exchange other CDs whilst playing a disc: Press the button for the stopped disc and exchange discs. To remove the CDs: Whilst in the stop mode, press the desired - Sharp XL-HP500 | Operation Manual - Page 16
, " END" will appear on the display and CD operation will be paused. When the beginning of the first track is reached during fast reverse, the unit will enter the playback mode. ( : Last track number) ! To specify a disc to play You can play a disc by specifying the disc number. Press one of the - Sharp XL-HP500 | Operation Manual - Page 17
Advanced CD playback ! Direct search of the track By using the direct search buttons, the desired tracks on the current disc can be played. Use the direct search buttons on the remote control to select the desired track whilst playing the selected disc. Selected track number " The direct search - Sharp XL-HP500 | Operation Manual - Page 18
1 Whilst in the stop mode, press the MEMORY/SET (MEMORY) button to enter the programming save mode. CD Playback 2 Press one of the DISC SELECT - ( 1 - 3) buttons to select the desired disc. Selected disc number 3 Press the direct search buttons on the remote control to select the desired track - Sharp XL-HP500 | Operation Manual - Page 19
to the de- sired station. Manual tuning: Press the TUNING/TIME at the first receivable broadcast station. XL-HP500W ENGLISH Radio Notes: " When stereo transmission: Press the TUNER (BAND) button to display the "ST" indicator. " " " will appear when an FM broadcast is in stereo. FM stereo mode - Sharp XL-HP500 | Operation Manual - Page 20
for less than 0.5 seconds to select the desired station. 1 Perform steps 1 - 3 in "Tuning" on page 18. 2 Press the MEMORY/SET button to enter the preset tuning saving mode. 3 Within 30 seconds, press the PRESET ( or ) button to select the preset channel number. Store the stations in memory, in - Sharp XL-HP500 | Operation Manual - Page 21
button. 3 Open the cassette door by push- ing the area marked "PUSH EJECT ". 4 Load a cassette into the cas- sette compartment with side A facing you. XL-HP500W ENGLISH Tape Playback 5 Press the button to choose one side or both sides. ... To listen to both sides. ... For endless repeat play of - Sharp XL-HP500 | Operation Manual - Page 22
XL-HP500W Playing karaoke ENGLISH 1 Set the MIC LEVEL control to MIN to protect the speakers from shock noise and to avoid CD, TUNER (BAND), TAPE or VIDEO/AUX button to select the audio source and play it. 5 Adjust the volume of the audio source using the VOLUME control. 6 Turn the MIC LEVEL control - Sharp XL-HP500 | Operation Manual - Page 23
speakers. Caution: ! When not using the microphone, remove it from the MIC socket. ! When connecting or disconnecting the microphone, set the MIC LEVEL control to MIN. XL-HP500W " Recording of mixed sound to a cassette tape You can record mixed sound from the microphone and CD, TUNER or VIDEO/AUX - Sharp XL-HP500 | Operation Manual - Page 24
. ! The volume and sound controls can be adjusted with no effect on the recorded signal (Variable Sound Monitor). ! For recording, use only normal tapes. Do not use metal or CrO tapes. " Recording from a CD (CDs) You can record the desired CD using the DISC SELECT - ( 1 - 3) buttons. 1 Press the - Sharp XL-HP500 | Operation Manual - Page 25
The CD and tape will stop. Auto restart function: If the recording side is switched from side A to B during recording, the system will record sides. ... To record on both sides. ... To record on only one side. XL-HP500W ENGLISH Tape Recording 4 Press the button. Recording will be paused. 5 Press - Sharp XL-HP500 | Operation Manual - Page 26
Before setting timer: 1 Press the CLOCK button to check that the clock is on time. 2 For timer play- Load a cassette or discs to the VOLUME control. Do not turn the volume up too high. 4 Press the TIMER/SLEEP button repeatedly to select timer playback or timer recording. Display the white - Sharp XL-HP500 | Operation Manual - Page 27
time is set, the setting will be retained until a new time is entered. ! When performing timer playback or recording using another unit connected to the VIDEO/AUX sockets, select "VIDEO/AUX" in step 2. At this time, only this unit will be turned on or enter the power stand-by mode automatically. It - Sharp XL-HP500 | Operation Manual - Page 28
sleep timer is set. The remaining sleep time is displayed for about 5 seconds. Red White White To the line output sockets Red RCA lead (not supplied) " Listening to the playback sounds from VCR, DVD, etc. 1 Use a connection lead to connect the VCR, DVD, etc. to the VIDEO/AUX sockets. When using - Sharp XL-HP500 | Operation Manual - Page 29
on a tape 1 Insert a cassette in the cassette compartment. 2 Press the VIDEO/AUX button. 3 Press the button. 4 Press the / ( ) or button. the speakers automatically. Adjust the volume using the VOLUME control. XL-HP500W " Subwoofer connection When a commercially available speaker with - Sharp XL-HP500 | Operation Manual - Page 30
Troubleshooting chart ENGLISH Many potential problems can be resolved by the owner without calling a service technician. If something is wrong with this product, check the following before calling your authorised SHARP dealer or service centre. " General Symptom Possible cause ! The clock - Sharp XL-HP500 | Operation Manual - Page 31
memory including clock, timer settings, tuner preset, and CD programme. " Condensation Sudden temperature changes, storage or operation in an extremely humid environment may cause condensation inside the cabinet (CD pickup, tape heads, etc.) or on the transmitter on the remote control. Condensation - Sharp XL-HP500 | Operation Manual - Page 32
of the unit. It may cause malfunc- tions. Specifications As part of our policy of continuous improvement, SHARP reserves the right to make design and specification changes for product improvement without prior notice. The performance specification figures indicated are nominal values of production - Sharp XL-HP500 | Operation Manual - Page 33
input power Rated input power Impedance Dimensions Weight 2-way type speaker system 5 cm (2") Tweeter 13 cm (5-1/8") Woofer 100 W 50 W 6 ohms Width: 165 mm (6-1/2") Height: 260 mm (10-1/4") Depth: 241 mm (9-1/2") 2.5 kg (5.5 lbs.)/each References XL-HP500W ENGLISH 02/8/6 XL-HP500W(A)3.fm E-32 - Sharp XL-HP500 | Operation Manual - Page 34
MEMO XLHP500WA_MEMO 1 02.8.7, 9:56 AM - Sharp XL-HP500 | Operation Manual - Page 35
MEMO XLHP500WA_MEMO 1 02.8.7, 9:56 AM - Sharp XL-HP500 | Operation Manual - Page 36
XLHP500WA_BACK 1 SHARP CORPORATION 9906 02.8.7, 9:55 AM TINSE0487AWZZ 02H R KS 1
-
 1
1 -
 2
2 -
 3
3 -
 4
4 -
 5
5 -
 6
6 -
 7
7 -
8
-
9
-
10
-
11
-
12
-
13
-
14
-
15
-
16
-
17
-
18
-
19
-
20
-
21
-
22
-
23
-
24
-
25
-
26
-
27
-
28
-
29
-
30
-
31
-
32
-
33
-
34
-
35
-
36
 |
 |
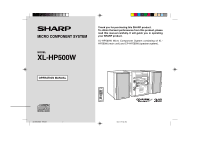
Thank you for purchasing this SHARP product.
To obtain the best performance from this product, please
read this manual carefully. It will guide you in operating
your SHARP product.
XL-HP500W Micro Component System consisting of XL-
HP500W (main unit) and CP-HP500W (speaker system).
MICRO COMPONENT SYSTEM
MODEL
XL-HP500W
OPERATION MANUAL
XLHP500WA_FRONT
02.8.7, 9:54 AM
1