Sharp XL-HP500 Operation Manual - Page 11
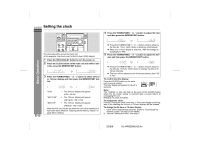
Setting the FM/AM span selector, Demonstration mode, To turn the power - set clock
 |
View all Sharp XL-HP500 manuals
Add to My Manuals
Save this manual to your list of manuals |
Page 11 highlights
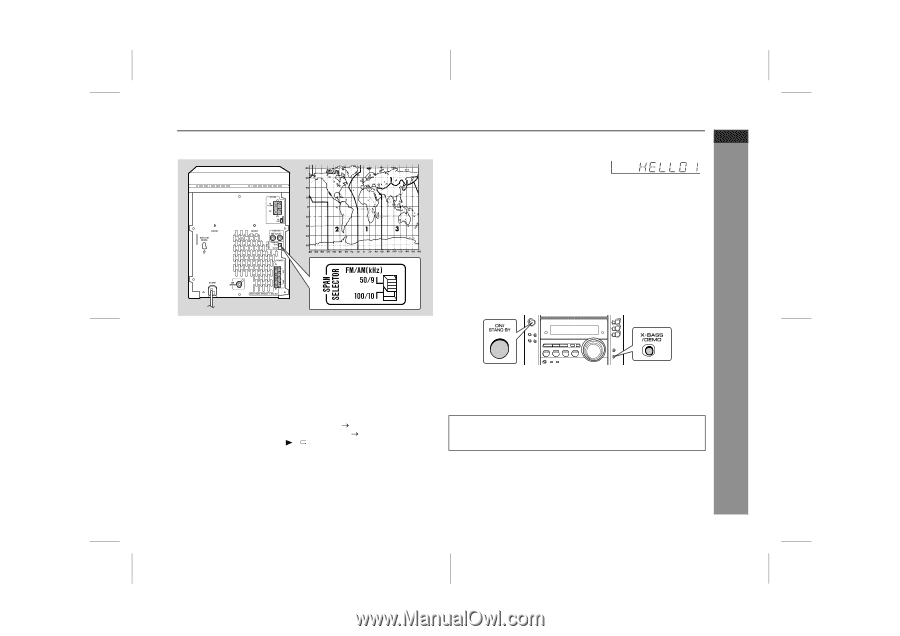
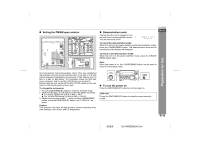
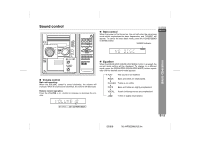
! Setting the FM/AM span selector XL-HP500W ! Demonstration mode The first time the unit is plugged in, the unit will enter the demonstration mode. You will see words scroll. ENGLISH To cancel the demonstration mode: When the unit is in the power stand-by mode (demonstration mode), press the X-BASS/DEMO button. The demonstration mode will be cancelled and the display will disappear. To return to the demonstration mode: When the unit is in the power stand-by mode, press the X-BASS/ DEMO button again. Note: When the power is on, the X-BASS/DEMO button can be used to select the extra bass mode. Preparation for Use The International Telecommunication Union (ITU) has established that member countries should maintain either a 100 kHz or a 50 kHz interval between broadcasting frequencies of FM stations and 10 kHz or 9 kHz for AM station. The illustration shows the 50/9 kHz zones (regions 1 and 3), and the 100/10 kHz zone (region 2). Before using the unit, set the SPAN SELECTOR switch (on the rear panel) to the interval (span) of your area. To change the tuning zone: 1 Press the ON/STAND-BY button to enter the stand-by mode. 2 Set the SPAN SELECTOR switch (on the rear panel) as follows. " For 50 kHz FM interval (9 kHz in AM) 50/9 " For 100 kHz FM interval (10 kHz in AM) 100/10 3 Whilst pressing down the / button and the X-BASS/DEMO button, press the ON/STAND-BY button until "CLEAR AL" appears. Caution: This operation will erase all data stored in memory including clock, timer settings, tuner preset, and CD programme. ! To turn the power on Press the ON/STAND-BY button to turn the power on. After use: Press the ON/STAND-BY button to enter the power stand-by mode. E-10 02/8/6 XL-HP500W(A)1.fm
-
 1
1 -
2
-
3
-
4
-
5
-
 6
6 -
 7
7 -
 8
8 -
 9
9 -
 10
10 -
 11
11 -
 12
12 -
 13
13 -
 14
14 -
 15
15 -
 16
16 -
17
-
18
-
19
-
20
-
21
-
22
-
23
-
24
-
25
-
26
-
27
-
28
-
29
-
30
-
31
-
32
-
33
-
34
-
35
-
36
 |
 |