Sharp XL-HP500 Operation Manual - Page 27
Advanced Features
 |
View all Sharp XL-HP500 manuals
Add to My Manuals
Save this manual to your list of manuals |
Page 27 highlights
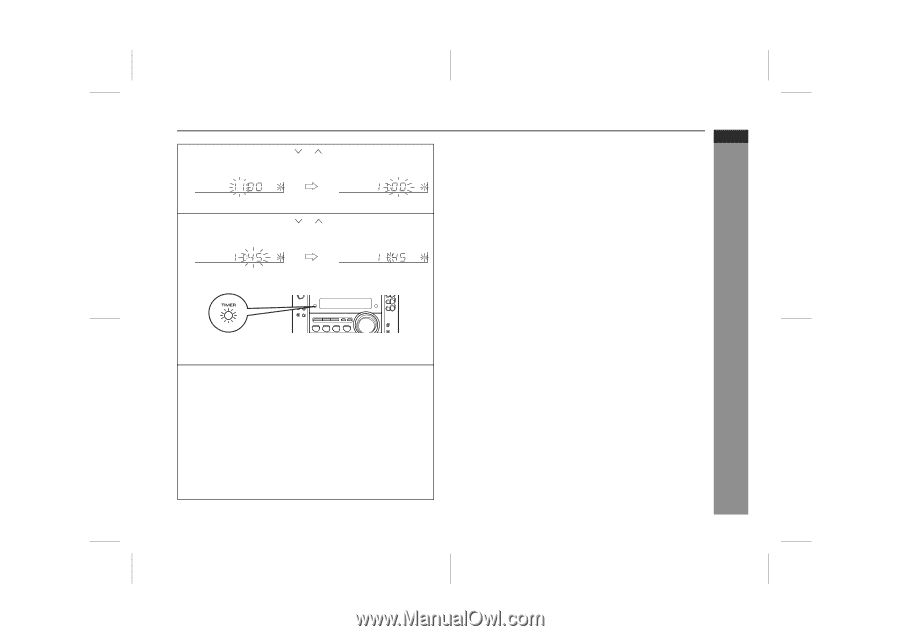
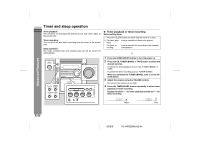
5 Press the TUNING/TIME ( or ) button to specify the hour to start, then press the MEMORY/SET button. The illustrations show the timer playback setting. 6 Press the TUNING/TIME ( or ) button to specify the min- utes, then press the MEMORY/SET button. The unit will enter the timer stand-by mode automatically. To reset or change the timer setting: Perform "Timer playback or timer recording" from the beginning. XL-HP500W ENGLISH Notes: ! Once the time is set, the setting will be retained until a new time is entered. ! When performing timer playback or recording using another unit connected to the VIDEO/AUX sockets, select "VIDEO/AUX" in step 2. At this time, only this unit will be turned on or enter the power stand-by mode automatically. It will enter the power stand-by mode when the end of the recording tape is reached in timer recording or 1 hour after the playback starts in timer playback. However, another unit will not be turned on or off. Advanced Features To cancel the timer playback/timer recording: Press the ON/STAND-BY button to turn the power on. 7 When the preset time is reached, playback or recording will start. The volume will increase gradually until it reaches the volume you were listening at before your system enters the timer standby mode. In timer playback: If you select CD or TAPE, the unit will enter the stand-by mode after the playback. If you select TUNER, it will enter the standby mode one hour after the timer playback starts. In timer recording: When the recording tape reaches its end, the timer recording will end, and the unit will enter the stand-by mode. 02/8/6 XL-HP500W(A)3.fm E-26
-
 1
1 -
2
-
3
-
4
-
5
-
6
-
7
-
8
-
9
-
10
-
11
-
12
-
13
-
14
-
15
-
16
-
17
-
18
-
19
-
20
-
21
-
 22
22 -
 23
23 -
 24
24 -
 25
25 -
 26
26 -
 27
27 -
 28
28 -
 29
29 -
 30
30 -
 31
31 -
 32
32 -
33
-
34
-
35
-
36
 |
 |