Sharp XR-30XDM Operation Manual - Page 20
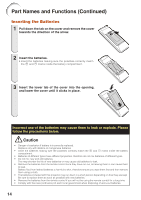
Quick Start, Remove the lens cap and turn the projector
 |
View all Sharp XR-30XDM manuals
Add to My Manuals
Save this manual to your list of manuals |
Page 20 highlights
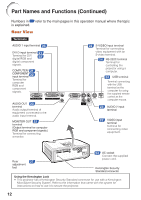
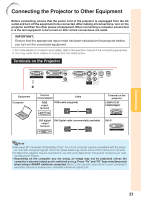
Quick Start This section shows the basic operation (projector connecting with the computer). For details, see the page described below for each step. Setup and Projection In this section, connection of the projector and the computer is explained using one example. 3 STANDBY/ON 8 button 6 INPUT buttons 4 ENTER button 5 Adjustment buttons (P/R/O/Q) 8 STANDBY button 3 ON button 6 COMPUTER button 5 KEYSTONE button 4 Zoom ring 4 Focus ring 4 HEIGHT ADJUST lever 4 ENTER button 5 Adjustment buttons (P/R/O/Q) 5 KEYSTONE button 1. Place the projector facing a wall or a screen _P. 18 2. Connect the projector to the computer and plug the power cord into the AC socket of the projector When connecting equipment other than a computer, see pages 22 and 23. _PP. 21, 24 3. Remove the lens cap and turn the projector on On the projector On the remote control _P. 25 16
-
 1
1 -
2
-
3
-
4
-
5
-
6
-
7
-
8
-
9
-
10
-
11
-
12
-
13
-
14
-
 15
15 -
 16
16 -
 17
17 -
 18
18 -
 19
19 -
 20
20 -
 21
21 -
 22
22 -
 23
23 -
 24
24 -
 25
25 -
26
-
27
-
28
-
29
-
30
-
31
-
32
-
33
-
34
-
35
-
36
-
37
-
38
-
39
-
40
-
41
-
42
-
43
-
44
-
45
-
46
-
47
-
48
-
49
-
50
-
51
-
52
-
53
-
54
-
55
-
56
-
57
-
58
-
59
-
60
-
61
-
62
-
63
-
64
-
65
-
66
-
67
-
68
-
69
-
70
-
71
 |
 |
