Sharp XR-30XDM Operation Manual - Page 21
Adjust the projected image with the Setup Guide, Correct trapezoidal distortion, Turn the power off
 |
View all Sharp XR-30XDM manuals
Add to My Manuals
Save this manual to your list of manuals |
Page 21 highlights
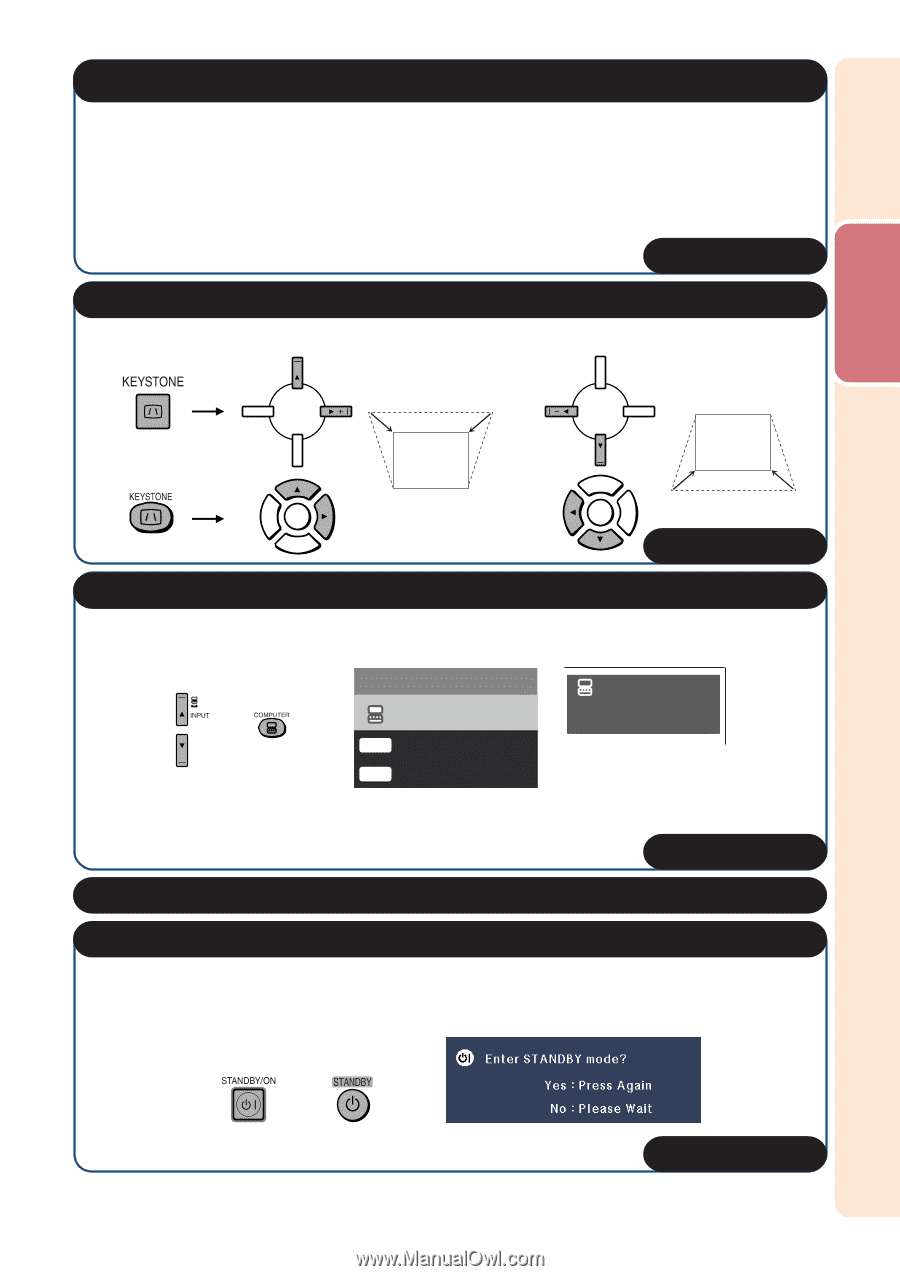
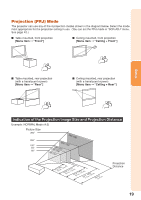
Quick Start 4. Adjust the projected image with the Setup Guide 1 After the projector turns on, the Setup Guide appears. (When "Setup Guide" is set to "On". See page 42.) 2 Follow the steps in the Setup Guide and adjust the focus, picture size, and height (angle). 3 After adjusting the focus, height (angle) and picture size, press ENTER to finish the Setup Guide. _PP. 26, 27 5. Correct trapezoidal distortion Correcting trapezoidal distortion using Keystone Correction. On the projector Shrinks upper side. Shrinks lower side. On the remote control _P. 28 6. Select the INPUT mode Select the "COMPUTER" using INPUT on the projector or COMPUTER on the remote control. On the On the remote projector control INPUT list INPUT COMPUTER D DVI-D Computer On-screen display (RGB) COMPUTER RGB 1024 × 768 D DVI-D Video • When you press INPUT on the projector, the INPUT list appears. Press '/" to switch the INPUT mode. _P. 29 7. Turn the computer on 8. Turn the power off Press STANDBY/ON on the projector or STANDBY on the remote control, and then press the button again while the confirmation message is displayed to put the projector into standby mode. On the On the remote projector control On-screen display _P. 25 17
-
 1
1 -
2
-
3
-
4
-
5
-
6
-
7
-
8
-
9
-
10
-
11
-
12
-
13
-
14
-
15
-
 16
16 -
 17
17 -
 18
18 -
 19
19 -
 20
20 -
 21
21 -
 22
22 -
 23
23 -
 24
24 -
 25
25 -
 26
26 -
27
-
28
-
29
-
30
-
31
-
32
-
33
-
34
-
35
-
36
-
37
-
38
-
39
-
40
-
41
-
42
-
43
-
44
-
45
-
46
-
47
-
48
-
49
-
50
-
51
-
52
-
53
-
54
-
55
-
56
-
57
-
58
-
59
-
60
-
61
-
62
-
63
-
64
-
65
-
66
-
67
-
68
-
69
-
70
-
71
 |
 |