Sharp XR-30XDM Operation Manual - Page 45
Adjusting the Projected Image (“SCR - ADJ” Menu), Setting the Resize Mode
 |
View all Sharp XR-30XDM manuals
Add to My Manuals
Save this manual to your list of manuals |
Page 45 highlights
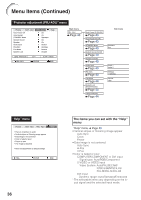
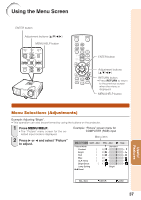
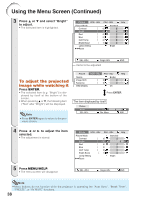
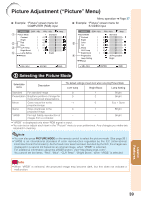
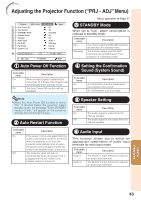
Adjusting the Projected Image ("SCR - ADJ" Menu) Picture SCR - ADJ PRJ - ADJ Help 1 Resize 2 Image Shift 3 Keystone 4 OSD Display 5 Background 6 Setup Guide 7 PRJ Mode 8 Language Border 0 0 On Logo On Front English Menu operation n Page 37 SEL./ADJ. ENTER END 1 Setting the Resize Mode 3 Keystone Correction Note • For details of the Resize mode, see pages 30 and 31. • You can also press RESIZE on the remote con- trol to set the resize mode. (See page 30.) 2 Adjusting the Image Position You can move the projected image vertically. When the image is projected either from the top or from the bottom towards the screen at an angle, the image becomes distorted trapezoidally. The function for correcting trapezoidal distortion is called Keystone Correction. Select "Keystone" on the "SCR-ADJ" menu and adjust with the slide bar. See page 28 for details of Keystone Correction. Q button O button O button Q button Note • The Keystone Correction can be adjusted up to an angle of approximately ±20 degrees (when "Resize" is set to "Normal"). Note • You cannot set this item when "Resize" is set to "Normal". Useful Features 41
-
 1
1 -
2
-
3
-
4
-
5
-
6
-
7
-
8
-
9
-
10
-
11
-
12
-
13
-
14
-
15
-
16
-
17
-
18
-
19
-
20
-
21
-
22
-
23
-
24
-
25
-
26
-
27
-
28
-
29
-
30
-
31
-
32
-
33
-
34
-
35
-
36
-
37
-
38
-
39
-
 40
40 -
 41
41 -
 42
42 -
 43
43 -
 44
44 -
 45
45 -
 46
46 -
 47
47 -
 48
48 -
 49
49 -
 50
50 -
51
-
52
-
53
-
54
-
55
-
56
-
57
-
58
-
59
-
60
-
61
-
62
-
63
-
64
-
65
-
66
-
67
-
68
-
69
-
70
-
71
 |
 |