Singer CE-150 Futura Instruction Manual - Page 10
Getting To Know Machine - sewing
 |
View all Singer CE-150 Futura manuals
Add to My Manuals
Save this manual to your list of manuals |
Page 10 highlights
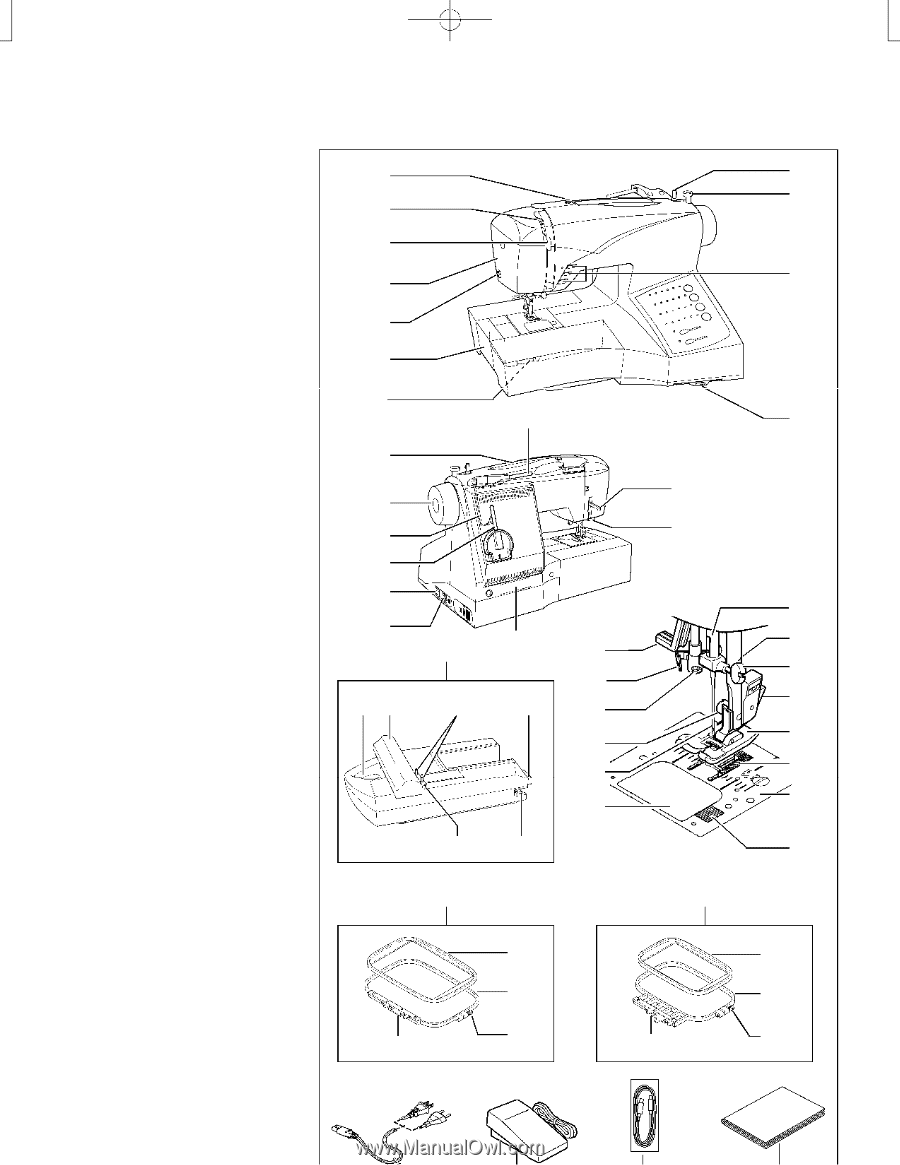
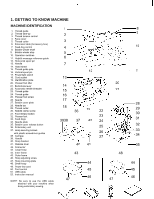
1. GETTING TO KNOW MACHINE MACHINE IDENTIFICATION 1. Thread guide 2. Thread take-up 3. Thread tension control 4. Face cover 5. Thread cutter 6. Extension table (Accessory box) 7. Feed dog control 8. Bobbin winder shaft 9. Bobbin winder stop 10. Operation switches 11. Helpful message reference guide 12. Horizontal spool pin 13. Handle 14. Hand wheel 15. Thread guide pole 16. Vertical spool pin 17. Power/light switch 18. Cord socket 19. Identification plate 20. Presser foot lifter 21. Buttonhole lever 22. Automatic needle threader 23. Thread guide 24. Thread guide 25. Presser foot screw 26. Needle 27. Bobbin cover plate 28. Needle bar 29. Thread cutter 30. Needle clamp screw 31. Foot release button 32. Presser foot 33. Feed dogs 34. Needle plate 35. Bobbin cover release button 36. Embroidery unit 37. Hoop securing screws with plastic screwdriver guides 38. Carriage 39. Handle 40. Hoop bracket 41. Release lever 42. Connector 43. Large hoop 44. Inner frame 45. Outer frame 46. Hoop adjusting screw 47. Hoop mounting plate 48. Small hoop 49. Power line cord 50. Foot control 51. USB cable 52. Instruction manual NOTE: Be sure to use the USB cable attached with your machine when doing embroidery sewing. 1 2 3 4 5 6 7 13 14 15 16 17 18 3938 47 36 37 40 43 12 19 42 41 44 45 46 20 21 22 23 24 25 26 27 48 47 8 9 10 11 28 29 30 31 32 33 34 35 44 45 46
-
 1
1 -
2
-
3
-
4
-
 5
5 -
 6
6 -
 7
7 -
 8
8 -
 9
9 -
 10
10 -
 11
11 -
 12
12 -
 13
13 -
 14
14 -
 15
15 -
16
-
17
-
18
-
19
-
20
-
21
-
22
-
23
-
24
-
25
-
26
-
27
-
28
-
29
-
30
-
31
-
32
-
33
-
34
-
35
-
36
-
37
-
38
-
39
-
40
-
41
-
42
-
43
-
44
-
45
-
46
-
47
-
48
-
49
-
50
-
51
-
52
-
53
-
54
-
55
-
56
-
57
-
58
-
59
-
60
-
61
-
62
-
63
-
64
-
65
-
66
-
67
-
68
-
69
-
70
-
71
-
72
-
73
-
74
-
75
-
76
-
77
-
78
-
79
-
80
-
81
-
82
-
83
-
84
-
85
-
86
-
87
-
88
-
89
-
90
-
91
-
92
-
93
-
94
-
95
-
96
-
97
-
98
-
99
-
100
-
101
-
102
-
103
-
104
-
105
-
106
-
107
-
108
-
109
-
110
-
111
-
112
-
113
-
114
-
115
-
116
-
117
-
118
-
119
-
120
-
121
-
122
-
123
-
124
-
125
-
126
-
127
 |
 |