Sony DCR-TRV740 Operating Instructions (primary manual) - Page 9
Recording a picture, Monitoring the playback picture on the LCD, screen - battery
 |
View all Sony DCR-TRV740 manuals
Add to My Manuals
Save this manual to your list of manuals |
Page 9 highlights
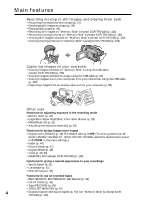
E ERMAORY E ERMAORY Recording a picture (p. 21) 1 Remove the lens cap. 2 Set the POWER switch to CAMERA while pressing the small green button. V POWER OFCFR(CHG) CAM M 3 Open the LCD panel while pressing OPEN. The picture appears on the LCD screen. 4 Press START/STOP. Your camcorder starts recording. To stop recording, press START/STOP button again. Viewfinder When the LCD panel is closed, use the viewfinder with your eye against the eyecup. The picture in the viewfinder is black and white. When you purchase your camcorder, the clock setting is set to off. If you want to record the date and time for a picture, set the clock setting before recording (p. 18). Monitoring the playback picture on the LCD screen (p. 34) 2 Press m to rewind the tape. REW 3 Press N to start playback. PLAY Quick Start Guide OFCFR(CHG) 1 Set the POWER switch to VCR while pressing the small green button. V POWER CAM M Note Do not pick up your camcorder by holding the viewfinder, the LCD panel, or the battery pack. 9
-
 1
1 -
2
-
3
-
 4
4 -
 5
5 -
 6
6 -
 7
7 -
 8
8 -
 9
9 -
 10
10 -
 11
11 -
 12
12 -
 13
13 -
 14
14 -
15
-
16
-
17
-
18
-
19
-
20
-
21
-
22
-
23
-
24
-
25
-
26
-
27
-
28
-
29
-
30
-
31
-
32
-
33
-
34
-
35
-
36
-
37
-
38
-
39
-
40
-
41
-
42
-
43
-
44
-
45
-
46
-
47
-
48
-
49
-
50
-
51
-
52
-
53
-
54
-
55
-
56
-
57
-
58
-
59
-
60
-
61
-
62
-
63
-
64
-
65
-
66
-
67
-
68
-
69
-
70
-
71
-
72
-
73
-
74
-
75
-
76
-
77
-
78
-
79
-
80
-
81
-
82
-
83
-
84
-
85
-
86
-
87
-
88
-
89
-
90
-
91
-
92
-
93
-
94
-
95
-
96
-
97
-
98
-
99
-
100
-
101
-
102
-
103
-
104
-
105
-
106
-
107
-
108
-
109
-
110
-
111
-
112
-
113
-
114
-
115
-
116
-
117
-
118
-
119
-
120
-
121
-
122
-
123
-
124
-
125
-
126
-
127
-
128
-
129
-
130
-
131
-
132
-
133
-
134
-
135
-
136
-
137
-
138
-
139
-
140
-
141
-
142
-
143
-
144
-
145
-
146
-
147
-
148
-
149
-
150
-
151
-
152
-
153
-
154
-
155
-
156
-
157
-
158
-
159
-
160
-
161
-
162
-
163
-
164
-
165
-
166
-
167
-
168
-
169
-
170
-
171
-
172
-
173
-
174
-
175
-
176
-
177
-
178
-
179
-
180
-
181
-
182
-
183
-
184
-
185
-
186
-
187
-
188
-
189
-
190
-
191
-
192
-
193
-
194
-
195
-
196
-
197
-
198
-
199
-
200
-
201
-
202
-
203
-
204
-
205
-
206
-
207
-
208
-
209
-
210
-
211
-
212
 |
 |
