Sony DSC-T200/R Cyber-shot® Handbook (Large File - 10.47 MB) - Page 106
Selecting and marking the, images, To cancel the selection, To remove the mark
 |
View all Sony DSC-T200/R manuals
Add to My Manuals
Save this manual to your list of manuals |
Page 106 highlights
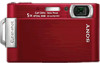
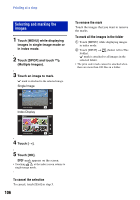
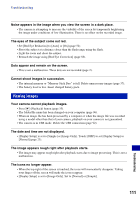
Printing at a shop Selecting and marking the images 1 Touch [MENU] while displaying images in single-image mode or in index mode. 2 Touch [DPOF] and touch (Multiple Images). 3 Touch an image to mark. mark is attached to the selected image. Single Image To remove the mark Touch the images that you want to remove the marks. To mark all the images in the folder 1 Touch [MENU] while displaying images in index mode. 2 Touch [DPOF] t (Select All in This Folder). mark is attached to all images in the selected folder. • The print order mark cannot be attached when there are more than 100 files in a folder. Index Display 4 Touch [t]. 5 Touch [OK]. mark appears on the screen. • Touching at the index screen returns to single-image mode. To cancel the selection To cancel, touch [Exit] in step 5. 106
-
 1
1 -
2
-
3
-
4
-
5
-
6
-
7
-
8
-
9
-
10
-
11
-
12
-
13
-
14
-
15
-
16
-
17
-
18
-
19
-
20
-
21
-
22
-
23
-
24
-
25
-
26
-
27
-
28
-
29
-
30
-
31
-
32
-
33
-
34
-
35
-
36
-
37
-
38
-
39
-
40
-
41
-
42
-
43
-
44
-
45
-
46
-
47
-
48
-
49
-
50
-
51
-
52
-
53
-
54
-
55
-
56
-
57
-
58
-
59
-
60
-
61
-
62
-
63
-
64
-
65
-
66
-
67
-
68
-
69
-
70
-
71
-
72
-
73
-
74
-
75
-
76
-
77
-
78
-
79
-
80
-
81
-
82
-
83
-
84
-
85
-
86
-
87
-
88
-
89
-
90
-
91
-
92
-
93
-
94
-
95
-
96
-
97
-
98
-
99
-
100
-
 101
101 -
 102
102 -
 103
103 -
 104
104 -
 105
105 -
 106
106 -
 107
107 -
 108
108 -
 109
109 -
 110
110 -
 111
111 -
112
-
113
-
114
-
115
-
116
-
117
-
118
-
119
-
120
-
121
-
122
-
123
-
124
-
125
-
126
-
127
-
128
-
129
-
130
-
131
 |
 |