Sony HDR-CX160 Handycam® Handbook - Page 44
the source and the destination, Touch the desired item to select - power supply
 |
UPC - 027242820210
View all Sony HDR-CX160 manuals
Add to My Manuals
Save this manual to your list of manuals |
Page 44 highlights
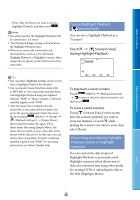
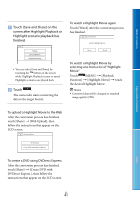
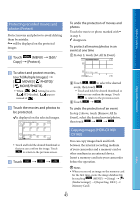
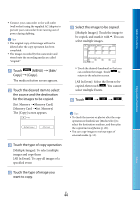
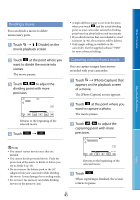
Table of Contents Enjoy Useful Functions Connect your camcorder to the wall outlet (wall socket) using the supplied AC Adaptor to prevent your camcorder from running out of power during dubbing. Tips The original copy of the image will not be deleted after the copy operation has been completed. The images recorded by this camcorder and stored onto the recording media are called "original." Touch (MENU) [Edit/ Copy] [Copy]. The media selection screen appears. Touch the desired item to select the source and the destination for the images to be copied. [Int. Memory Memory Card] [Memory Card Int. Memory] The [Copy] screen appears. Touch the type of copy operation. [Multiple Images]: To select multiple images and copy them [All In Event]: To copy all images of a specified event Touch the type of image you want to copy. Select the image to be copied. [Multiple Images]: Touch the image to be copied, and mark it with . You can select multiple images. Touch the desired thumbnail so that you can confirm the image. Touch to return to the selection screen. [All In Event]: Select the Event to be copied, then touch . You cannot select multiple Events. Touch . Tips To check the movies or photos after the copy operation is finished, use [Media Select] to select the destination medium, and then play the copied movies/photos (p. 20). You can copy images to various types of external media (p. 53). Index US 44
-
 1
1 -
2
-
3
-
4
-
5
-
6
-
7
-
8
-
9
-
10
-
11
-
12
-
13
-
14
-
15
-
16
-
17
-
18
-
19
-
20
-
21
-
22
-
23
-
24
-
25
-
26
-
27
-
28
-
29
-
30
-
31
-
32
-
33
-
34
-
35
-
36
-
37
-
38
-
 39
39 -
 40
40 -
 41
41 -
 42
42 -
 43
43 -
 44
44 -
 45
45 -
 46
46 -
 47
47 -
 48
48 -
 49
49 -
50
-
51
-
52
-
53
-
54
-
55
-
56
-
57
-
58
-
59
-
60
-
61
-
62
-
63
-
64
-
65
-
66
-
67
-
68
-
69
-
70
-
71
-
72
-
73
-
74
-
75
-
76
-
77
-
78
-
79
-
80
-
81
-
82
-
83
-
84
-
85
-
86
-
87
-
88
-
89
-
90
-
91
-
92
-
93
-
94
-
95
-
96
-
97
-
98
-
99
-
100
-
101
-
102
-
103
-
104
-
105
-
106
-
107
-
108
 |
 |
