Sony HDR-CX190 Operating Guide - Page 42
Using BRAVIA Sync, When connecting to your TV via - video
 |
View all Sony HDR-CX190 manuals
Add to My Manuals
Save this manual to your list of manuals |
Page 42 highlights
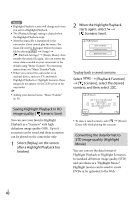
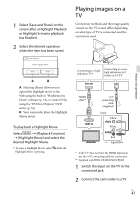
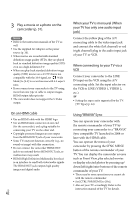
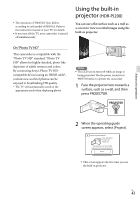
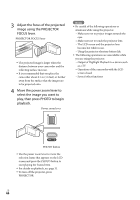
3 Play a movie or a photo on the camcorder (p. 31). Notes Refer to the instruction manuals of the TV as well. Use the supplied AC Adaptor as the power source (p. 20). When movies are recorded with standard definition image quality (STD), they are played back in standard definition image quality (STD) even on a high definition TV. When you play back standard definition image quality (STD) movies on a 4:3 TV that is not compatible with the 16:9 signal, set [ Wide Mode] to [4:3] to record movies with 4:3 aspect ratio. If you connect your camcorder to the TV using more than one type of cable to output images, HDMI output takes priority. The camcorder does not support the S-Video output. On an HDMI cable Use an HDMI cable with the HDMI logo. Use an HDMI mini connector on one end (for the camcorder), and a plug suitable for connecting your TV on the other end. Copyright-protected images are not output from the HDMI OUT jack of your camcorder. Some TVs may not function correctly (e.g., no sound or image) with this connection. Do not connect the camcorder HDMI OUT jack to an external device HDMI OUT jack, as malfunction may result. HDMI (High Definition Multimedia Interface) is an interface to send both video/audio signals. The HDMI OUT jack outputs high quality images and digital audio. US 42 When your TV is monaural (When your TV has only one audio input jack) Connect the yellow plug of the A/V connecting cable to the video input jack and connect the white (left channel) or red (right channel) plug to the audio input jack of your TV or VCR. When connecting to your TV via a VCR Connect your camcorder to the LINE IN input on the VCR using the A/V connecting cable. Set the input selector on the VCR to LINE (VIDEO 1, VIDEO 2, etc.). Setting the aspect ratio supported by the TV: [TV Type] (p. 63) Using "BRAVIA" Sync You can operate your camcorder with the remote commander of your TV by connecting your camcorder to a "BRAVIA" Sync compatible TV launched in 2008 or later with the HDMI cable. You can operate the menu of your camcorder by pressing the SYNC MENU button of the remote commander of your TV. You can display the camcorder screens such as Event View, play selected movies or display selected photos by pressing up/ down/left/right/enter buttons of the remote commander of your TV. There may be some operations you cannot do with the remote commander. Set [CTRL FOR HDMI] to [On]. Also set your TV accordingly. Refer to the instruction manual of the TV for details.
-
 1
1 -
2
-
3
-
4
-
5
-
6
-
7
-
8
-
9
-
10
-
11
-
12
-
13
-
14
-
15
-
16
-
17
-
18
-
19
-
20
-
21
-
22
-
23
-
24
-
25
-
26
-
27
-
28
-
29
-
30
-
31
-
32
-
33
-
34
-
35
-
36
-
 37
37 -
 38
38 -
 39
39 -
 40
40 -
 41
41 -
 42
42 -
 43
43 -
 44
44 -
 45
45 -
 46
46 -
 47
47 -
48
-
49
-
50
-
51
-
52
-
53
-
54
-
55
-
56
-
57
-
58
-
59
-
60
-
61
-
62
-
63
-
64
-
65
-
66
-
67
-
68
-
69
-
70
-
71
-
72
-
73
-
74
-
75
-
76
-
77
-
78
-
79
-
80
-
81
-
82
-
83
-
84
-
85
-
86
-
87
-
88
-
89
-
90
-
91
-
92
-
93
-
94
-
95
-
96
-
97
-
98
-
99
-
100
-
101
-
102
-
103
-
104
-
105
-
106
-
107
-
108
-
109
-
110
-
111
-
112
-
113
-
114
-
115
-
116
-
117
-
118
-
119
-
120
-
121
-
122
-
123
-
124
-
125
-
126
-
127
-
128
-
129
-
130
-
131
-
132
-
133
-
134
-
135
-
136
-
137
-
138
-
139
-
140
-
141
-
142
-
143
-
144
-
145
-
146
-
147
-
148
-
149
-
150
-
151
-
152
-
153
-
154
-
155
 |
 |
