Sony HT-7200DH Operating Instructions - Page 31
When you have finished, When error codes appear, To rectify the error, Error codes and remedies
 |
View all Sony HT-7200DH manuals
Add to My Manuals
Save this manual to your list of manuals |
Page 31 highlights
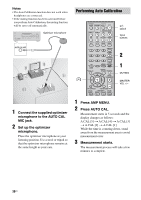
The table below shows the display when measurement starts. Measurement for Display Environment noise NOISE.CHK level Speaker connection MEASURE and SP DET. appears alternately* Speaker level MEASURE and GAIN appears alternately* Speaker distance MEASURE and DISTANCE appears alternately* * The corresponding speaker indicator lights up in the display during measurement. 4 Measurement ends. "COMPLETE" appears on the display and the settings are registered. When you have finished Disconnect the optimizer microphone from the AUTO CAL MIC jack. Notes • Auto Calibration cannot detect the sub woofer. Therefore, all sub woofer settings will be maintained. • If you have repositioned your speakers, we recommend that you perform Auto Calibration again to enjoy the surround sound. Tips • When Auto Calibration starts: - Stand some distance from the speakers and the listening position to avoid measurement failure. This is because test signals are output from the speakers during measurement. - Avoid making noise to get a more accurate measurement. • During the measurement process, the Auto Calibration function will be canceled when you do the following: - Press ?/1 or MUTING. - Press the input buttons or turn INPUT SELECTOR on the receiver. - Change the volume level. - Connect the headphones. - Press AUTO CAL again. Error and warning codes When error codes appear When an error is detected during Auto Calibration, an error code will appear on the display cyclically after each measurement process as follows: Error code t blank display t (error code t blank display)a) t PUSH t blank display t ENTER a)Appears when there are more than one error code. To rectify the error 1 Record down the error code. 2 Press . 3 Press ?/1 to turn off the receiver. 4 Rectify the error. For details, see "Error codes and remedies" below. 5 Turn on the receiver and perform Auto Calibration again (page 30). Error codes and remedies Error code ERROR 10 ERROR 11 ERROR 12 ERROR 20 ERROR 21 Cause and remedy The environment is too noisy. Make sure the environment is quiet during Auto Calibration. The speakers are placed too near the optimizer microphone. Place your speakers further away from the optimizer microphone. None of the speakers are detected. Make sure that the optimizer microphone is connected properly and perform Auto Calibration again. Front speakers are not detected or only one front speaker is detected. Check the front speakers connection. Only one surround speaker is detected. Check the surround speakers connection. continued 31US Getting Started
-
 1
1 -
2
-
3
-
4
-
5
-
6
-
7
-
8
-
9
-
10
-
11
-
12
-
13
-
14
-
15
-
16
-
17
-
18
-
19
-
20
-
21
-
22
-
23
-
24
-
25
-
 26
26 -
 27
27 -
 28
28 -
 29
29 -
 30
30 -
 31
31 -
 32
32 -
 33
33 -
 34
34 -
 35
35 -
 36
36 -
37
-
38
-
39
-
40
-
41
-
42
-
43
-
44
-
45
-
46
-
47
-
48
-
49
-
50
-
51
-
52
-
53
-
54
-
55
-
56
-
57
-
58
-
59
-
60
-
61
-
62
-
63
-
64
-
65
-
66
-
67
-
68
-
69
-
70
-
71
-
72
-
73
-
74
-
75
-
76
-
77
-
78
-
79
-
80
-
81
-
82
-
83
-
84
-
85
-
86
-
87
-
88
 |
 |