Sony LBT-GTZ4i Operating Instructions - Page 16
Setting the clock, Using the remote - size
 |
UPC - 027242752221
View all Sony LBT-GTZ4i manuals
Add to My Manuals
Save this manual to your list of manuals |
Page 16 highlights
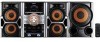
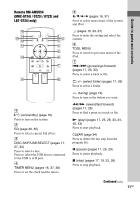
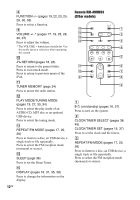
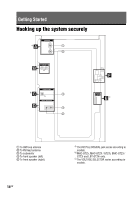
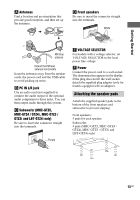
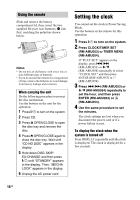
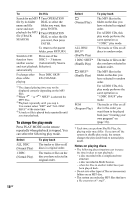
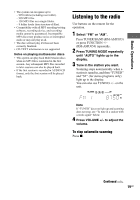
Using the remote Slide and remove the battery compartment lid, then, insert the two supplied R6 (size AA) batteries, E side first, matching the polarities shown below. Notes • Do not mix an old battery with a new one or mix different types of batteries. • If you do not use the remote for a long period of time, remove the batteries to avoid damage from battery leakage and corrosion. When carrying the unit Do the following procedure to protect the disc mechanism. Use the buttons on the unit for the operation. 1 Press "/1 to turn on the system. 2 Press CD. 3 Press Z OPEN/CLOSE to open the disc tray and remove the disc. 4 Press Z OPEN/CLOSE again to close the disc tray. Wait until "CD NO DISC" appears in the display. 5 Hold down DISC SKIP/ EX-CHANGE and then press "/1 until "STANDBY" appears in the display. Then, "MECHA LOCK" appears in the display. 6 Unplug the AC power cord. Setting the clock You cannot set the clock in Power Saving Mode. Use the buttons on the remote for this operation. 1 Press "/1 to turn on the system. 2 Press CLOCK/TIMER SET (RM-AMU053) or TIMER MENU (RM-AMU054). If "PLAY SET" appears on the display, press ./> (RM-AMU053) or V/v (RM-AMU054) repeatedly to select "CLOCK SET" and then press ENTER (RM-AMU053) or (RM-AMU054). 3 Press ./> (RM-AMU053) or V/v (RM-AMU054) repeatedly to set the hour, and then press ENTER (RM-AMU053) or (RM-AMU054). 4 Use the same procedure to set the minutes. The clock settings are lost when you disconnect the power cord or if a power failure occurs. To display the clock when the system is turned off Press DISPLAY repeatedly until the clock is displayed. The clock is displayed for a few seconds. 16GB
-
 1
1 -
2
-
3
-
4
-
5
-
6
-
7
-
8
-
9
-
10
-
 11
11 -
 12
12 -
 13
13 -
 14
14 -
 15
15 -
 16
16 -
 17
17 -
 18
18 -
 19
19 -
 20
20 -
 21
21 -
22
-
23
-
24
-
25
-
26
-
27
-
28
-
29
-
30
-
31
-
32
-
33
-
34
-
35
-
36
-
37
-
38
-
39
-
40
-
41
-
42
-
43
-
44
-
45
-
46
-
47
-
48
-
49
-
50
-
51
-
52
-
53
-
54
-
55
-
56
 |
 |
