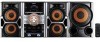
Sony LBT-GTZ4i Operating Instructions - Page 21
REC1 Transferring, Analog Transferring
 |
UPC - 027242752221
View all Sony LBT-GTZ4i manuals
Add to My Manuals
Save this manual to your list of manuals |
Page 21 highlights
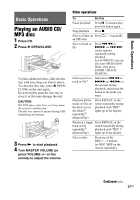
When the USB cable connection is necessary, connect the USB cable supplied with the USB device to be connected. Refer to the operating instructions supplied with the USB device to be connected for details on the operation method. 2 Press CD, then load the disc you want to transfer. 3 Press PLAY MODE on the remote repeatedly in stop mode to select the play mode. The play mode automatically changes to normal play mode, if you start transferring in shuffle play mode, repeat play mode or in program play mode (when no tracks or MP3 files are programmed). For details about the play mode, see "To change the play mode" (page 18). 4 Press REC TO USB . "SYNC" lights up and "REC" flashes in the display. "PUSH ENTER" appears in the display. 5 Press ENTER. Transferring starts when "DON'T REMOVE" appears in the display. When the transferring is completed, the disc and the USB device stop automatically. Transferring a single track or MP3 file during playback (REC1 Transferring) You can easily transfer the track or MP3 file that is currently being played back onto an USB device. 1 Connect a transferable USB device to the B port on the unit (page 20). 2 Press CD, then load the disc you want to transfer. 3 Select the track or MP3 file you want to transfer, then start play. 4 Press REC TO USB while the selected track or MP3 file is being played back. "REC" flashes in the display. "PUSH ENTER" appears in the display. 5 Press ENTER. Transferring starts from the beginning of the track or file when "DON'T REMOVE" appears in the display. When the transferring is completed, the disc continues to play. Transferring from a sound source other than disc and USB device (Analog Transferring) You can transfer just the portion you want from a sound source, including connected audio components. 1 Connect a transferable USB device to the B port on the unit (page 20). 2 Press the function button to select the source you want to transfer. 3 Press REC TO USB on the unit. "REC" flashes in the display. "PUSH ENTER" appears in the display. Continued l 21GB Basic Operations
-
 1
1 -
2
-
3
-
4
-
5
-
6
-
7
-
8
-
9
-
10
-
11
-
12
-
13
-
14
-
15
-
 16
16 -
 17
17 -
 18
18 -
 19
19 -
 20
20 -
 21
21 -
 22
22 -
 23
23 -
 24
24 -
 25
25 -
 26
26 -
27
-
28
-
29
-
30
-
31
-
32
-
33
-
34
-
35
-
36
-
37
-
38
-
39
-
40
-
41
-
42
-
43
-
44
-
45
-
46
-
47
-
48
-
49
-
50
-
51
-
52
-
53
-
54
-
55
-
56
 |
 |
