Sony MDCC-2000 Operating Instructions - Page 7
Connection
 |
View all Sony MDCC-2000 manuals
Add to My Manuals
Save this manual to your list of manuals |
Page 7 highlights
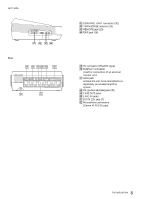
Connection Insert a lithium battery as a backup for the clock and connect the microphones and AC power adapter to the unit. Up to eight microphones can be connected. Insert the microphones firmly. to a wall outlet AC power cord (supplied) AC power adaptor (supplied) to DC IN 12 V Rear Canon XLR-3-12C type Microphones Notes on lithium battery • Keep the lithium battery out of reach of children. Should the battery be swallowed, immediately consult a doctor. • Wipe the battery with a dry cloth to assure good contact. • Be sure to install the battery in the correct polarity position. • Do not hold the battery with metallic tweezers, as doing so may cause a short-circuit. • Do not break up the battery or throw it into a fire, which might cause it to explode. Carefully dispose of the used battery. Note on the AC power adaptor Use only the AC power adaptor supplied. Do not use any other AC power adaptor. 1 Insert the supplied CR2032 lithium battery into the lithium battery compartment in the bottom. Insert the battery with correct polarity. 2 Plug in the supplied AC power adapter to the DC IN 12V jack. Put the cord of the AC power adaptor in the groove on the bottom of the unit. Porarity of the plug Note When recording the input from an external device, connect it to the LINE IN (1-4 ch) jack. 3 Connect the microphones. 4 Connect the AC power cord to the AC power adaptor firmly and plug in the AC power cord to a wall outlet. Note The battery life may shorten depending on the operation of the unit. When to replace the battery The lithium battery will last for about 1 year. If the clock loses or gains, replace the lithium battery with a new one. Setting Up 7
-
 1
1 -
 2
2 -
 3
3 -
 4
4 -
 5
5 -
 6
6 -
 7
7 -
 8
8 -
 9
9 -
 10
10 -
 11
11 -
 12
12 -
13
-
14
-
15
-
16
-
17
-
18
-
19
-
20
-
21
-
22
-
23
-
24
-
25
-
26
-
27
-
28
-
29
-
30
-
31
-
32
-
33
-
34
-
35
-
36
-
37
-
38
-
39
-
40
-
41
-
42
-
43
-
44
-
45
-
46
-
47
-
48
 |
 |
