Sony NEX-F3 Handbook - Page 90
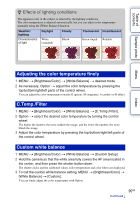
Adjusting the color temperature finely, C.Temp./Filter, Custom white balance
 |
View all Sony NEX-F3 manuals
Add to My Manuals
Save this manual to your list of manuals |
Page 90 highlights
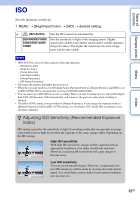
Table of contents z Effects of lighting conditions The apparent color of the subject is affected by the lighting conditions. The color temperature is adjusted automatically, but you can adjust color temperature manually using the [White Balance] function. Weather/ lighting Characteristics of light Daylight White (standard) Cloudy Bluish Fluorescent Incandescent Green-tinged Reddish Sample photo Menu Index Adjusting the color temperature finely 1 MENU t [Brightness/Color] t [White Balance] t desired mode. 2 As necessary, Option t adjust the color temperature by pressing the top/bottom/right/left parts of the control wheel. You can adjust the color temperature towards G (green), M (magenta), A (amber) or B (blue). C.Temp./Filter 1 MENU t [Brightness/Color] t [White Balance] t [C.Temp./Filter]. 2 Option t select the desired color temperature by turning the control wheel. The higher the number, the more reddish the image, and the lower the number, the more bluish the image. 3 Adjust the color temperature by pressing the top/bottom/right/left parts of the control wheel. Custom white balance 1 MENU t [Brightness/Color] t [White Balance] t [Custom Setup]. 2 Hold the camera so that the white area fully covers the AF area located in the center, and then press the shutter button down. The shutter clicks and the calibrated values (color temperature and color filter) are displayed. 3 To call the custom white balance setting, MENU t [Brightness/Color] t [White Balance] t [Custom]. You can finely adjust the color temperature with Option. 90GB Continued r
-
 1
1 -
2
-
3
-
4
-
5
-
6
-
7
-
8
-
9
-
10
-
11
-
12
-
13
-
14
-
15
-
16
-
17
-
18
-
19
-
20
-
21
-
22
-
23
-
24
-
25
-
26
-
27
-
28
-
29
-
30
-
31
-
32
-
33
-
34
-
35
-
36
-
37
-
38
-
39
-
40
-
41
-
42
-
43
-
44
-
45
-
46
-
47
-
48
-
49
-
50
-
51
-
52
-
53
-
54
-
55
-
56
-
57
-
58
-
59
-
60
-
61
-
62
-
63
-
64
-
65
-
66
-
67
-
68
-
69
-
70
-
71
-
72
-
73
-
74
-
75
-
76
-
77
-
78
-
79
-
80
-
81
-
82
-
83
-
84
-
 85
85 -
 86
86 -
 87
87 -
 88
88 -
 89
89 -
 90
90 -
 91
91 -
 92
92 -
 93
93 -
 94
94 -
 95
95 -
96
-
97
-
98
-
99
-
100
-
101
-
102
-
103
-
104
-
105
-
106
-
107
-
108
-
109
-
110
-
111
-
112
-
113
-
114
-
115
-
116
-
117
-
118
-
119
-
120
-
121
-
122
-
123
-
124
-
125
-
126
-
127
-
128
-
129
-
130
-
131
-
132
-
133
-
134
-
135
-
136
-
137
-
138
-
139
-
140
-
141
-
142
-
143
-
144
-
145
-
146
-
147
-
148
-
149
-
150
-
151
-
152
-
153
-
154
-
155
-
156
-
157
-
158
-
159
-
160
-
161
-
162
-
163
-
164
-
165
-
166
-
167
-
168
-
169
-
170
-
171
-
172
-
173
-
174
-
175
-
176
-
177
-
178
-
179
-
180
-
181
-
182
-
183
-
184
-
185
-
186
-
187
-
188
-
189
-
190
-
191
-
192
-
193
-
194
-
195
-
196
-
197
-
198
-
199
-
200
-
201
-
202
-
203
-
204
-
205
-
206
 |
 |
