Sony PCV-MXS20 Online Help Center (VAIO User Guide) - Page 109
Caution, To avoid damaging the DIMM slot
 |
View all Sony PCV-MXS20 manuals
Add to My Manuals
Save this manual to your list of manuals |
Page 109 highlights
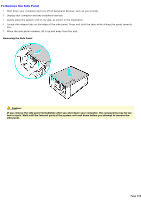
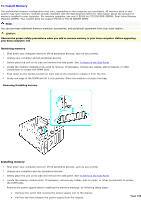
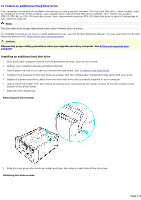
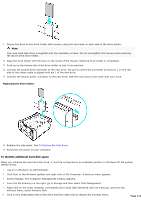
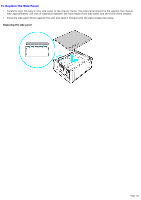
Slide the power supply unit up until it clears the chassis. Rotate the power supply to an upside down position and rest it on top of the chassis. 5. Handle the DIMM only by the edges, and remove it from its anti-static package. 6. Locate the notches on the bottom edge of the DIMM. 7. Align the module over the open memory slot. 8. Firmly insert the bottom edge of the DIMM into the slot. 9. Press down evenly against the upper corners of the DIMM. The end latches snap into position to hold the module in place. 10. Reinstall any components or add-on cards you removed. Caution: To avoid damaging the DIMM slot, move the end latches slightly outward to relieve pressure. The module clicks into place. 11. Reinstall the power supply by following these steps: Rotate the power supply to its original position and slide it into the chassis until the tab snaps into position. Replace the screw that secures the power supply to the chassis. 12. Replace the side panel. See To Replace the Side Panel. Page 109
-
 1
1 -
2
-
3
-
4
-
5
-
6
-
7
-
8
-
9
-
10
-
11
-
12
-
13
-
14
-
15
-
16
-
17
-
18
-
19
-
20
-
21
-
22
-
23
-
24
-
25
-
26
-
27
-
28
-
29
-
30
-
31
-
32
-
33
-
34
-
35
-
36
-
37
-
38
-
39
-
40
-
41
-
42
-
43
-
44
-
45
-
46
-
47
-
48
-
49
-
50
-
51
-
52
-
53
-
54
-
55
-
56
-
57
-
58
-
59
-
60
-
61
-
62
-
63
-
64
-
65
-
66
-
67
-
68
-
69
-
70
-
71
-
72
-
73
-
74
-
75
-
76
-
77
-
78
-
79
-
80
-
81
-
82
-
83
-
84
-
85
-
86
-
87
-
88
-
89
-
90
-
91
-
92
-
93
-
94
-
95
-
96
-
97
-
98
-
99
-
100
-
101
-
102
-
103
-
 104
104 -
 105
105 -
 106
106 -
 107
107 -
 108
108 -
 109
109 -
 110
110 -
 111
111 -
 112
112 -
 113
113 -
 114
114
 |
 |