Symphonic 19TVCRMKIIIS Owner's Manual - Page 7
Digital, Display
 |
View all Symphonic 19TVCRMKIIIS manuals
Add to My Manuals
Save this manual to your list of manuals |
Page 7 highlights
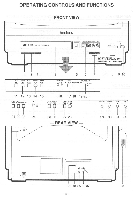
1 POWER button- To turn the unit on and off. 2 PLAY button- To begin playback of a tape. 3 STOP/EJECT button- To stop tape motion and remove the tape from VCR. 4 CASSETTE COMPARTMENT 5 REMOTE SENSOR- Receives the infrared control signals from the handheld remote control unit. 6 DIGITAL DISPLAY 7 CHANNEL UP/DOWN button- To select the chan- nel for viewing or recording. 8 VOLUME UP/DOWN button- To adjust the volume level. 9 MONITOR indicator- is the picture tube on/off indi- cator. 10 MONITOR button- To turn the picture tube on and off. 11 REW button- To rewind tape, or to view video, in reverse, during play mode at a faster than normal speed. Press play button to return VCR to normal playback speed. 12 F.FWD button- To advance tape or to view video, in forward direction, during play mode at a faster than normal speed. Press PLAY button to return VCR to normal playback speed. 13 PAUSE/STILL button- To temporarily stop tape during playback or manual recording. 14 RECORD/QTR button-To begin manual recording. • 5 TAPE SPEED switch- To set desired recording speed. (SP/LP/EP) 16 TRACKING control- Adjust to minimize video "noise" (lines or dots on screen) during playback. 17 CLOCK/COUNTER button- To alternate between clock and counter display modes. 18 RESET button- To reset counter to 0000. 19 MEMORY button-To set memory-in. 20 INPUT SELECT button- To select the signal to be recorded TUNER or EXT. 21 CLOCK SET button- To select clock setting mode. 22 PROG.CHECK button-To select program number. 23 PRESET button- Use to select channel program mode. 24 CATV selector switch- Use to select the TV or CATV (NOR/HRC) mode. 25 SET (+) /TUNING button- Adjust time, channel, pro- gram and tuning. 26 SELECT/ADD button-To select timer setting mode. Press to add programmed channel. 27 TIMER REC. button- To activate the automatic recording timer. 28 ERASE/CANCEL button- To erase memorized channel and cancel Timer Program. 29 BRIGHTNESS control- See page 15 for detail. 30 CONTRAST control- See page 15 for detail. 31 COLOR control- See page 15 for detail. 32 TINT control- See page 15 for detail. 33 ANT.IN jack- Connect 75-ohm antenna. 34 VIDEO OUT jack- Connect to the video in jack of video processor or another VCR. 35 VIDEO INPUT jack- Connect to video output jack of your video camera or another VCR. 36 AUDIO INPUT jack- Connect to audio output jack of a video camera or another VCR. 37 AUDIO OUT jack- Connect to the line in jack of your audio equipment or another VCR. 38 EARPHONE jack- To connect earphones (not sup- plied) for personal listening. - DIGITAL DISPLAY - TIMER INDICATOR CASSETTE-IN INDICATOR PROGRAM NUMBER INDICATORS TIMER INDICATOR STOP/VCR POWER ONCASSET- 2ND PROGRAM INDICATOR E-IN INDICA-DAY OF THE WEEK IN- INDICATOR TOR WEEKLY PROGRAM INDICATORPROGR DICATORS FUNCTION REC CYD W 1 2 3 4 5 6 7 SP 14 I SUN MON TUE WED THU FRI SAT INDICATORS - 4 II • SPEED PLAY 8 .88 INDICATOR -ER2nd START AM END CH QTR P CHANNEL INDICATOR TIMER RECORDING ----AM-NUMBER ItilDICA-CLOCK/TAPE COUNTER DISPLAY TORS START AND END INDICATORFU COUNTER MEMORY INDICATOR NCTION QTR INDICATOR - 7 -
-
 1
1 -
 2
2 -
 3
3 -
 4
4 -
 5
5 -
 6
6 -
 7
7 -
 8
8 -
 9
9 -
 10
10 -
 11
11 -
 12
12 -
13
-
14
-
15
-
16
-
17
-
18
-
19
-
20
-
21
-
22
-
23
-
24
-
25
-
26
-
27
-
28
-
29
-
30
-
31
 |
 |
