TEAC TN-280BT Owners Manual English Francais Espanol Deutsch Italiano Nederlan - Page 6
Preparing the record player, Balancing the tonearm and adjusting the, tracking force - a3
 |
View all TEAC TN-280BT manuals
Add to My Manuals
Save this manual to your list of manuals |
Page 6 highlights
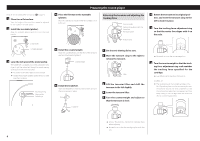
Keep the unit in standby while setting it up ( D on page 5). 1 Place it on a flat surface. Since the heights of this unit's feet cannot be adjusted, be sure to place it on a flat surface. 2 Install the turntable (platter). Align the turntable (platter) with the center shaft and install it. Center shaft Turntable (platter) 3 Loop the belt around the motor pulley. The rubber belt is wrapped around the sub-platter. Use a finger to pull the rubber belt through the round opening and loop it around the motor pulley. oo Be careful not to let the rubber become twisted. oo Rotate the turntable (platter) several times to make sure that it is secure. Round opening Motor pulley Rubber belt 6 Preparing the record player 4 Place the felt mat on the turntable (platter). Place the mat that is included with the turntable on it before use. AN 0 3 NG Balancing the tonearm and adjusting the tracking force Counterweight Tracking force adjustment ring Center line TI-SKATI Anti-skating dial Tonearm lifter 5 Install the counterweight. Place the counterweight over the end of the tonearm and turn it clockwise to tighten it. Counterweight 1 Set the anti-skating dial to zero. 2 Move the tonearm clasp to the right to release the tonearm. TI-SKATI AN 0 3 NG Clasp 6 Install the headshell. Insert the headshell on the end of the tonearm and turn the nut to secure it in place. Nut Headshell 3 Lift the tonearm lifter and shift the tonearm to the left slightly. 4 Lower the tonearm lifter. 5 Turn the counterweight and adjust so that the tonearm is level. AN 0 3 TI-SKATI oo Remove the protective cap from the cartridge stylus before adjusting. oo Be careful not to let the cartridge stylus touch the unit. 1.5 NG NG AN 0 3 0.5 6 Return the tonearm to its original posi- tion, and move the tonearm clasp to the left to lock it in place. 7 Turn the tracking force adjustment ring so that the center line aligns with 0 on the scale. AN 0 3 NG TI-SKATI oo Be careful not to let the counterweight turn. 8 Turn the counterweight so that the track- ing force adjustment ring scale matches the tracking force specified for the cartridge. oo Turn it from 0 in the direction of 0.5 and 1.0. TN-280BT-A3: oo The tracking force of the included cartridge is 3.5 g. For 3.5g tracking force, turn the counterweight counterclockwise around one time completely so that the tracking force adjustment ring passes 0 and then keep turning it until 1.0 aligns with the center line. (Do not turn the ring by itself.) T I-S K ATI 1 0 2
-
 1
1 -
 2
2 -
 3
3 -
 4
4 -
 5
5 -
 6
6 -
 7
7 -
 8
8 -
 9
9 -
 10
10 -
 11
11 -
 12
12 -
13
-
14
-
15
-
16
-
17
-
18
-
19
-
20
-
21
-
22
-
23
-
24
-
25
-
26
-
27
-
28
-
29
-
30
-
31
-
32
-
33
-
34
-
35
-
36
-
37
-
38
-
39
-
40
-
41
-
42
-
43
-
44
-
45
-
46
-
47
-
48
-
49
-
50
-
51
-
52
-
53
-
54
-
55
-
56
-
57
-
58
-
59
-
60
-
61
-
62
-
63
-
64
-
65
-
66
-
67
-
68
-
69
-
70
-
71
-
72
-
73
-
74
-
75
-
76
-
77
-
78
-
79
-
80
-
81
-
82
-
83
-
84
 |
 |
