TRENDnet TEW-653AP User's Guide - Page 30
Client List, WMM, This screen allows users to view a list of connected clients. - - wireless router
 |
UPC - 710931600704
View all TRENDnet TEW-653AP manuals
Add to My Manuals
Save this manual to your list of manuals |
Page 30 highlights
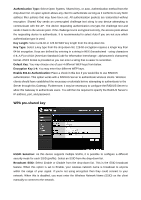
wireless client and switch it to WPS mode, then fill-in the PIN code of the wireless client through the web configuration interface of the wireless router. . WPS: Place a check in this box to enable this feature. WPS Current Status: Displays the current status of the WPS configuration. Self Pin Code: Displays the current PIN. SSID: Displays the current SSID. Authentication Mode: Displays the current authentication mode. Passphrase Key: Displays the current passphrase. Interface: Displays the current interface. WPS Via Push Button: Click on the Start to Process button if you would like to enable WPS through the Push Button instead of the PIN. After pressing this button you will be required to press the WPS on the client device within two minutes. Click on the OK button in the dialog box. WPS via PIN: Specify a PIN, which unique number that can be used to add the router to an existing network or to create a new network. Then click on the Start to Process button. Click on the Apply button to save the changes. Client List This screen allows users to view a list of connected clients. WMM This screen allows users to configure the WMM (Wi-Fi Multi-Media) settings in Repeater
-
 1
1 -
2
-
3
-
4
-
5
-
6
-
7
-
8
-
9
-
10
-
11
-
12
-
13
-
14
-
15
-
16
-
17
-
18
-
19
-
20
-
21
-
22
-
23
-
24
-
 25
25 -
 26
26 -
 27
27 -
 28
28 -
 29
29 -
 30
30 -
 31
31 -
 32
32 -
 33
33 -
 34
34 -
 35
35 -
36
-
37
-
38
-
39
-
40
 |
 |
