TRENDnet TEW-653AP User's Guide - Page 7
Mounting Installation, Power Port, RJ-45/PoE Port
 |
UPC - 710931600704
View all TRENDnet TEW-653AP manuals
Add to My Manuals
Save this manual to your list of manuals |
Page 7 highlights
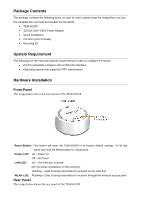
Power Port: Connect the supplied power adapter here, power port is not required when using PoE port. RJ-45/PoE Port: Plug standard LAN cables (RJ45 connectors) to connect into a network or to a PoE powering device. 1 Place the unit in an appropriate place after conducting a site survey. 2 Plug one end of the Ethernet cable into the RJ-45 port on the rear panel of the device and another end into your PC/Notebook. 3 Insert the DC-inlet of the power adapter into the port labeled "DC-IN" and the other end into the power socket on the wall. Mounting Installation 1 Use the mounting plate as a template and mark the wall or ceiling for the correct screw position 2 Drill holes for the screws at the marked positions. 3 Align the TEW-653AP with the mounting plate 4 Follow the arrow to secure the TEW-653AP to the mounting plate
-
 1
1 -
 2
2 -
 3
3 -
 4
4 -
 5
5 -
 6
6 -
 7
7 -
 8
8 -
 9
9 -
 10
10 -
 11
11 -
 12
12 -
13
-
14
-
15
-
16
-
17
-
18
-
19
-
20
-
21
-
22
-
23
-
24
-
25
-
26
-
27
-
28
-
29
-
30
-
31
-
32
-
33
-
34
-
35
-
36
-
37
-
38
-
39
-
40
 |
 |
