Thermador UCVM30FS Installation Instructions - Page 16
Step 8: Verify Installation, Operation, and Cooktop Alignment - review
 |
View all Thermador UCVM30FS manuals
Add to My Manuals
Save this manual to your list of manuals |
Page 16 highlights
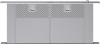
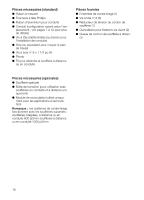
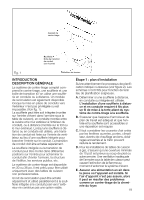
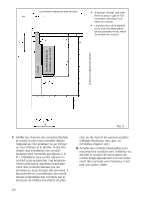
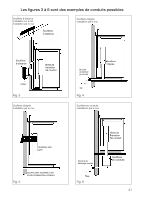
Step 8: Verify Installation, Operation and Cooktop Alignment Y Before performing this procedure, verify that all packing materials were removed from inside the snorkel and that the grease filters and front panel have been properly installed. Refer to the Care and Use Manual for instructions regarding filter and front panel installation. Y Plug the vent power cord into a proper electrical receptacle and ensure that the circuit is energized. Y A. Raise the snorkel to its fully extended position by pressing the UP/DOWN push-button once. Do not hold the pushbutton. The elevating motor will stop when the snorkel reaches its full height. (Note: the blower will not operate unless the snorkel is fully raised). Y B. Remove protective tape from top cap. Y C. Turn the blower ON by selecting in turn each of the 3 speeds. Let the blower run several minutes at each speed to evaluate its operation. Y D. With the blower running, lower the snorkel to its fully retracted position by pressing the UP/DOWN push-button once. The blower will immediately turn off. Step 8: Verify Installation, Operation and Cooktop Alignment Y E. With the blower on HIGH, close the windows and doors to the area to ensure that fan does not cause back drafting in any outlet vent for another appliance. Y F. Raise and lower the vent again, and check to make sure that the top cap on the snorkel does not catch on the back edge of the cooktop when it is lowered. If interference occurs, adjust the position of the cooktop by moving it against the front edge of the countertop. Failure to eliminate interference may result in permanent damage to the vent. Also, ensure that the vent support legs have been properly secured to the cabinet base using the screws provided. ṇ If the vent system does not operate satisfactorily during any of the above procedures, review all steps in these Installation Instructions to ensure that nothing has been omitted or overlooked. Also, refer to the Care & Use Manual for additional information or call Thermador Customer Support 1800-735-4328. Note: Check boxes as tasks are completed. 16
-
 1
1 -
2
-
3
-
4
-
5
-
6
-
7
-
8
-
9
-
10
-
 11
11 -
 12
12 -
 13
13 -
 14
14 -
 15
15 -
 16
16 -
 17
17 -
 18
18 -
 19
19 -
 20
20 -
 21
21 -
22
-
23
-
24
-
25
-
26
-
27
-
28
-
29
-
30
-
31
-
32
-
33
-
34
-
35
-
36
-
37
-
38
-
39
-
40
-
41
-
42
-
43
-
44
-
45
-
46
-
47
-
48
 |
 |
