Viking DTWN3648SS Installation Instructions - Page 25
Number of spacers, and baffles may vary by model.
 |
View all Viking DTWN3648SS manuals
Add to My Manuals
Save this manual to your list of manuals |
Page 25 highlights
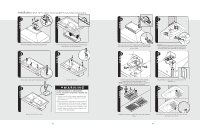
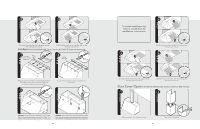
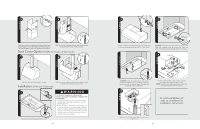
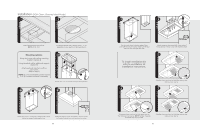
6 1 7 1 3 2 Slide filter front over front lip. Push filter rear up, then slide back over rear lip. 8 1 2 3 Slide spacer front over front lip. Push spacer rear up, then slide back over rear lip. NOTE: Number of spacers and baffles may vary by model. 2 3 Slide filter front over front lip. Push filter rear up, then slide back over rear lip. Duct Cover Option (DTWS Slim Traditional Wall Hoods) 1 2 Measure distance from ceiling to canopy. 48 Tape to avoid scratching. 3 4 2 Place duct cover top inside duct cover base and lower until desired height is found. Mark height. Use the retaining nuts and bolts to fasten in place from inside and remove tape. Slide duct cover in place and fasten from inside canopy using the sheet metal screws provided. 49
-
 1
1 -
2
-
3
-
4
-
5
-
6
-
7
-
8
-
9
-
10
-
11
-
12
-
13
-
14
-
15
-
16
-
17
-
18
-
19
-
 20
20 -
 21
21 -
 22
22 -
 23
23 -
 24
24 -
 25
25 -
 26
26 -
 27
27 -
 28
28
 |
 |

49
48
3
4
2
Place duct cover top inside duct cover base and lower until
desired height is found. Mark height. Use the retaining nuts
and bolts to fasten in place from inside and remove tape.
Slide duct cover in place and fasten from inside canopy
using the sheet metal screws provided.
2
1
3
7
1
2
1
2
3
8
Slide filter front over front lip. Push filter rear up, then
slide back over rear lip.
Slide spacer front over front lip. Push spacer rear up,
then slide back over rear lip.
NOTE:
Number of spacers
and baffles may vary by model.
Duct Cover Option
(DTWS Slim Traditional Wall Hoods)
Tape to avoid scratching.
Measure distance from ceiling to canopy.
1
2
3
6
Slide filter front over front lip. Push filter rear up, then
slide back over rear lip.