Viking DTWN3648SS Installation Instructions - Page 5
Dimensions & Specifications, Installing Hood Canopy
 |
View all Viking DTWN3648SS manuals
Add to My Manuals
Save this manual to your list of manuals |
Page 5 highlights
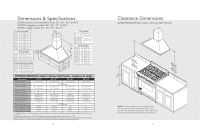
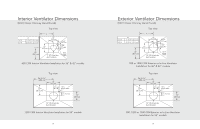
Dimensions & Specifications (DPPV Custom Power Packs w/Standard Ventilator System) A* *For best results, center the unit over B* the burners of the cooking product (front to back; right to left). Make sure the back wall of the custom hood canopy is flush with the cutout so the ventilator system may be mounted as shown on page 9. Bottom Cutout Dimensions Description 30" W. 36" W. Power Packs A (Hood Width) 28-11/16" (72.9 cm) 34-11/16" (88.1 cm) B (Hood Depth) 16-1/2" (41.9 cm) 16-1/2" (41.9 cm) DPPV Custom Power Packs w/Standard Ventilator System Description Number of lights Number of filters 30" 36" 2 2 Interior ventilator kit Interior duct size Interior-Maximum amps 460 CFM 7" (17.8 cm) 5.6 460 CFM blower is shipped with hood. NOTE: All products must be hard wired with 2-wire with ground. 8 Installing Hood Canopy (Custom Hood Canopy Cutouts) Custom Hood Canopy A B 1) Position ventilator system inside of the custom hood canopy and center it front to back and left to right. 2) Bottom mounting holes fasten ventilator system to bottom of custom hood canopy with the screws provided. Built-In Ventilator System 3) OPTIONAL Rear mounting holes fasten ventilator system to rear of custom hood canopy. 9
-
 1
1 -
 2
2 -
 3
3 -
 4
4 -
 5
5 -
 6
6 -
 7
7 -
 8
8 -
 9
9 -
 10
10 -
 11
11 -
12
-
13
-
14
-
15
-
16
-
17
-
18
-
19
-
20
-
21
-
22
-
23
-
24
-
25
-
26
-
27
-
28
 |
 |
