Viking DTWN3648SS Installation Instructions - Page 26
DCIH Classic Chimney Island Hoods
 |
View all Viking DTWN3648SS manuals
Add to My Manuals
Save this manual to your list of manuals |
Page 26 highlights
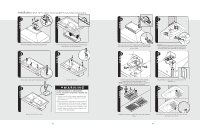
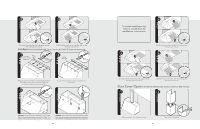
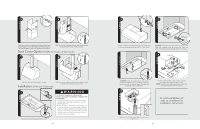
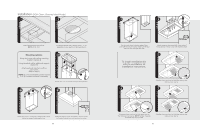
Installation (DCIH Classic Chimney Island Hoods) 1 2 Check framing where cutout will be. NOTE: 200 lb. limit. Cut appropriate size hole in ceiling. Either 7" or 10" depending on your specific unit and ventilator kit. Mounting options: Using duct cover with ceiling mounting bracket. (Option A) Using threaded rod for additional support. (Option B) Attaching hood directly to soffit or duct cover. (Skip to step 3) NOTE: It is recommended to follow option A or B, however both aren't necessary. A1 Attach duct cover to optional ceiling mounting bracket. A2 B1 5/16" nut driver Attach duct cover to ceiling. The ceiling bracket can be hidden by using a locally supplied trim. Additional support option. Drill holes in all four corners for threaded rod and run rods from hood to ceiling. 50 3 4 5/16" nut driver Run duct work down to bottom edge of duct cover/soffit and secure in place. Make sure the duct does not stick down past the cover. To install ventillation kit refer to ventillation kit installation instructions. Attach canopy to duct cover/soffit. From inside of hood, seal top of hood to duct with aluminum tape. 5 1 6 1 2 3 Slide filter front over front lip. Push filter rear up, then slide back over rear lip. 7 1 3 2 Slide spacer front over front lip. Push spacer rear up, then slide back over rear lip. NOTE: Number of spacers and baffles may vary by model. 3 2 Slide filter front over front lip. Push filter rear up, then slide back over rear lip. 51
-
 1
1 -
2
-
3
-
4
-
5
-
6
-
7
-
8
-
9
-
10
-
11
-
12
-
13
-
14
-
15
-
16
-
17
-
18
-
19
-
20
-
 21
21 -
 22
22 -
 23
23 -
 24
24 -
 25
25 -
 26
26 -
 27
27 -
 28
28
 |
 |
