Vivitar T026 ViviCam T026 Camera Manual
Vivitar T026 Manual
 |
View all Vivitar T026 manuals
Add to My Manuals
Save this manual to your list of manuals |
Vivitar T026 manual content summary:
- Vivitar T026 | ViviCam T026 Camera Manual - Page 1
ViviCam T026 Digital Camera User Manual © 2010 Sakar International, Inc. All rights reserved. Windows and the Windows logo are registered trademarks of Microsoft Corporation. All other trademarks are the property of their respective companies. - Vivitar T026 | ViviCam T026 Camera Manual - Page 2
from Your Camera to Your Computer 59 Get started! ...60 Transfer media from my camera to my computer manually (Using Windows 61 Transfer media from my camera to my computer manually (Using Macintosh 62 Camera Maintenance ...62 Sakar Warranty Card...63 Technical Support...64 Troubleshooting...65 1 - Vivitar T026 | ViviCam T026 Camera Manual - Page 3
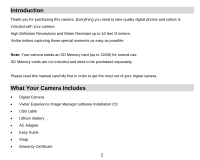
SD Memory cards are not included and need to be purchased separately. Please read this manual carefully first in order to get the most out of your digital camera. What Your Camera Includes Digital Camera Vivitar Experience Image Manager software Installation CD USB cable Lithium Battery AC - Vivitar T026 | ViviCam T026 Camera Manual - Page 4
AVI Internal Memory 32MB External Memory SD Card (up to 32GB) LCD Display 2.4 Inch TFT LCD Lens Zoom f=6.5mm F3.1 4X Digital Zoom Snapshots Yes Interface USB 2.0 System Requirements Windows XP and above / Mac OSX 10.5 and above Battery Lithium (3.7V) Working Temperature 0~40 ℃ 3 - Vivitar T026 | ViviCam T026 Camera Manual - Page 5
To be able to download photos and videos to your PC, you will need the following minimum configuration: Pentium 4 processor or above with Windows XP service pack 2, Windows Vista or Windows 7 512 MB RAM, with 100MB of free disk space 1024 x 768 Recommended screen resolution 16-bit color or - Vivitar T026 | ViviCam T026 Camera Manual - Page 6
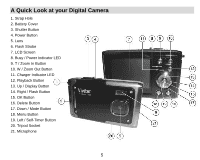
A Quick Look at your Digital Camera 1. Strap Hole 2. Battery Cover 3. Shutter Button 4. Power Button 5. Lens 6. Flash Strobe 7. LCD Screen 8. Busy / Power Indicator LED 9. T / Zoom In Button 10. W / Zoom Out Button 11. Charger Indicator LED 12. Playback Button 13. Up / Display Button 14. Right / - Vivitar T026 | ViviCam T026 Camera Manual - Page 7
the battery compartment. 1) Make sure the camera is powered off. 2) Plug in the AC Adapter included in the package and connect the other end to the USB slot of the camera. 3) Alternatively, connect the USB cable to the USB slot on the camera and to the USB port of your computer. 4) The Charge LED - Vivitar T026 | ViviCam T026 Camera Manual - Page 8
ON for the first time the camera will take you through the initial camera setup. Powering the Camera ON 1) Make sure the battery is fully charged before the first use. 2) Make sure an SD card has been inserted into your camera. 3) Make sure the battery cover is tightly closed and locked into place - Vivitar T026 | ViviCam T026 Camera Manual - Page 9
to its default settings. These settings can be adjusted at any time manually through the menus in the camera. Setting the Date and Time The next step in the initial camera setup is to set the date and time on the camera. Set the Date and Time as Desired and press the OK button - Vivitar T026 | ViviCam T026 Camera Manual - Page 10
Using Your Digital Camera Make sure the batteriy is fully charged before the first use. Powering the camera ON Press the Power button to turn your camera ON. The camera will be in Photo Capture mode to start. Powering the camera OFF While the camera is on, you can press the Power button again - Vivitar T026 | ViviCam T026 Camera Manual - Page 11
LCD screen are the best default settings so that you can begin to capture and enjoy clear quality photos. To change the active camera mode, make sure the camera is powered ON. Press the Down directional MODE button to select the mode. Press the Playback Button to open the Palyback mode. When - Vivitar T026 | ViviCam T026 Camera Manual - Page 12
the highlighted menu option. 4) If the selection can be remembered by the camera, a selection icon will appear to the right of the selected menu option. 5) Some menu options are single-use functions that are not remembered by the camera and do not display this icon when selected. 6) At any time you - Vivitar T026 | ViviCam T026 Camera Manual - Page 13
/out if desired. 3) Click the Shutter button on the top of the camera to take the picture. 4) The picture will automatically be saved to the memory or SD card. Photo Capture Mode Quick Function Buttons Your digital camera has a four-directional pad that functions as Quick Function buttons: Left Up - Vivitar T026 | ViviCam T026 Camera Manual - Page 14
you arrive at your desired settings. Forced Off (Default) Red Eye A Auto Flash Forced On Self-Timer Include yourself in the picture. Place the camera on a tripod or a flat and strudy surface. 1) Press the Right /Self-Timer button select the time delay. 2) Press the Shutter button and join the - Vivitar T026 | ViviCam T026 Camera Manual - Page 15
Photo Capture Mode Menus The following are the menus that appear in your camera‟s Photo Capture Mode: 14 - Vivitar T026 | ViviCam T026 Camera Manual - Page 16
Scene Menu The Scene Menu allows you to choose scene settings that allow your camera to adapt properly to your current environment. 15 - Vivitar T026 | ViviCam T026 Camera Manual - Page 17
manually change the setting or restore the camera‟s default factory settings. Image Resolution Menu The Image Resolution menu allows you to choose the desired size of the images taken by your camera. Keep in mind that images with a higher resolution will also take up more of your camera‟s memory - Vivitar T026 | ViviCam T026 Camera Manual - Page 18
you manually change the setting or restore the camera‟s default factory settings. Image Quality Menu The Image Quality menu allows you to select the desired quality level of the images taken by your camera. Keep in mind that images with a higher image quality level will also take up more memory on - Vivitar T026 | ViviCam T026 Camera Manual - Page 19
Just set the desired self-timer delay, press the shutter button on your camera and position yourself in front of the camera as desired. 1) Press the UP or DOWN direction control buttons to scroll that this setting will be remembered by your camera until you manually change the setting or restore the - Vivitar T026 | ViviCam T026 Camera Manual - Page 20
the LCD screen. 6) Remember that this setting will be remembered by your camera until you manually change the setting or restore the camera‟s default factory settings. White Balance Menu The White Balance feature allows your camera to adjust the coloring of the captured images depending on the type - Vivitar T026 | ViviCam T026 Camera Manual - Page 21
icon reflecting your selection will display on the LCD screen 7) Remember that this setting will be remembered by your camera until you manually change the setting or restore the camera‟s default factory settings. Color Effect Menu You can choose to add a color effect to the images taken with your - Vivitar T026 | ViviCam T026 Camera Manual - Page 22
to exit the menu and return to your previous mode. 6) Remember that this setting will be remembered by your camera until you manually change the setting or restore the camera‟s default factory settings. Multi-Snapshots Menu When enabled, the Multi-Snapshots feature allows you to take five rapid - Vivitar T026 | ViviCam T026 Camera Manual - Page 23
reflecting your selection will display on the LCD screen 7) Remember that this setting will be remembered by your camera until you manually change the setting or restore the camera‟s default factory settings. Light Exposure Menu The Light Exposure setting helps you control the amount of light that - Vivitar T026 | ViviCam T026 Camera Manual - Page 24
by using the negative count) to reduce the amount of light allowed into the lens by your camera. If the environment has less light (darker) than is needed, increase the exposure setting (by that this setting will be remembered by your camera until you manually change the setting or restore the - Vivitar T026 | ViviCam T026 Camera Manual - Page 25
giving greater weight to the subjectin the center Multi - Used in standard conditions the camera divides and adjusts the settings of the image into several zones for light metering such Remember that this setting will be remembered by your camera until you manually change the setting or restore the - Vivitar T026 | ViviCam T026 Camera Manual - Page 26
to your previous mode. 6) Remember that this setting will be remembered by your camera until you manually change the setting or restore the camera‟s default factory settings. Date/Time Menu When you capture an image with your camera, the image will include a time stamp with the date and time that - Vivitar T026 | ViviCam T026 Camera Manual - Page 27
to exit the menu and return to your previous mode. 5) Remember that this setting will be remembered by your camera until you manually change the setting or restore the camera‟s default factory settings. To Set the Date and Time: 1) Highlight the "Date Setup" menu option. 2) Press the OK button - Vivitar T026 | ViviCam T026 Camera Manual - Page 28
until you manually change the setting or restore the camera‟s default factory settings. Auto Power Off Menu You can use the Auto Power Off feature in order to conserve you camera‟s battery life. The designated time represents when your camera will automatically power off. When the camera sits idle - Vivitar T026 | ViviCam T026 Camera Manual - Page 29
exit the menu and return to your previous mode. 6) Remember that this setting will be remembered by your camera until you manually change the setting or restore the camera‟s default factory settings. Frequency Menu The options in the Frequency menu represent the frequency of the electrical current - Vivitar T026 | ViviCam T026 Camera Manual - Page 30
return to your previous mode. 6) Remember that this setting will be remembered by your camera until you manually change the setting or restore the camera‟s default factory settings. Format Memory Card Menu You can use the Format Memory Card menu to delete all of the content that is currently on your - Vivitar T026 | ViviCam T026 Camera Manual - Page 31
memory card has been formatted clean. Factory Settings Menu Use this menu to view the Firmware version on your camera or to reset your camera button to begin the format. 5) The camera will be reset. 6) A message will appear indicating When you first turn on the camera, the camera will be in Photo Capture mode - Vivitar T026 | ViviCam T026 Camera Manual - Page 32
the LEFT or RIGHT direction buttons to scroll through the images on your camera‟s memory card. Photos appear with a JPG icon on the top left of the Press the T / Zoom In button to zoom in on a photo on your camera. Use the direction buttons to navigate around the photo. Press the W / Zoom Out button to - Vivitar T026 | ViviCam T026 Camera Manual - Page 33
1) Press the W/Zoom Out button 2) All the images on your camera will appear in the Thumbnail View. 3) Use the direction buttons to scroll and size Photo Playback Mode Menus The following are the menus that appear in your camera‟s Photo Playback Mode. Press the MENU button for the menus to appear. 32 - Vivitar T026 | ViviCam T026 Camera Manual - Page 34
menu to rotate the pictures that you‟ve taken with your camera. 1) Press the UP or DOWN direction control buttons to and return to your previous mode. Protect/Lock Menu Pictures and Videos taken with your camera can be protected or "locked" to prevent any deletion or alteration being made to the - Vivitar T026 | ViviCam T026 Camera Manual - Page 35
Menu While in the playback mode, you can delete pictures from your camera through the delete menu. 1) Use the LEFT or RIGHT buttons to select delete all the images (including all unlocked photos and videos) on your camera‟s memory card, select "Delete All Images". 7) Press the OK button to select - Vivitar T026 | ViviCam T026 Camera Manual - Page 36
the selected photo. 5) You will be asked to connect the camera to the Pictbridge printer. 6) Connect the USB cable provided in the package form the camera to the Pictbridge port of the printer. 7) Once connected, follow the instructions on the printer to proceed with the printing process. 8) Select - Vivitar T026 | ViviCam T026 Camera Manual - Page 37
on the top of the camera to start the video capture. 4) You will see a red icon at the top of the LCD indicating that the record is in progress. 5) To stop the video record, press the Shutter button again. 6) The video will automatically be saved to the camera`s memory or SD card memory card. 36 - Vivitar T026 | ViviCam T026 Camera Manual - Page 38
Video Capture Mode Menus The following are the menus that appear in your camera‟s Video Capture Mode: 37 - Vivitar T026 | ViviCam T026 Camera Manual - Page 39
manually change the setting or restore the camera‟s default factory settings. Image Resolution Menu The Image Resolution menu allows you to choose the desired size of the images taken by your camera. Keep in mind that images with a higher resolution will also take up more of your camera‟s memory - Vivitar T026 | ViviCam T026 Camera Manual - Page 40
you manually change the setting or restore the camera‟s default factory settings. Image Quality Menu The Image Quality menu allows you to select the desired quality level of the images taken by your camera. Keep in mind that images with a higher image quality level will also take up more memory on - Vivitar T026 | ViviCam T026 Camera Manual - Page 41
reflecting your selection will display on the LCD screen. 7) Remember that this setting will be remembered by your camera until you manually change the setting or restore the camera‟s default factory settings. Anti-Shake Menu The Anti-Shake feature reduces image corruption that can be caused by - Vivitar T026 | ViviCam T026 Camera Manual - Page 42
icon reflecting your selection will display on the LCD screen 7) Remember that this setting will be remembered by your camera until you manually change the setting or restore the camera‟s default factory settings. Color Effect Menu You can choose to add a color effect to the images taken with your - Vivitar T026 | ViviCam T026 Camera Manual - Page 43
to exit the menu and return to your previous mode. 6) Remember that this setting will be remembered by your camera until you manually change the setting or restore the camera‟s default factory settings. Multi-Snapshots Menu When enabled, the Multi-Snapshots feature allows you to take five rapid - Vivitar T026 | ViviCam T026 Camera Manual - Page 44
icon reflecting your selection will display on the LCD screen 7) Remember that this setting will be remembered by your camera until you manually change the setting or restore the camera‟s default factory settings. Image Sharpness Menu You can set the level of sharpness in the images taken with your - Vivitar T026 | ViviCam T026 Camera Manual - Page 45
that this setting will be remembered by your camera until you manually change the setting or restore the camera‟s default factory settings. Light Exposure Menu The Light Exposure setting helps you control the amount of light that enters your camera‟s lens. This setting should be adjusted when the - Vivitar T026 | ViviCam T026 Camera Manual - Page 46
on the LCD screen 7) Remember that this setting will be remembered by your camera until you manually change the setting or restore the camera‟s default factory settings. Metering Menu The Metering setting will affect how your camera focuses when capturing an image. Depending on your selection, the - Vivitar T026 | ViviCam T026 Camera Manual - Page 47
on the LCD screen 6) Remember that this setting will be remembered by your camera until you manually change the setting or restore the camera‟s default factory settings. Language Menu You can select your camera‟s language setting by selecting the desired language from the Language menu. 1) Press - Vivitar T026 | ViviCam T026 Camera Manual - Page 48
also disable the timestamp for future images that will be taken with your camera. On - The timestamp will appear on photos taken Off - The date will be remembered by your camera until you manually change the setting or restore the camera‟s default factory settings. To Set the Date and Time: 47 - Vivitar T026 | ViviCam T026 Camera Manual - Page 49
to exit the menu and return to your previous screen. Audio Menu The Audio menu allows you to control the camera‟s ability to record audio in the video clips recorded with your camera in addition to the video record. 1) Press the UP or DOWN direction control buttons to scroll through the menu - Vivitar T026 | ViviCam T026 Camera Manual - Page 50
6) Remember that this setting will be remembered by your camera until you manually change the setting or restore the camera‟s default factory settings. Auto Power Off Menu You can use the Auto Power Off feature in order to conserve you camera‟s battery life. The designated time represents when your - Vivitar T026 | ViviCam T026 Camera Manual - Page 51
to your previous mode. 6) Remember that this setting will be remembered by your camera until you manually change the setting or restore the camera‟s default factory settings. Format Memory Card Menu You can use the Format Memory Card menu to delete all of the content that is currently on your - Vivitar T026 | ViviCam T026 Camera Manual - Page 52
to begin the format. 6) The memory card will be completely formatted 7) A message will appear confirming that your memory card has been formatted clean. Factory Settings Menu Use this menu to view the Firmware version on your camera or to reset your camera settings to the factory default settings - Vivitar T026 | ViviCam T026 Camera Manual - Page 53
The playback mode will allow you to review and edit photos and videos that you‟ve already taken with you camera. Playing Videos on Your Camera Once in Playback mode, press the LEFT or RIGHT direction buttons to scroll through the images on your camera‟s or memory card. Each image will display on the - Vivitar T026 | ViviCam T026 Camera Manual - Page 54
you choice. 3) Press the OK button. Video Playback Mode Menus The following are the menus that appear in your camera‟s Video Playback Mode: Protect/Lock Menu Pictures and Videos taken with your camera can be protected or "locked" to prevent any deletion or alteration being made to the files. 53 - Vivitar T026 | ViviCam T026 Camera Manual - Page 55
. 5) To delete this one video, select "Delete This Video". 6) To delete all the images (including all unlocked photos and videos) on your camera‟s memory card, select "Delete All Images". 7) Press the OK button to select the desired option. 8) You will be asked to confirm your selection. 9) The - Vivitar T026 | ViviCam T026 Camera Manual - Page 56
to record on the TV screen. 4) When the camera is set to Playback mode, you can review on the TV all the photos and videos stored in the camera or on the SD memory card. Installing the Software You must be connected to the internet to install and run the Vivitar Experience Image Manager software. 55 - Vivitar T026 | ViviCam T026 Camera Manual - Page 57
The installation screen should automatically open. 2) On PC: The Vivitar Experience Image Manager Installer window appears. If the window does On Macintosh: Click the icon that appears on the desktop to install the Vivitar Experience Image Manager. 4) If you do not have internet access at the time - Vivitar T026 | ViviCam T026 Camera Manual - Page 58
Note: If you do not have internet access, you can still download media from the camera. Click the "How to transfer photos and videos from my camera to my computer" button for instructions. 5) If you have internet access, the "Choose your language" window opens, choose your language and click "Next" - Vivitar T026 | ViviCam T026 Camera Manual - Page 59
application 14) If you close the application you can run the Vivitar Experience Image Manager from the Programs (PC) or Application (Mac) menu on your computer. Connecting the Camera to the Computer 1) Use the USB cable that came with your camera to connect your camera to your computer. 2) Power the - Vivitar T026 | ViviCam T026 Camera Manual - Page 60
will have to wait a few seconds until the computer recognizes the device. Getting Photos and Videos from Your Camera to Your Computer An SD card needs to be inserted. Do not disconnect the cable during transfer. Doing so will cancel the transfer of any files on their way to your computer. 1) Select - Vivitar T026 | ViviCam T026 Camera Manual - Page 61
, videos or both. 4) Select your camera (removable disk) from the device window. If your camera is the only USB device connected then it will be selected selected folder and albums ready for your use. Get started! Using the Vivitar Experience Image Manager, you can: Upload and manage photos and - Vivitar T026 | ViviCam T026 Camera Manual - Page 62
on how to use the Vivitar Experience Image Manager open the Help file or click the "Take the Tour" button on the application`s Home page. Transfer media from my camera to my computer manually (Using Windows) 1) Use the USB cable that came with your camera to connect your camera to your computer - Vivitar T026 | ViviCam T026 Camera Manual - Page 63
care to avoid damaging it. Do not expose your camera to heat sources. Do not open the battery compartment with wet hands. Dry the camera with a soft dry towel before opening the battery compartment before inserting an SD card. Do not charge the camera with the AC Adapter if the camera is wet. 62 - Vivitar T026 | ViviCam T026 Camera Manual - Page 64
, modification or accident. What To Do When Service Is Required: When returning your defective product (postage pre-paid) for service, your package should include: 1) Copy of original bill of sale 2) A detailed written description of the problem. 3) Your return address and telephone number (Daytime - Vivitar T026 | ViviCam T026 Camera Manual - Page 65
: Service Department 2D, Siskin Parkway East 4020 Middlemarch Business Park Coventry, CV3 4PE Sakar Australia Return faulty camera to the Refund Counter at the store where purchased Technical Support For technical support issues please visit our website at www.vivitar.com. You can find manuals - Vivitar T026 | ViviCam T026 Camera Manual - Page 66
Troubleshooting Q: I have taken photos and selected the "Get camera powers off nothing will happen to the images stored on the SD memory card. We recommend always downloading your photos to your computer as soon as possible to prevent unintentional data loss. Q: I deleted images using the Vivitar
-
 1
1 -
 2
2 -
 3
3 -
 4
4 -
 5
5 -
 6
6 -
 7
7 -
8
-
9
-
10
-
11
-
12
-
13
-
14
-
15
-
16
-
17
-
18
-
19
-
20
-
21
-
22
-
23
-
24
-
25
-
26
-
27
-
28
-
29
-
30
-
31
-
32
-
33
-
34
-
35
-
36
-
37
-
38
-
39
-
40
-
41
-
42
-
43
-
44
-
45
-
46
-
47
-
48
-
49
-
50
-
51
-
52
-
53
-
54
-
55
-
56
-
57
-
58
-
59
-
60
-
61
-
62
-
63
-
64
-
65
-
66
 |
 |
ViviCam T026 Digital Camera
User Manual
© 2010 Sakar International, Inc. All rights reserved.
Windows and the Windows logo are registered trademarks of Microsoft Corporation.
All other trademarks are the property of their respective companies.